Archive
Old guides that aren't needed anymore
- Creating a Floor Plan - update
- Hot Water Storage - updated
- Leads Dashboard
- Sound Check (UK) - updated
- Introduction to the Plan Task v1
- Walls, Windows, Doors and Radiators - old
- Heat Pump Load - old
- Editing Room Properties - old
- Vaulted Ceilings and Dormers - old
Creating a Floor Plan - update
The first step in a project is to create a floor plan. The floor plan you build in Heatpunk is used to model the existing state of the property for heat loss calculations, model any emitter upgrades, and specify the location of the heat pump and hot water storage on the plan.
This guide focuses on creating the initial plan, called the Surveyed plan. Emitter upgrades, heat pumps and hot water storage also use the floor plan but are modelled in design options, rather than the surveyed plan.
Starting a floor plan
When you create a project, you will be prompted to select a material palette. This sets the default material used in the heat loss calculation. You are then prompted to enter the default height for the rooms in the property.
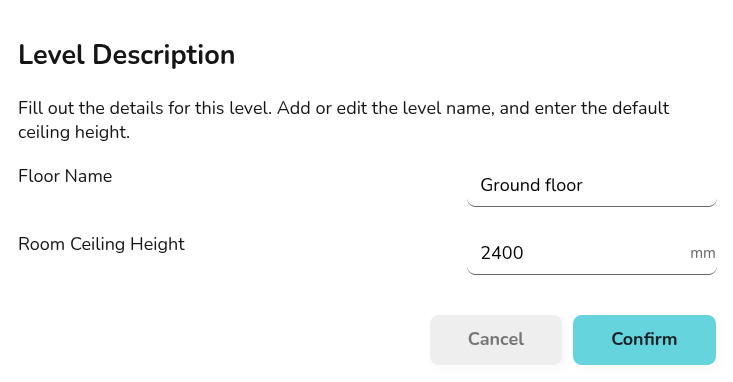
All of these details can be adjusted as you construct your floor plan.
Heatpunk Pro: Speed up creating your floor plan by uploading architectural plans to take measurements from.
Examples - need new examples
[demo video - recreate general demo and uploading floor plan videos - this is not urgent as this functionality is the same]
Join our weekly training session for a live example.
Creating rooms
Drag and drop a room from the left-hand menu into position and size to the correct shape. If not using an uploaded floor plan, click the corners of the room to view the dimensions. If using an uploaded floor plan, you can rely on aligning the rooms with the plan below.
Adjusting room properties
Click each room to view the following options:
 |
Change height Adjust the height of the room. Input the height and click the tick to save or the cross to cancel. |
 |
Flue Select whether there is a flue. Choose from: no flue, throat restrictor fitted to flue, no throat restrictor fitted to flue. |
 |
Edit name Change the name of the room. |
 |
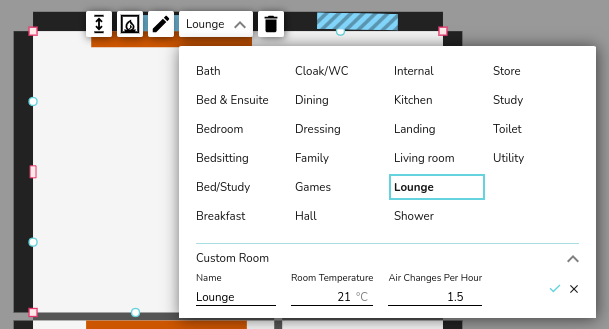
Select room type Each room needs a type as this determines the ACH, temperature and default name for the room. Select from pre-set options or create a custom room. |
 |
Delete Remove the room from the floor plan |
Note if ceiling regions are added later, they will override height for the room.
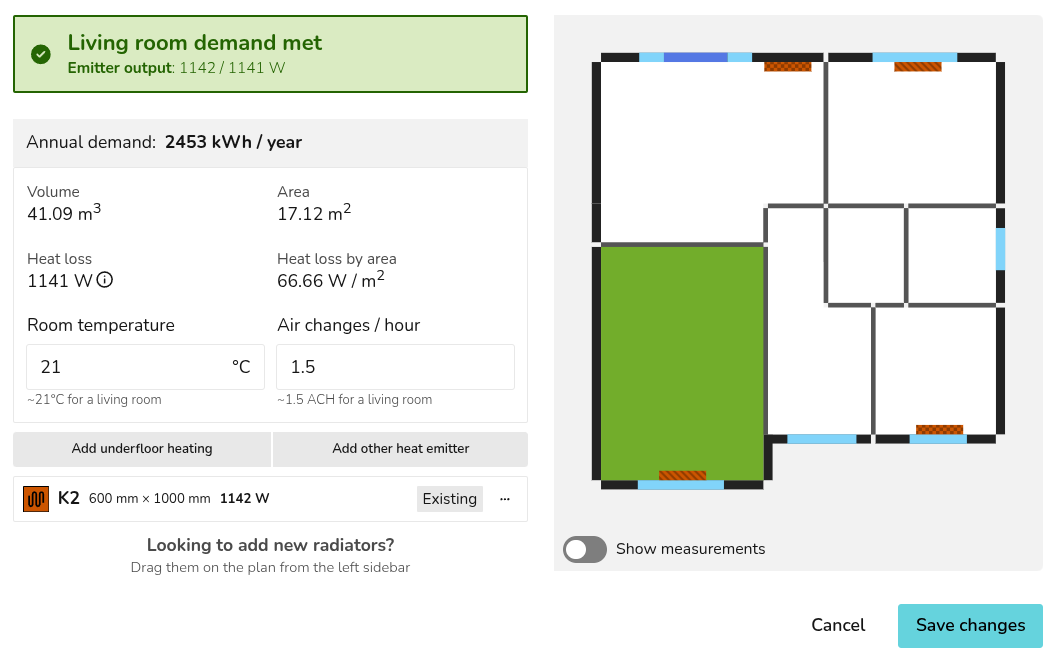
On the right-hand side bar, under emitters you can also see each room listed. Click 🡥 See room details. Here you can view the emitter, annual demand, volume, area, heat loss, heat loss by area for the room. You can also adjust the room temperature and ACH, as well as add underfloor heating or other emitters.
Adjusting wall properties
Click the walls to view the following options:
 |
Change material Click to view and select from the material options for this palette. Click Add Materials to adjust the palette. |
 |
External temperature Set the temperature of the region on the other side of this wall. This will default to the ODT and can be adjusted for walls adjoining unheated spaces or neighbouring properties. |
External and internal walls
Each wall is either an external or internal wall. This is detected automatically based on whether there is an adjoining room.
As you drag rooms into your plan, it's important that they lock together with existing walls correctly so external/internal walls are correctly identified. Only external walls will have the external temperature setting, external walls are also a darker grey colour.
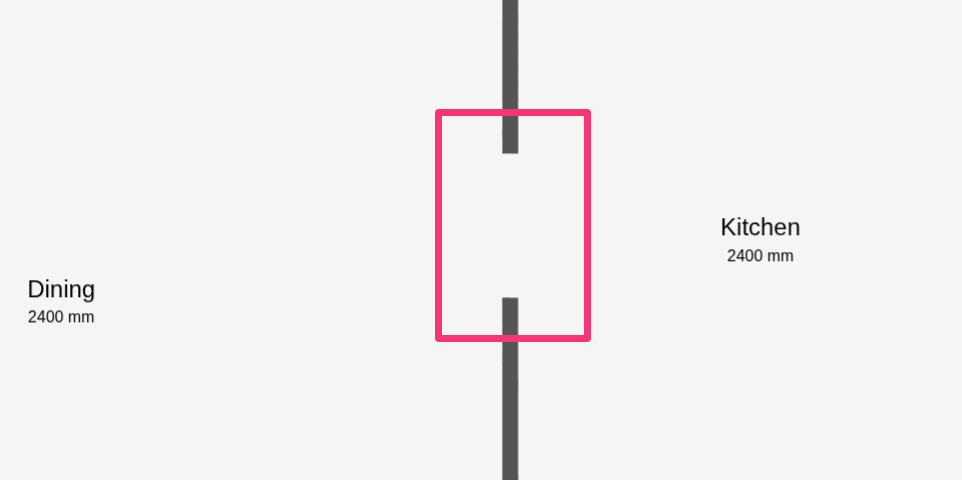
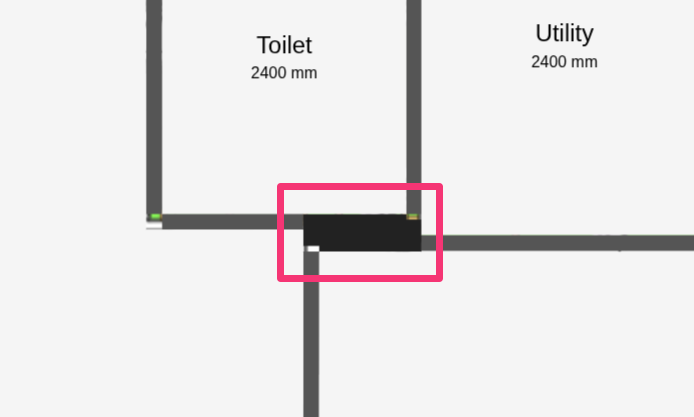
Walls should not overlap and there typically should not be external walls within the interior of a property. Below are some common errors that will lead to errors in the heat loss calculation.
|
Don't overlap walls |
 |
|
Don't leave large gaps between internal walls |
 |
Adding floors
You can add different floors by clicking the transparent box next to Add Level. Move between floors using the expanded view in the bottom-right.
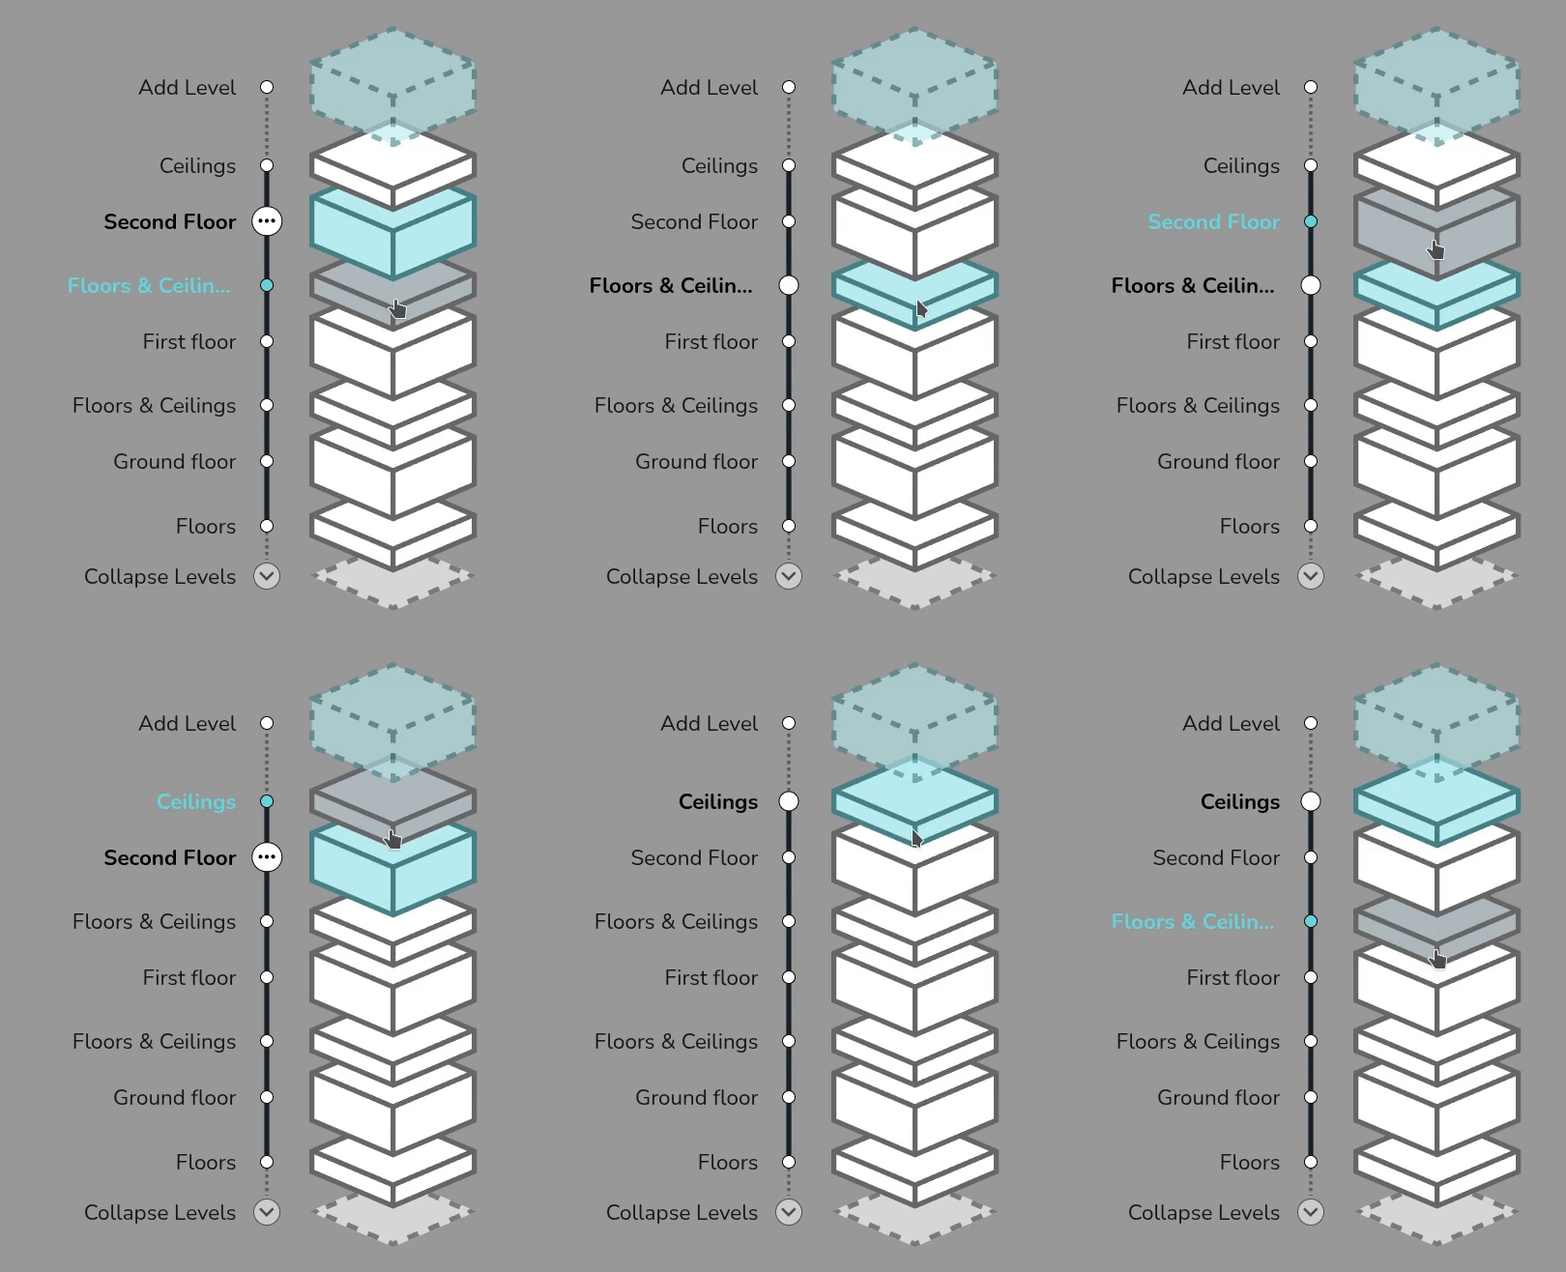
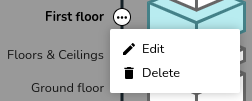
You can change the ceiling height on the whole floor by clicking on the three dots to the right of the relevant floor and selecting Edit. You can also change the name of the floor here. To delete an entire floor, select Delete.
Where the floor and ceiling materials are the default on the selected palette, there is no need to add a region. If the floor and ceiling region has a different material or height to the rest of the space, you can use regions to model this.
Read more on configuring floor and ceiling regions, including adding vaulted ceilings and dormers.
A light grey footprint of the floor below will be displayed, ensure the above rooms are correctly aligned with the floor below. Misalignment will lead to errors in the heat loss.

Adding room components
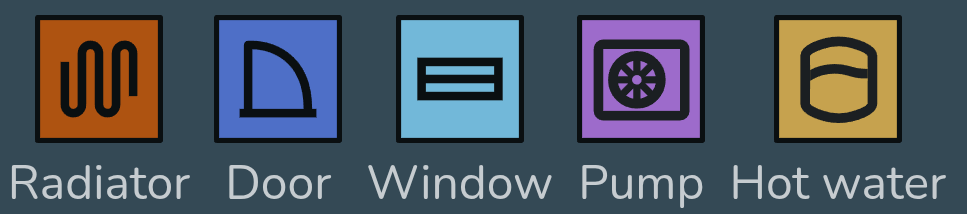
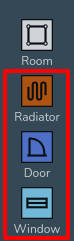
On the left-hand sidebar you will have the above options. Drag and drop an icon to place the component on your floor plan.
Adding emitters, doors and windows
Drag and drop a radiator, door or window from the left-hand menu into the room and snap it into position on a wall. Click the component to view and adjust the following options:
 |
Change material or type Click to view and select from the material options for the selected palette. Click Add Materials to edit the palette. |
 |
Adjust dimensions Input the width and height, then tick to save or cross to cancel. This option will not be available for custom radiators which require a different P50 for each radiator size. |
|
Delete Remove the component from the floor plan |
Internal doors do not need to be included in the floor plan. Rooms with open doorways should typically be modelled as one room.
To add other emitters or underfloor heating, on the room where you want underfloor heating click 🡥 See room details. Then click Add underfloor heating and specify the output per m². You can also see further details on the heat loss calculations in that menu.
For information on emitter upgrades, see Emitters and Design options.
Adding heat pump and hot water
Heat pumps and hot water storage cannot be added to the surveyed plan. Create a design option to add these to the plan.
Drag and drop a heat pump or hot water storage option onto the plan. Once you place the heat pump or hot water storage, a menu will appear to select a specific model.
Read more about this in Heat Sources and Hot Water Storage.
Hot Water Storage - updated
Heatpunk helps you specify a hot water storage solution that's compatible with selected heat pump and sized based on property details. Once selected, you can view specs, domestic hot water (DHW) calculations and Legionella calculations.
You can fine tune these calculations for the specific requirements of the installation and share these details with customer in the technical report and customer proposal.
Adding hot water storage
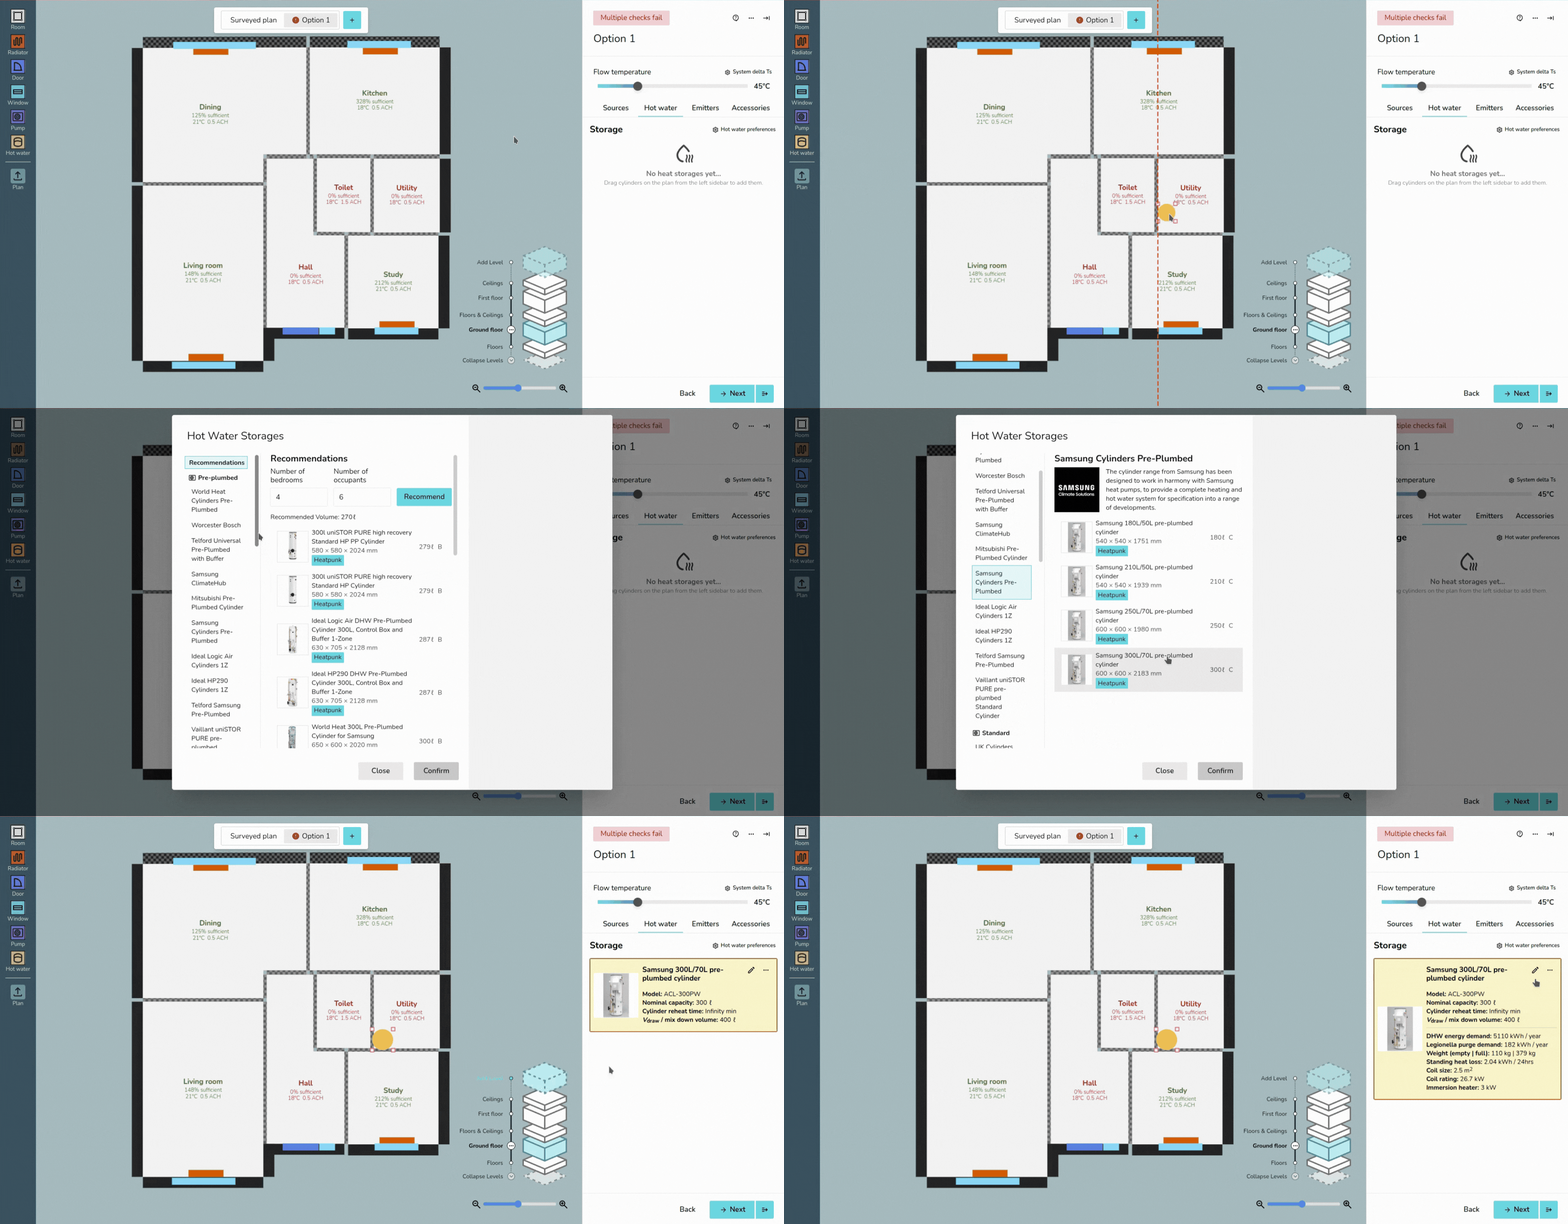
Hot water storage is selected in the Plan task.
While on a design option, drag and drop hot water storage from the left-hand sidebar to place the hot water storage in the plan. After placing it, you can select a hot water storage option from the recommendations or scroll through the sections on the left sorted by brand and type (pre-plumbed, standard, pre-plumbed slimline, slimline and horizontal).
How are the recommended options chosen?
Recommendations are based on compatibility with the heat pump and are sized according to the number of bedrooms and occupants. Adjust the number of bedrooms/occupants and click Recommend to get updated recommendations.
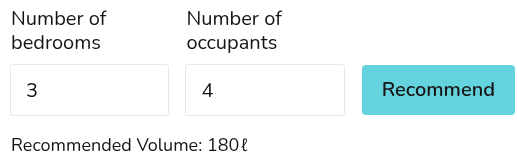
This is calculated using the MCS method for DHW demand:
Recommended volume = 45 * N
where N is the greater of:
- The number of rooms + 1
- The number of known occupants
When you have an option selected, on the right you will see specs, and Midsummer stock levels and pricing. If your account is connected to Midsummer, you will also see your specific pricing.
Hot water
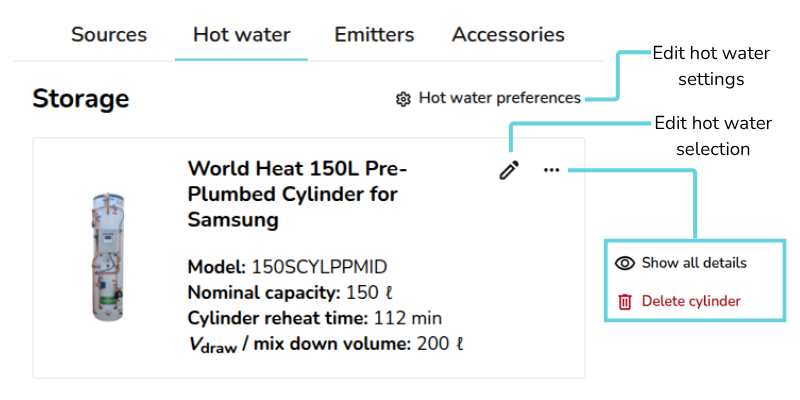
On the Hot water tab on the right-hand sidebar, you will see the following:
 |
Hot water preferences Edit DHW and Legionella calculations. Read more about this below. |
 |
Pencil Edit hot water selection for this design option |
|
|
Show/hide all details Show/hide DHW energy and Legionella purge demand, weight, standing heat loss, coil size and immersion heater power. Read more about these details below. |
 |
Delete cylinder Remove hot water storage from this design option |

Hot water storage details and DHW calculations
You can view details for the chosen hot water storage in the Hot water tab:
- Model
- Nominal capacity (ℓ)
- Cylinder re-heat time (min)
- Vdraw/Mix down volume (ℓ)
On the cylinder, click ⋯ three dots > Show all details to view the following additional details:
- DHW energy demand (kWh/year)
- Legionella Purge Demand (kWh/year)
- Weight (empty | full) (kg)
- Standing heat loss (kWh / Hrs)
- Coil size (m2)
- Immersion heater power (kW)
This information is then given in the Hot Water Calculations page of the Technical report and Customer proposal for you to share with the customer.
How is DHW energy demand calculated?
DHW energy demand is calculated using the storage temperature, supply temperature, number of occupants and the water needed per person.
First the volume of water needed per year is calculated with the following calculation:
Volume per year = number of occupants * the water needed per person * 365
Noting that for water, volume (L) = mass (kg). Then using the specific heat capacity of water (kJ/kg°C), this is converted to kWh/year:
DHW energy demand = 4.2 * (1/3600) * mass per year * (storage temperature - supply temperature)
Adjusting DHW and Legionella calculations
These calculations can be fine tuned by editing the Hot water preferences on the Hot water tab:
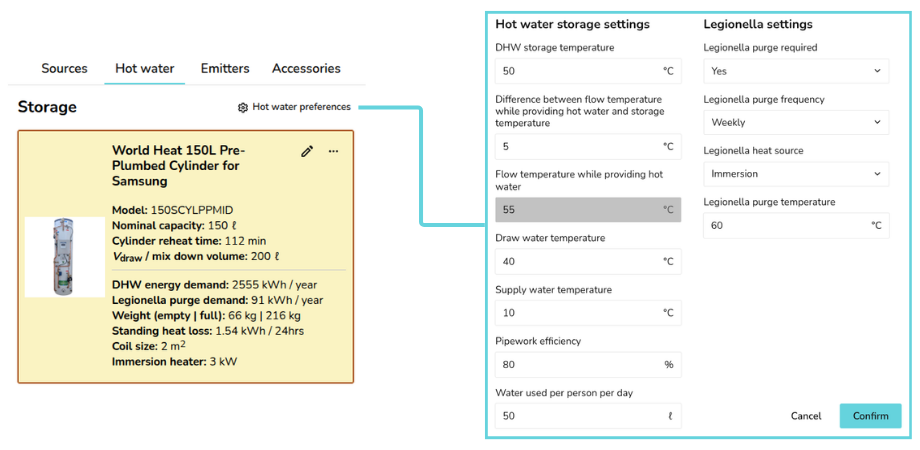
This will give you the following options to edit under Hot water storage settings:
- DHW Storage Temperature (°C)
- Difference between flow temperature while providing hot water and storage temperature (°C)
- Flow Temperature while providing hot water (°C) (This is calculated based on the two previous inputs)
- Draw Water Temperature (°C)
- Supply Water Temperature (°C)
- Pipework Efficiency (%)
- Water used per person per day (ℓ)
Under Legionella settings, you then have these options:
- Legionella purge required (Yes/No)
- Legionella purge frequency (Weekly/Daily)
- Legionella heat source (Immersion/Heat pump)
- Legionella purge temperature (°C)
Changes to these settings will only affect the selected design option.
Take a look at our Plan task guides for more info. If you have further questions, please get in touch on help@heatpunk.co.uk or help@heatpunk.ie.
Leads Dashboard
Where to find your leads?
Leads that have been submitted through the Shrunk Punk tool can be located in the Leads tab on the Heat Punk homepage.
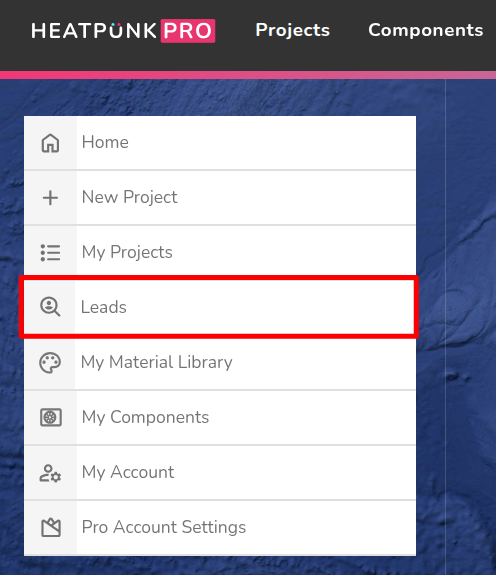

To see the full details of the lead, click on the arrow button on the right hand side.
Following up leads
You can email your new leads directly through Heat Punk by clicking the contact button. This will bring up an email template which is fully customizable and can be set up to come from your company email.

You can also send a customer a 'quick quote' using the quick quotation tool.


Converting leads to projects on Heat Punk
It is quick and easy to convert a lead into a project on Heat Punk by clicking the 'Convert To Project' icon.
From here you can complete the remaining tasks, send formal quotes and proposals and also order your kit from Midsummer Wholesale!
Wondering how to generate more leads through your website?
We recommend that you sign up to our free lead generation training session for useful tips on how to generate more traffic to your website and how to maximise results from leads!
Sound Check (UK) - updated
This guide covers and update coming to Heatpunk UK April 27th 2026. Read more about it here. The information provided here does not apply to heatpunk.ie.
The sound check is part of the Heat Pump task and helps determine whether the planned installation position will generate excessive noise that could disturb neighbouring properties. The results of the sound check will be displayed in the customer proposal and technical reports.
Completing the sound assessment
The sound assessment is completed in the Plan task. Make sure you have a design option plan selected and a heat pump added to the project.
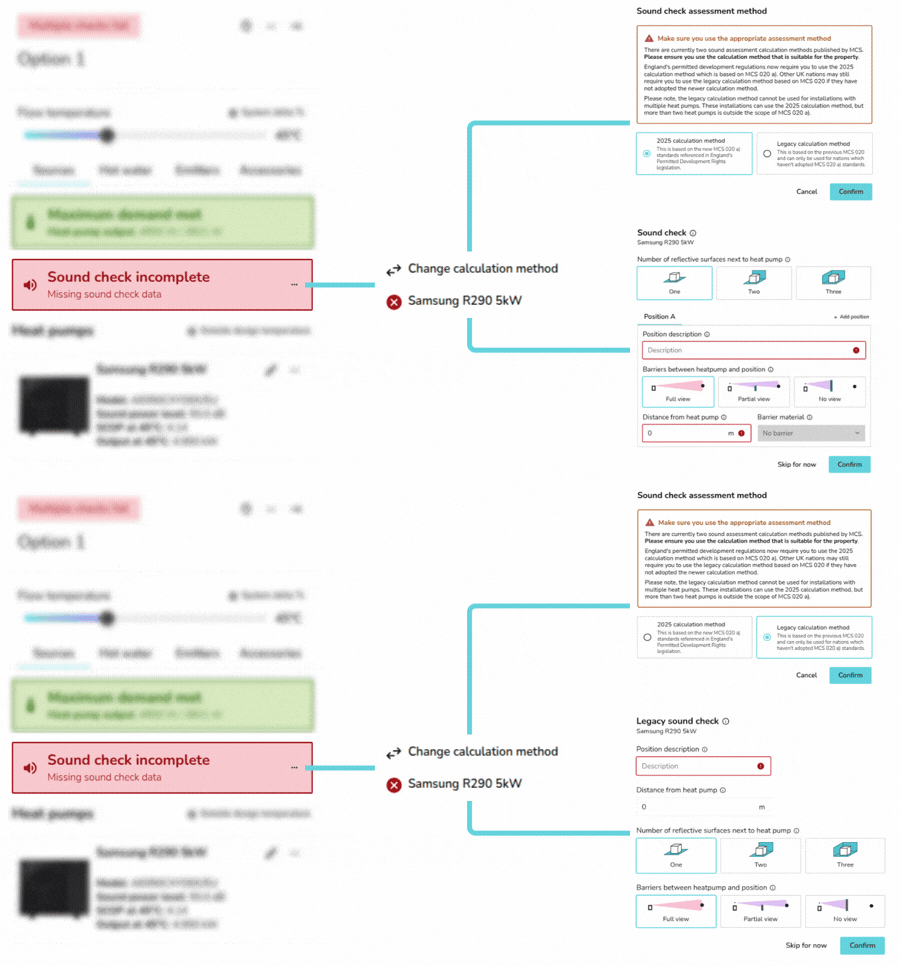
Click the ⋯ three dots and then Change calculation method to make sure the correct assessment method is selected on the Sources sidebar. See below for guidance on which method to choose.
Then follow these steps:
- Click the ⋯ three dots and then the name of the heat pump you would like to complete the sound assessment for.
- Input the details about the heat pump position and assessment points.
- Once you have completed the sound check for all the heat pumps in the project the project, the results will display on the right-hand sidebar under Sources.
To edit the details of the sound check click the ⋯ three dots and the name of the heat pump again.
Choosing a method
There are currently two sound assessment calculation methods published by MCS. England's Permitted Development Rights now require you to use the 2025 calculation method which is based on MCS 020 a). Other UK nations, where they have not changed their Permitted Development Rights, may still require you to use the legacy calculation method based on MCS 020. Please contact your local planning authority if you are unsure which method to use.
When you start the sound check for your project you can choose between the 2025 calculation method or the legacy calculation method.
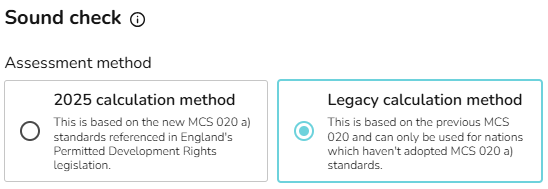
Using the 2025 calculation method - MCS 020 a)
To comply with MCS 020 a), the calculated noise level at each assessment position must be below 37 dB. Under MCS 020 a), it is vital to include multiple assessment positions, as more distant locations without a barrier may experience higher noise levels than closer positions that are shielded.
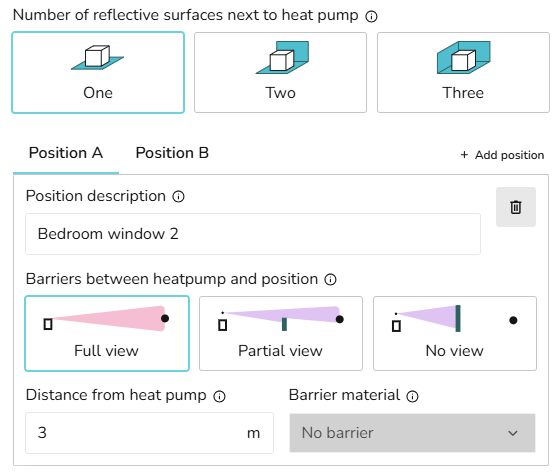
In order to comply with MCS 020 a) standard, start by making sure the 2025 calculation method is selected.
- Select the number of reflective surfaces next to the heat pump.
- Add details for the first assessment position, including the description, distance and details of any barriers.
- Add additional assessment positions by clicking + Add position.
- Delete any positions you no longer need using the dustbin icon.
- Click Confirm to view the sound check results.
See MCS guidelines for further information on the calculation.
Using the legacy calculation method - MCS 020
To comply with the legacy MCS 020 standard, the noise level at a single assessment position must be below 42 dB.
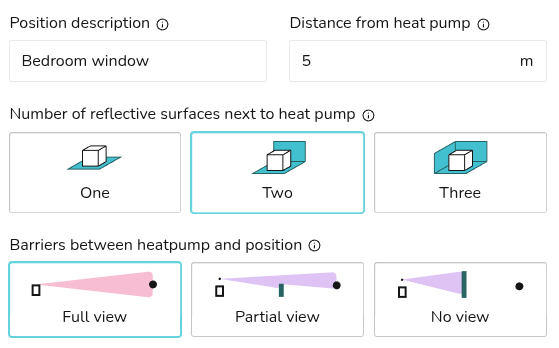
In order to comply with the previous MCS 020 standards, make sure the legacy calculation method is selected.
- Add details for the assessment position, including the description, distance, number of reflective surfaces and details of any barriers.
- Click Confirm to view the sound check results.
See MCS guidelines for further information on the calculation.
Introduction to the Plan Task v1
Overview
[video like 3D overview video and design modes video. Overview of sections (side bars, design area), sped up design. Wait til it's on staging. Purpose of this video is to show the flow of the task]
In the plan task, model your surveyed plan, with any existing emitters, and create design options based on the surveyed plan. In these design options, you can model emitter upgrades, place the heat pump and cylinder and specify any accessories.
Heat loss calculations are fully integrated into the plan process In the plan task you can also complete sound assessment (UK only) and ventilation calculations.
Once you have completed the surveyed plan and the design option you wish to continue with, click Next in the bottom right.
Creating your surveyed plan
Read more about creating a floor plan and how to speed up creating your floor plan by uploading architectural plans with Heatpunk Pro.
When creating a floor plan, the first step is to select or create your material palette. You will then be prompted to input the default ceiling height and can then complete the surveyed plan.
When completing the plan, elements (rooms, radiators, windows, doors) can be dragged and dropped from the left-hand sidebar. On the Emitters tab, you can also access key details about the plan:
- Click ⋯ three dots > 🡥 See room details to:
- View the annual demand, volume, area and heat loss for that room
- View the measurements for that floor
- Edit room temperature and ACH
- Add underfloor heating or other heat emitters
- Reset the room to the surveyed plan
- Hover over the 🛈 info icon next to emitters to view:
- Total expected heat loss
- Total building floor area
- Total heat loss per floor area
- Total emitter output
- Total annual demand
All emitters added to this the Plan will be listed as Existing in the Emitters tab. To specify new emitter, add these to a design option.
Once you have completed your initial plan, click Finish Plan at the top.
Ventilation calculation
When you finish your plan, you will be prompted to complete the ventilation calculation.
For Heatpunk UK/IE, choose from:
- Legacy MCS method / S.R.50-2021
- Standard method / BS EN 12831-1:2017 using assumed air permeability
- BS EN 12831-1:2017 using measured air permeability
Once completed, to edit ventilation calculations, in the top right corner click ⋯ three dots > Ventilation details.
Ventilation settings are consistent across plans, but the calculation is done per plan or option based on ACH and room temperature. To create an option with proposed MVHR, duplicate the project and input the proposed air permeability.
Completing design option plan
Once the sound check and ventilation calculations are completed, you can start speccing the heat pump, cylinders and any emitter upgrades. You can also specify the location of the new emitters, the heat pump, and the cylinder on the plan.
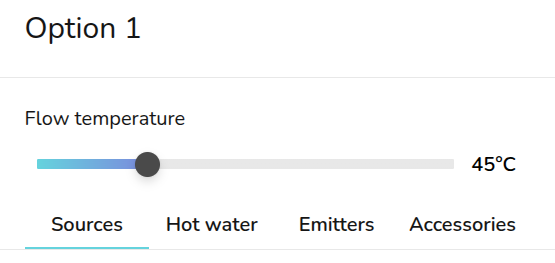
On the right hand sidebar, you can adjust the flow temperature using the slider. From the Sources and Emitters tab, you can view how this affects the heat pump and emitter outputs.
Changes made to the room temperature, ACH and emitters are specific to each design option. Changes will not apply across plans. Adjust the Plan if you would like changes to apply to each option. Read more about how design options work.
Sources
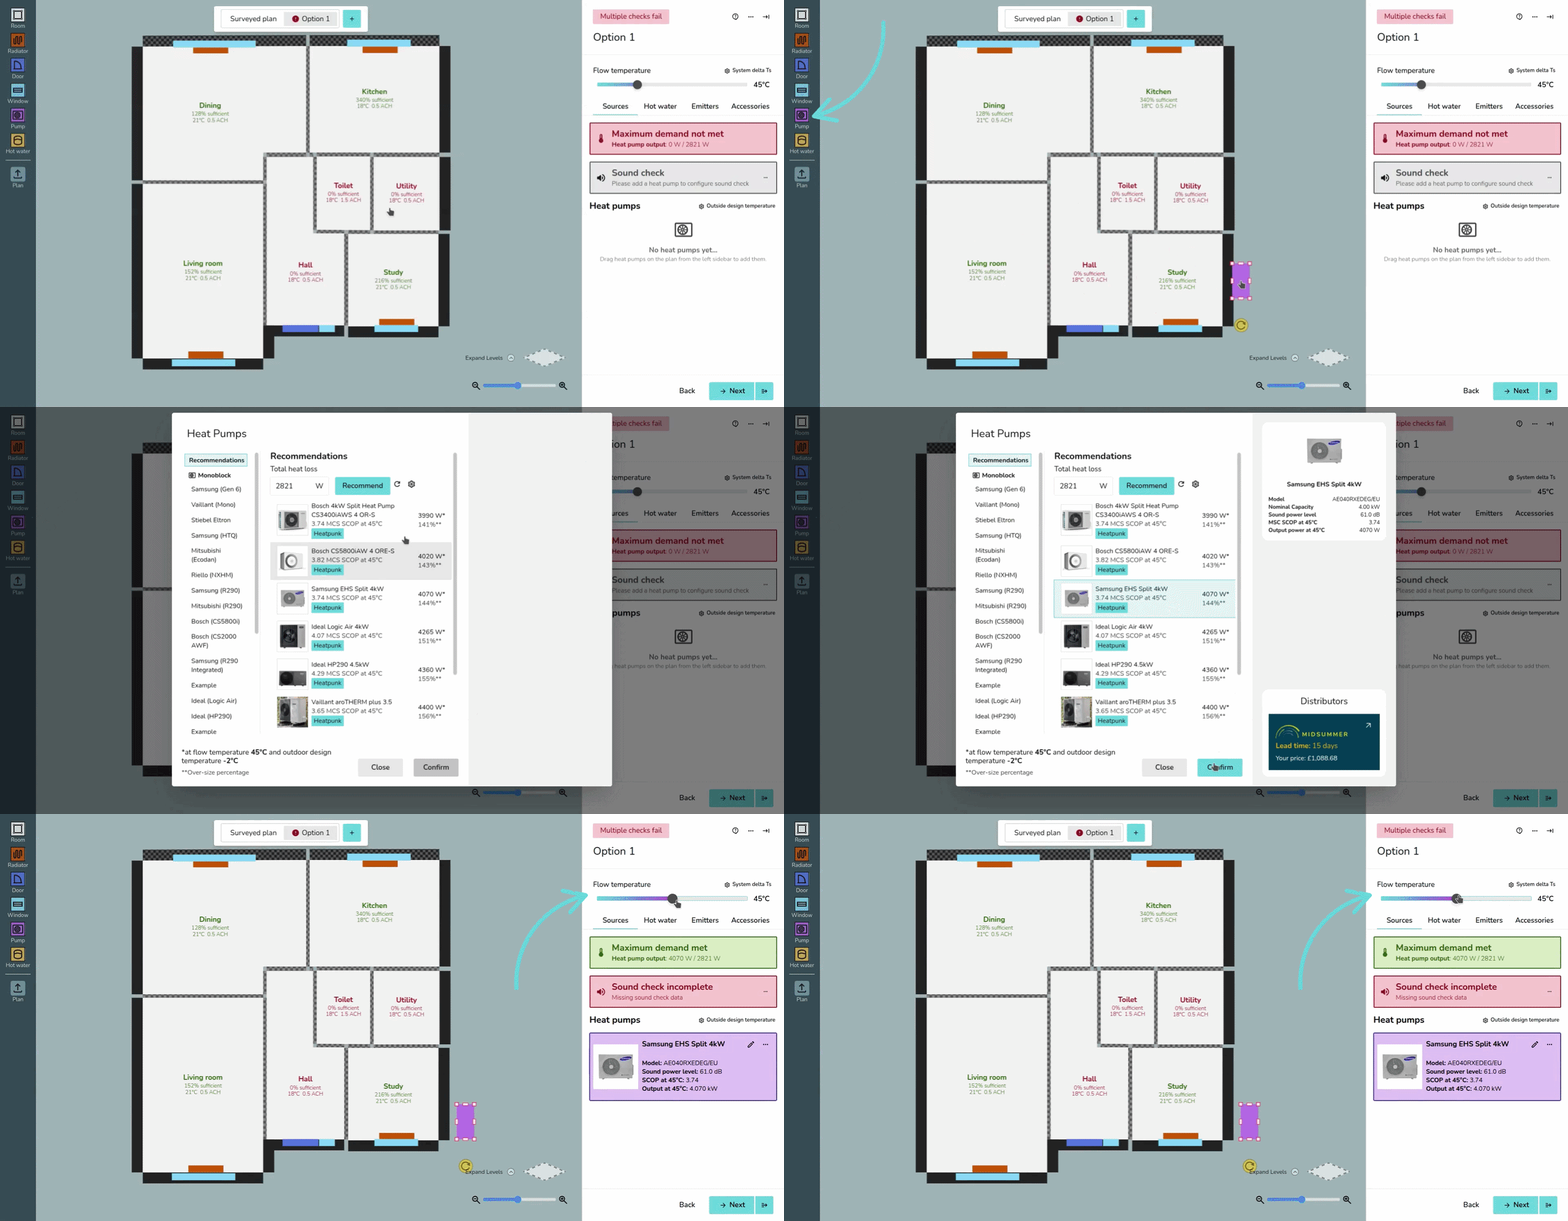
To add a heat pump, drag and drop a Pump from the left-hand sidebar. Once you have placed these on the floor plan, a menu will pop up to specify the model.
Adjust the flow temperature on the right-hand sidebar.
Sound check (UK)
On the Sources tab, where it says Sound check incomplete, click the ⋯ three dots and then the name of the heat pump(s) where the sound check hasn't been completed.
Read more about selecting a heat pump and completing the sound check.
Hot water
Similarly, to add a hot water storage, drag and drop from Hot water on the left-hand sidebar. A menu will then appear to specify the model.
Read more about specifying hot water storage, including information on domestic hot water calculations.
Emitters
[gif showing removing existing, adding new and navigating emitters tab]
Summarise new/existing emitters functionality
Accessories
Once you have added a heat pump and hot water storage, you can add accessories to the project. When you click + Add Accessories from the accessories tab, compatible components will automatically be selected.
Walls, Windows, Doors and Radiators - old
Consolidated into https://help.heatpunk.co.uk/books/creating-a-floor-plan/page/creating-a-floor-plan
To add windows, doors and radiators, drag and drop the relevant icon from the left hand menu.
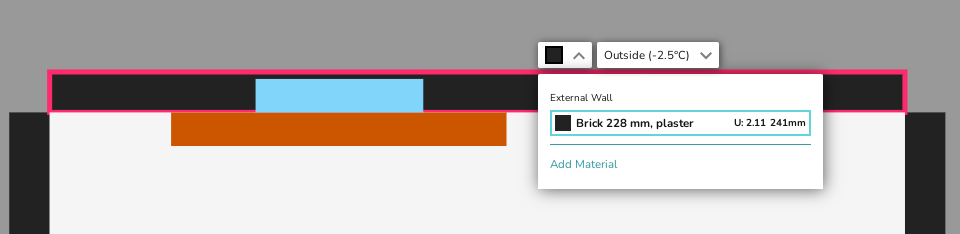
Click on walls, windows, doors and radiators to change their material. The materials shown will be those chosen in your palette. The default defined in your palette will be used initially. If the material you need is not in your chosen palette, you can add a custom material at this stage. Please see the guide on Managing Your Material Library for more details on this topic.
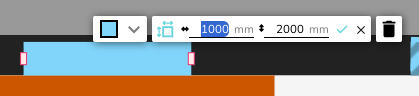
To change the width on windows, doors and radiators you can click and drag the pink handles at each end. Alternatively, you can also click on windows, doors, and radiators, then select the dimensions icon to change their dimensions, including height.
External Walls
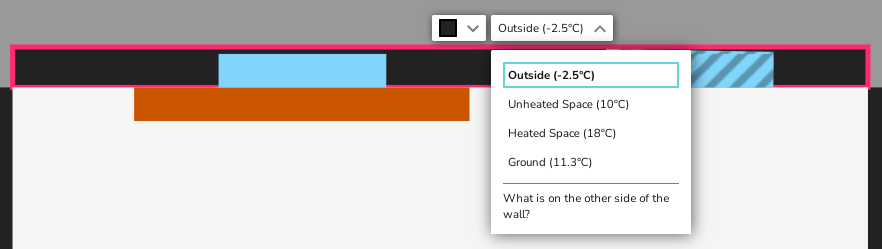
You will need to define what is on the other side of your external walls. Heatpunk will automatically set this as Outside. To change this, click on walls and use the drop down menu to define what is on the otherside. This is particualrly important for parting walls.
Heat Pump Load - old
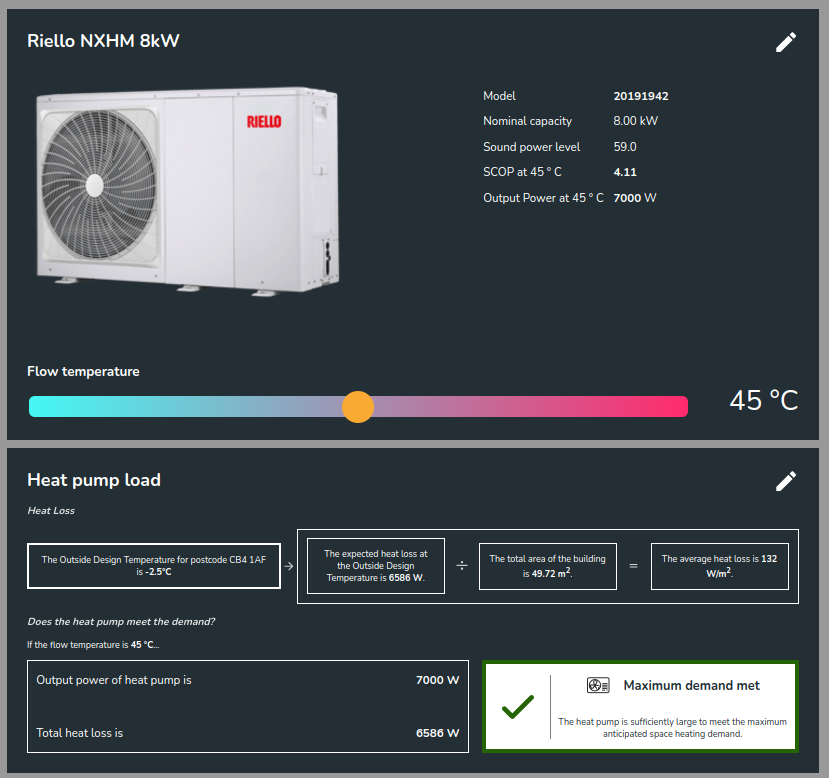
In the Heat Pump task you can see the results of the heat loss calculation as well as information on the heat pump you have chosen. You can alter the flow temperature and see the impact of this on SCOP and output power. This is also given for each heat emitter as shown in the example below.
Editing Room Properties - old
Consolidated into: https://help.heatpunk.co.uk/books/creating-a-floor-plan/page/creating-a-floor-plan
Once you have created a floor plan you can change the properties of each room by clicking on it.
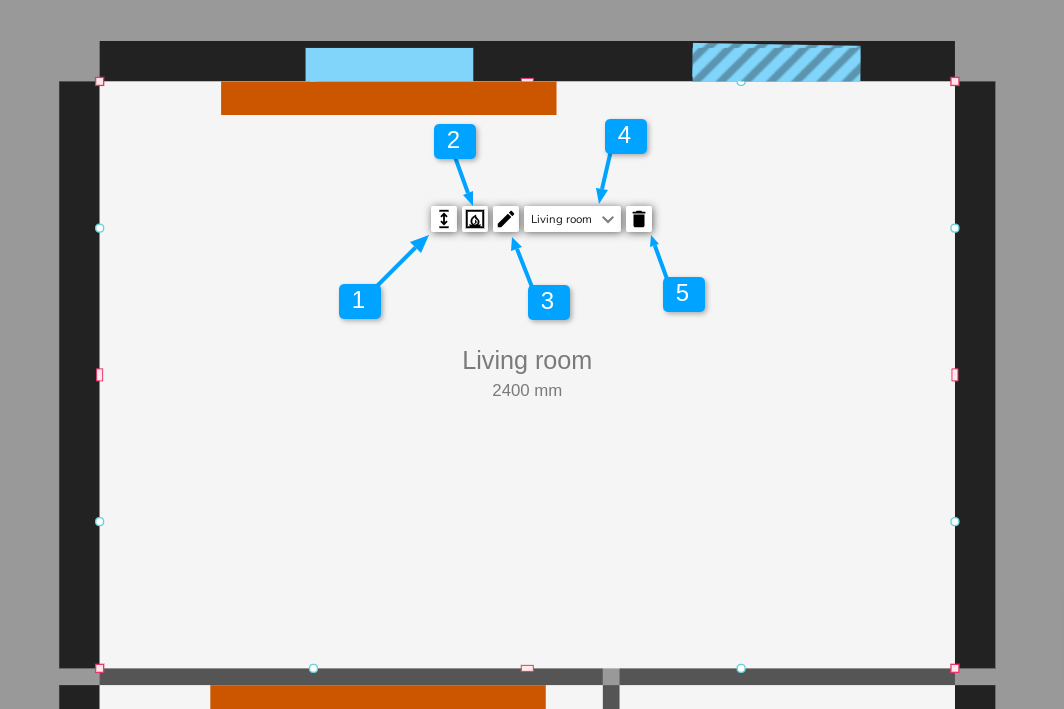
- Use this tool to change the height of the ceiling. Note, this is for the selected room only. See our guide on Floors and Ceilings for how to edit the ceiling height for the whole floor.
- Use this tool to toggle whether there is a flue or not in this room.
- Use this tool to change the name of the room.
- Use this menu to change the room type. This will also change the air changes and design temperature for the room in line with the room type chosen. See below for custom room types.
- Use this button to delete the room.
Custom room types
If you need custom air changes and design temperatures for a room you can do this by using a custom room type. When choosing the room type from the drop down menu, select Custom Room and edit the Name, Room Temperature and Air Changes Per Hour as necessary.
Vaulted Ceilings and Dormers - old
Please see the video below to learn how to add vaulted ceilings and dormers.