Plans task
- How can I create L-shaped rooms easily?
- How do I change the ceiling height of a room?
- Can I change ventilation rates for rooms?
- Can I do vaulted ceilings?
- How do I add dormers?
- How do I specify a parting wall?
- What do I do if only a section of the wall is a parting wall?
- Do I need to model unheated spaces?
- How do I model a space that goes from the ground floor to the ceiling of the next level?
- How do I model rooms with open doorways?
- Do I need to add stairs?
How can I create L-shaped rooms easily?
Moving the blue dots located on each wall will create new vertices. By dragging one of the blue dots along the boundary you can effectively split that wall in two segments while keeping it straight.
Select the segment you need to extend outwards and click on the rectangular handle. A pop-up will appear allowing you to change to an oval-shaped handle. This enables you to pull out that portion of the wall to create an L-shaped room.
Below is a step by step guide of the above outlined steps:
- Drag over your room and size one side of the L
- Drag the nearest blue dot to the point you want the L to 'turn'
- Select the rectangle handle in the middle of that new section of wall and select the option that isn't currently selected - this option allows you to extend out just that section between the pink dots, rather than the whole wall
- Drag the pink handle to make your L!
For more help on this topic, see our guide on Creating Rooms.
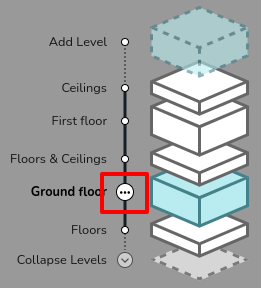
How do I change the ceiling height of a room?
To change the ceiling height across the whole floor, click the three dots next to the relevant floor in the exploded view, bottom right. Select edit and change the value of the ceiling height as necessary.
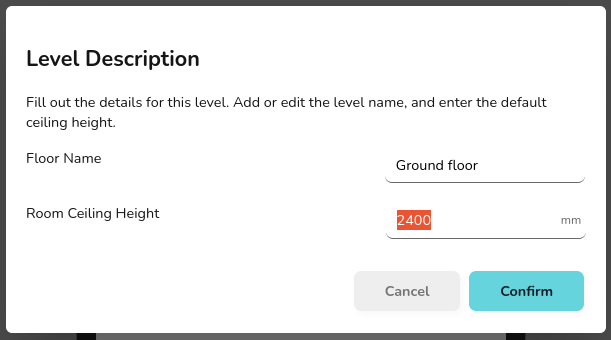
To adjust the height of just one room, select the relevant room, and click the two sided arrow icon. Then enter the value needed for ceiling height. Ensure you click the tick after editting the value to save your changes.

For more help on this topic, see our guide on Floors and Ceilings.
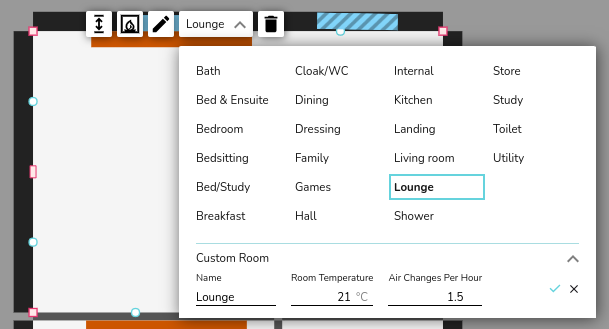
Can I change ventilation rates for rooms?
Yes, this is done by clicking on the room and changing the Room Type to a Custom Room. You can then edit the Air Changes Per Hour to suit your needs.
For more information on this topic see our guide on creating a floor plan.
Can I do vaulted ceilings?
Vaulted ceilings can be added by segmenting the roof into as many different slopes as are required.
This is done by dragging multiple ceiling regions onto the design and fitting them accordingly. You can then set the associated height at the corners of each segment by clicking on them, selecting the up/down arrow and inputting the appropriate values (you must click the tick beside the text box to confirm). An arrow should then be displayed, this indicates the downwards slope direction of the ceiling.
For more help on this topic, see our guide on Vaulted Ceilings and Dormers.
How do I add dormers?
Dormers can be added to any vaulted ceilings. For more information on this topic, see our guide on Vaulted Ceilings and Dormers.
To add a dormer simply drag and drop the Gable Dormer or Shed Dormer function onto where it is required. The dormer will automatically orientate itself with the slope of the roof. The specific dimensions can then be set, as well as the roof, wall, and window materials.
How do I specify a parting wall?
Click on the wall you want to specify and use the drop down menu to select whether the other side of this wall is a heated or unheated space. By default the drop down will be set to Outside.
For more information on this topic see our guide on creating floor plans.
What do I do if only a section of the wall is a parting wall?
If only a section of the wall is a parting wall, for instance, if there is a garage behind half the wall but not the other half, you can split the wall using the blue handles.
Simply drag and drop the blue handle to the point where the wall needs to be split.
You can then select whether the other side of this wall is a heated or unheated space. In the example, you would select one half of the wall as unheated space and the other as outside.
Do I need to model unheated spaces?
In general, you do not need to model unheated spaces. All rooms included will be added to the total heat loss calculation and therefore the heat pump will be sized against this. Therefore, including unheated spaces could lead to oversizing the heat pump.
It's therefore, better to exclude unheated spaces in most cases, for example garages and conservatories. Instead, you should specify the parting wall between the heated and unheated space.
However, some unheated spaces should be included for practicality, for example internal store rooms. Rather than leaving a gap in the floor plan, rooms like this should be included. In line with MCS, Heatpunk includes a room type for this scenario (Store).
How do I model a space that goes from the ground floor to the ceiling of the next level?
To model a tall room which goes from the floor on the ground level to the ceiling of the level above, you can simply model this as two rooms on top of each other.
Even if in reality there is no floor separating them, as long as both rooms are set to the same type, there will be no heat loss between them, so it will act as one room.
Heatpunk doesn't currently account for increased heat loss in rooms with high ceilings. Refer to CIBSE Domestic Heating Guide for information on what high ceiling factor to use.
How do I model rooms with open doorways?
For open plan spaces where rooms do not have doors separating them, you will need to model it all as one large room. Make sure that you set the room type to the one that has the highest air changes per hour (ACH).
If you need to use the wall between the rooms to place a radiator, then you can model these as separate rooms but make sure the room temperatures and the air changes are the same, again using the highest ACH. This will mean there will be no heat loss across that wall so the calculations are unaffected by modelling the wall.
Do I need to add stairs?
The nature of the calculations carried out by Heatpunk mean that you do not need to account for stairs. The landing and hallway can be considered separately and therefore should be added as separate rooms on separate floors. If the room temperatures are the same there will be no heat loss between them.