Getting started
Overview
Brought to you by the Midsummer development team, Heatpunk represents our vision of accessible heat loss calculations for all. As a standalone web-based tool, Heatpunk offers a complete design package for both commercial and personal use. Offering industry-leading value, installers rely on Heatpunk to support their front-line sales teams with a feature rich all-in-one solution. If you're looking for help with designs, quotations, purchasing and the certification process, we've got you sorted.
Heatpunk is suitable for everyone! Heatpunk has been designed with simplicity in mind. Simply let Heatpunk guide you through the design process step by step.
First time using Heatpunk? This video will walk you through many of the key features available, such as: choosing materials, creating a floor plan, choosing a heat pump, doing a performance estimate, viewing the report and filling out forms.
Heatpunk Pro
Considering using Heatpunk Pro? Below is a feature comparison showing all the different options you get when you upgrade.
| Standard | Pro | |
|
Floor plan designer |
✔ | ✔ |
| Room by room heat loss calculations | ✔ | ✔ |
| Heat pump sizing and flow temp design | ✔ | ✔ |
| Radiator Sizing | ✔ | ✔ |
|
DHW calculations |
✔ | ✔ |
| MCS Performance Estimate | ✔ | ✔ |
| Sound Assessment | ✔ | ✔ |
| Heat pump design report | ✔ | ✔ |
| DNO forms | ✔ | ✔ |
| Free Training | ✔ | ✔ |
| Access to Shrunk Punk | ✗ | ✔ |
| Upload floor plans | ✗ | ✔ |
| Project sharing & team management | ✗ | ✔ |
| Custom components | ✗ | ✔ |
| Share custom components and material folders | ✗ | ✔ |
| Project file management | ✗ | ✔ |
| Email templates & sending | ✗ | ✔ |
| Project status | ✗ | ✔ |
| Pre-installation survey | ✗ | ✔ |
| Customisation of proposal documents | ✗ | ✔ |
| E-signing | ✗ | ✔ |
| Additional forms and reports | ✗ | ✔ |
Sign up here for training on either Heatpunk or Heatpunk Pro to see all of these features in action!
Starting Your First Project
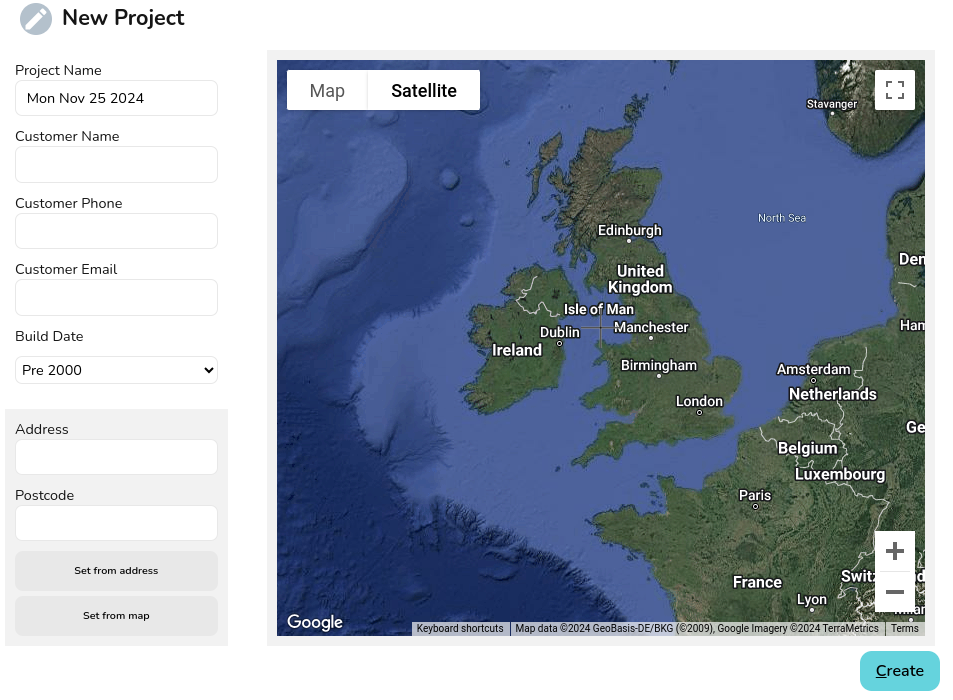
Create a new project
From the Heatpunk homepage, click New Project to create a new project. Set the customer details, build date (affects ventilation rates used) address for the property.
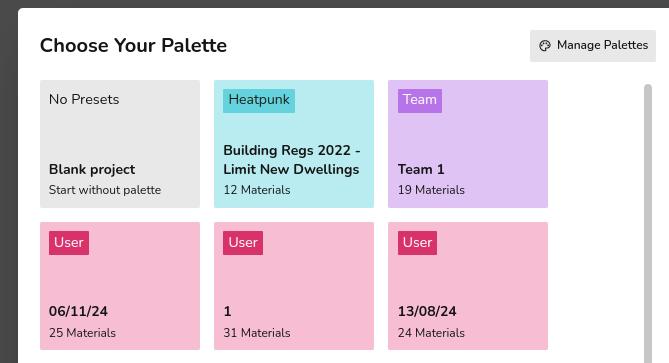
Choose your material palette
A material palette is a pre-defined set of material choices that can be used for accurate room-by-room heat loss calculations. You can choose from Heatpunk's default materials palette based on 2022 Building Regs, use one of your own custom palettes or a team-managed palette, or start from fresh with the blank project palette to set the construction type (u-values) for all the building elements. More about choosing a materials palette and managing custom materials palettes.
Create the first level of your floor plan
Input the name and default ceiling height for the rooms on this level of your floor plan.
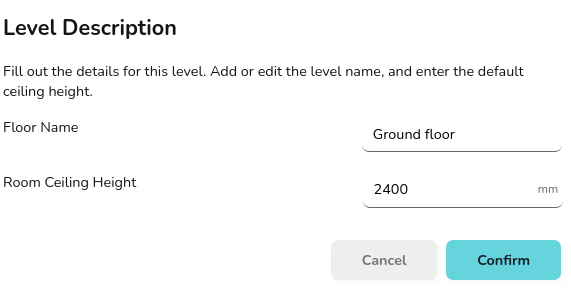
Click confirm to load the floor plan task. You're ready to start building your floorplan and generating a full room-by-room heat loss calculation. Next read our detailed user guides for the Floor Plan Task.
Who is Midsummer?
![]()
Heatpunk is brought to you by Midsummer's in-house development team. Midsummer is one the UK’s leading distributors of solar PV, batteries, EV chargers and Heat Pump systems. With over 20 years of experience in the industry, our wholesale distribution and digital tools allow us to support you from design to installation.
- National reach, local support: Over 150 staff across multiple sites in Cambridge, Glasgow and Leeds, plus a subsidiary in Dublin.
- Fast, accurate logistics: We offer next-day delivery and maintain over 99% picking accuracy on our dedicated vehicles.
- Technical expertise: Our team is technically savvy and includes former installers. We provide free technical support and training.
- Specialist sales teams: We have dedicated teams to support customers across C&I, high volume sales, residential and off grid projects.
- Competitive pricing: We offer best-in-market pricing across our entire
range.
Already installing solar or looking to get started? Take a look at Heatpunk's sister software Easy PV.
Get the most out of your account
Whether you're a regular customer or just getting started, linking your account to Heatpunk is the best way to simplify your work.
Heatpunk generates a complete kit list based on your design, including the heat pump, cylinder and heating ancillaries. You can see the kit list on the project overview page for each of your projects.

Add to cart in one-click
Just click Add to cart and we'll take you to the Midsummer Wholesale website and load all the products into your cart.
You can then:
- Place an order.
- Save cart as a quote to come back to later.
- Add or remove items and change quantities.
- Combine saved quotes to order kit for multiple projects.
Connecting your accounts
To make sure your pricing is accurate when designing, you can link your Midsummer and Heatpunk accounts.
- If you already have a Midsummer account, just follow these steps.
- Don't have an account yet? Apply here to see our full range of kit and unlock trade-only pricing.
- Have an account but haven't used it lately: Get in touch with our team and we'll make sure you're getting the best pricing we can offer. Email our sales team or call 01223851535.
Connecting to Midsummer
Connecting your Heatpunk account to your Midsummer Wholesale account will allow Heatpunk to set its prices to your wholesale price level. This means you do not have to make changes to your goods prices in the financial task except for custom components.
To connect your wholesale account:
- Navigate to My account > Preferences > Connect to Midsummer
- Click
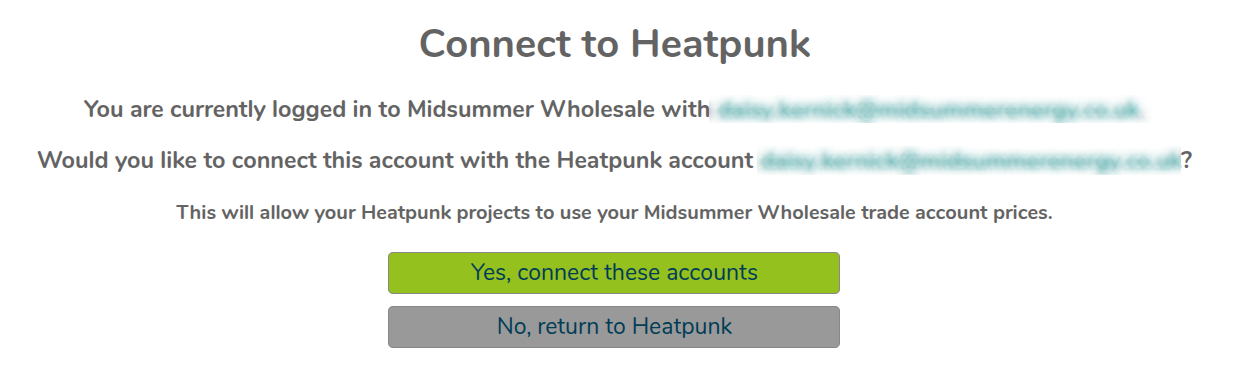
Connectand you will be redirected to Midsummer to log in. - Once you are logged into the account you'd like to connect, click
Yes, connect these accounts

- Then click
Return to Heatpunk

- Your account will then refresh and your wholesale prices will apply

Note: For Heatpunk Pro teams, each member will need to connect their wholesale account for discounts to apply consistently.