Heat Pump Task and System Performance
- Pro: Create and Manage Your Components
- Sound Check (UK)
- Ventilation Calculations in Heatpunk
- Heat Pump Load
- Hot Water Storage
- Design Options
- Performance Task (UK)
- Consumption task
- Editing and creating tariffs
Pro: Create and Manage Your Components
In this guide, we will detail how to create custom components on Heatpunk.
For most components you will need to add, there is a set of technical information that needs to be entered so that Heatpunk can conduct necessary performance calculations. This information is available from the manufacturer’s technical datasheet for that specific product.
If you require assistance reading technical information from a datasheet, please contact the manufacturer directly. This is not something we can provide significant support with since these will not be products Midsummer sells.
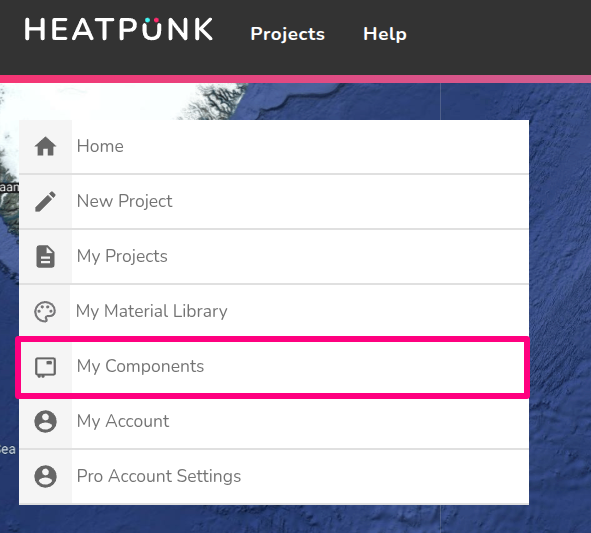
You can access the your components from the Heatpunk home page under 'My Components'.
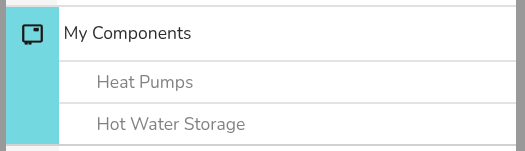
Heat pump
Creating manufacturer
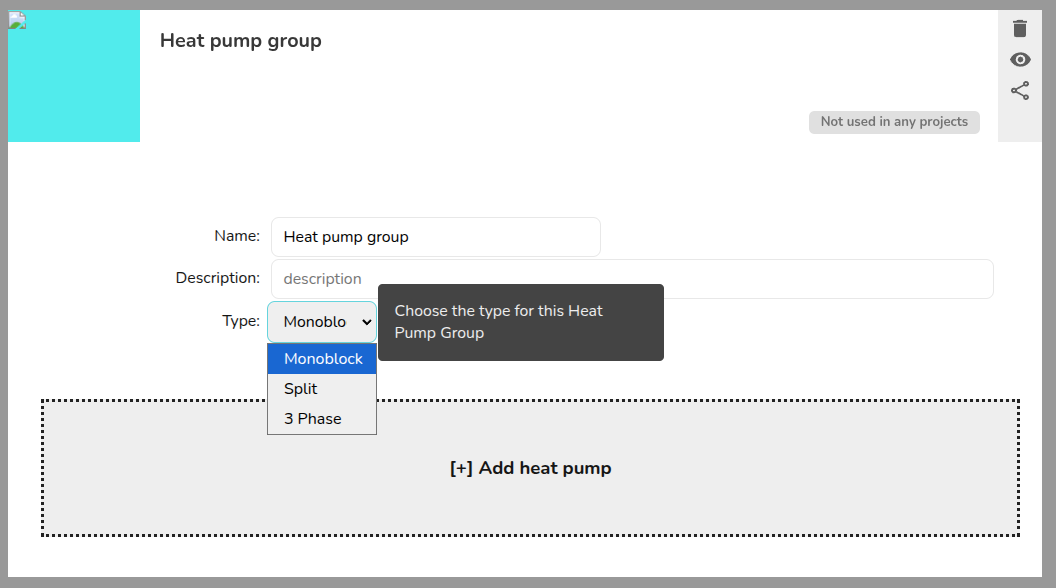
When adding any custom heat pump in Heatpunk you first need to add a custom manufacturer category which allows you to organise your custom components. The components added will be categorised by their manufacturer when it comes to select them in a project.

Inputting information from datasheet
After inputting the name for the manufacturer, re-open your custom manufacturer and you will see additional options to add a heat pump.
You will then need to input the technical information found in the datasheet for the heat pump.
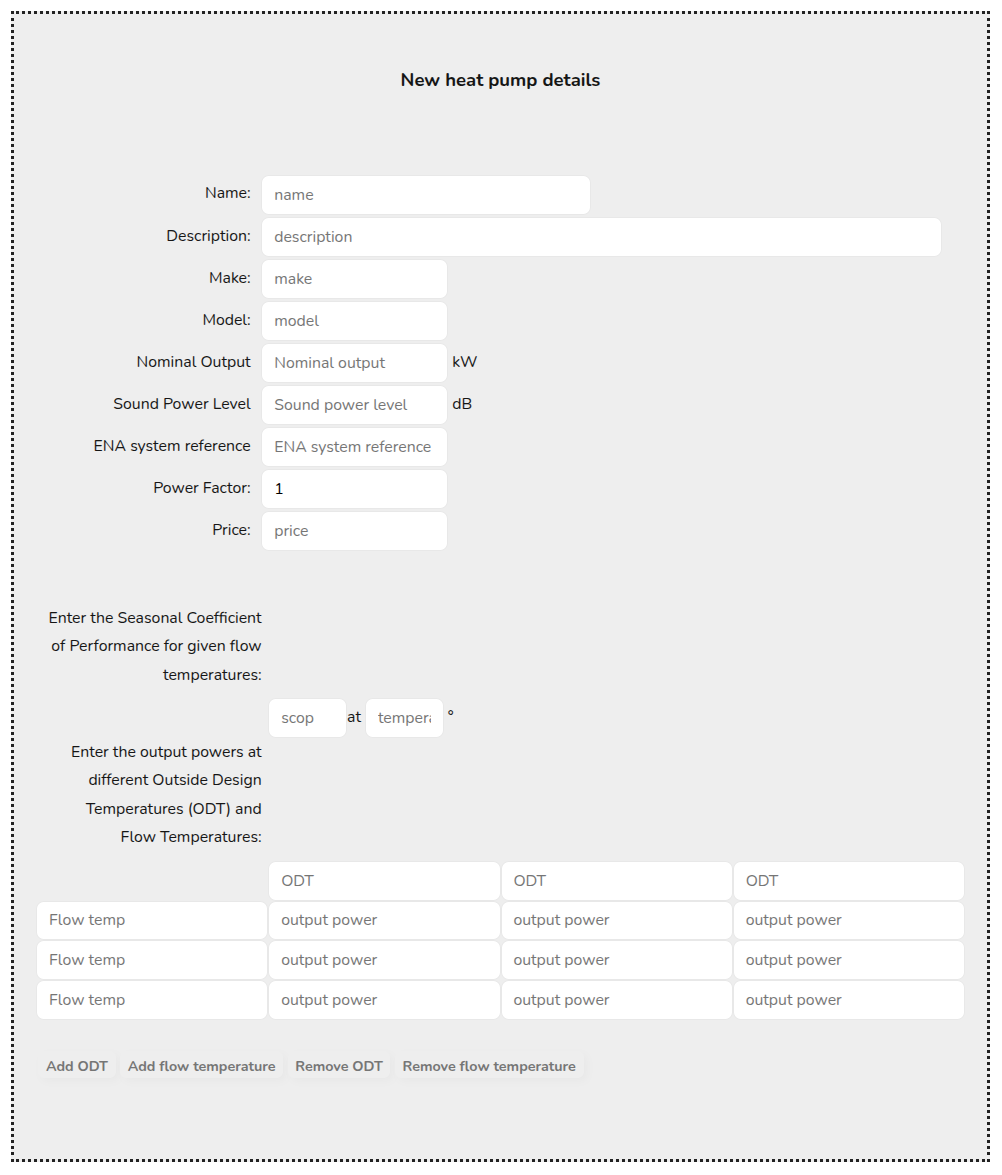
Below is a list of each value required to add a custom heat pump alongside some details for each.
|
Technical info |
Details |
|---|---|
|
Nominal output |
|
|
Sound power level |
|
|
ENA system reference |
|
|
Power factor |
|
The panel will auto-save once all the required fields are completed. It will not save before this.
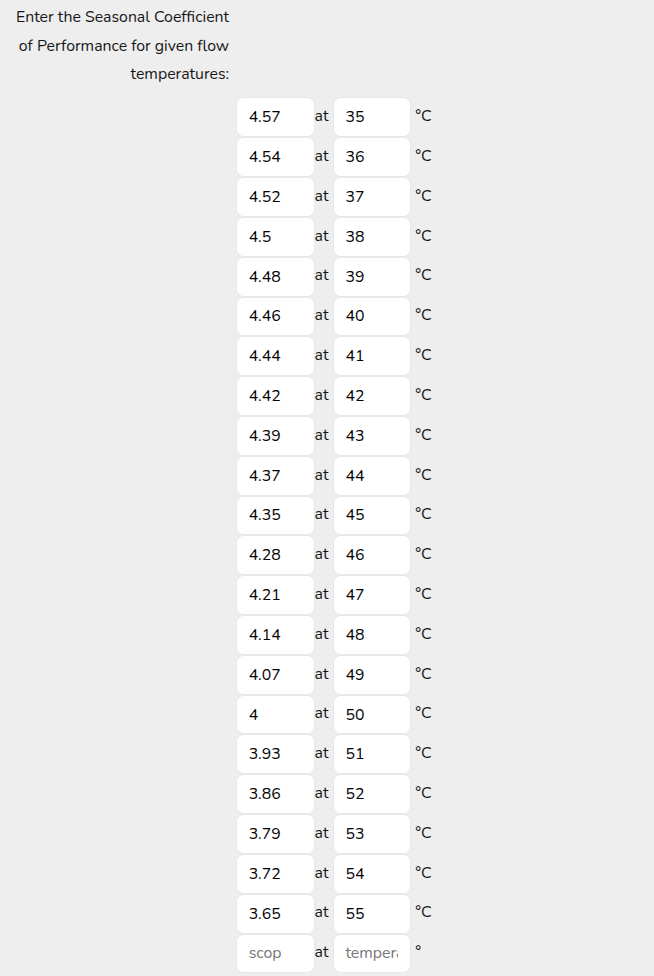
You should also add SCOPs and Output Powers. Without this information Heatpunk can not perform the required calculations.
SCOPs
You should input the MCS SCOP at a range of flow temperatures (usually 35-55℃). This information can be found on the MCS Product Directory.
You should add each SCOP at a given temperature individually. Once you have added one, the input box will appear to add the next. A completed example is shown below.
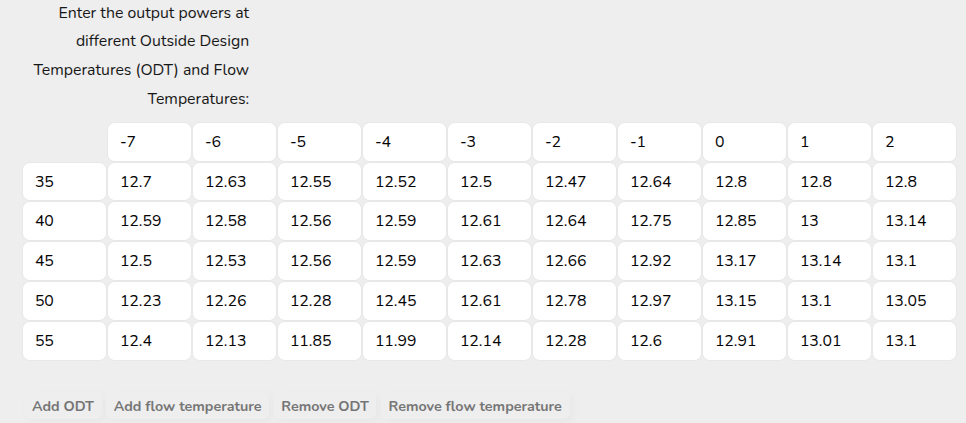
Output Powers
You should add the output power (kW) at a range of outside design temperatures (ODTs) and flow temperatures. You should be able to get this information from the manufacturer.
The more information the better but you should aim for at least -7℃ to 2℃ ODT and 35 to 55℃ flow temperature. A minimum of three data points is needed on each axis of the graph. You can add and remove rows and columns as necessary using the buttons below the table.
Outputs including the defrost cycle are preferred.
A completed example is shown below, however, please note not every manufacturer is able to provide the level of data shown here.
Additional details
You can add a number of additional details as necessary:
- You can name the heat pump you have created and add a short description. Both the name and description will show when choosing the heat pump as well as in your final customer proposal.
- You can add a photo of the heat pump. As with the name and description, this will show when choosing the heat pump as well as in the final customer proposal. To edit the image of the custom manufacturer or component, click on the default image and either upload from your files or paste a copied image.
- You can add a make and model of the heat pump.
- You can add a price for the heat pump. This will be the price that is used in your Heatpunk project.
Once you have added a heat pump successfully - you’ll be able to select it in the list of heat pumps when creating a new project.
Hot water storage
Creating manufacturer
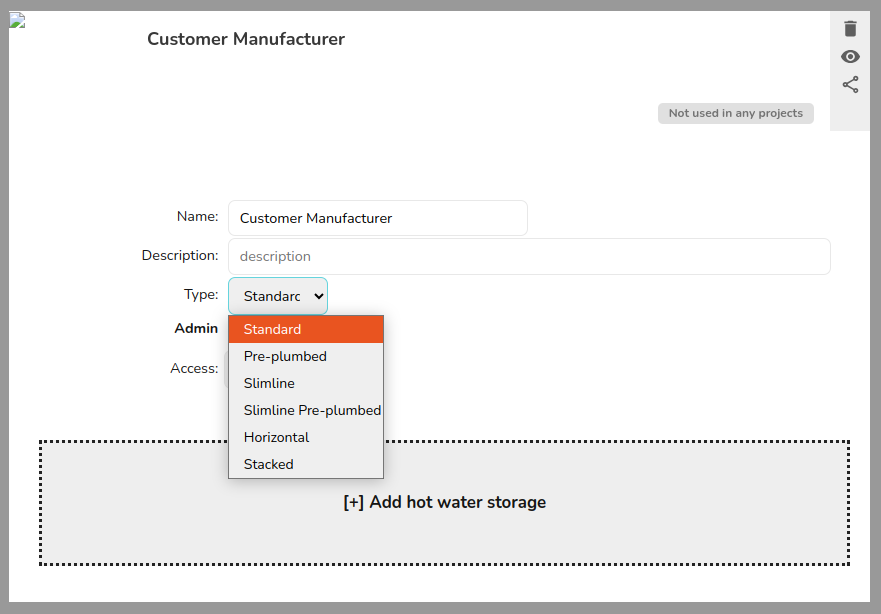
When adding any custom hot water storage unit in Heatpunk you first need to add a custom manufacturer category which allows you to organise your custom components. You should specify the type of storage unit you are adding from the drop-down menu. If you would like to add additional storage units that are of a different type, then you must create a new manufacturer category.

Inputting information from datasheet
After inputting the name for the manufacturer and type of storage unit, re-open your custom manufacturer and you will see additional options to add hot water storage.
You will then need to input the technical information found in the datasheet for the storage unit.
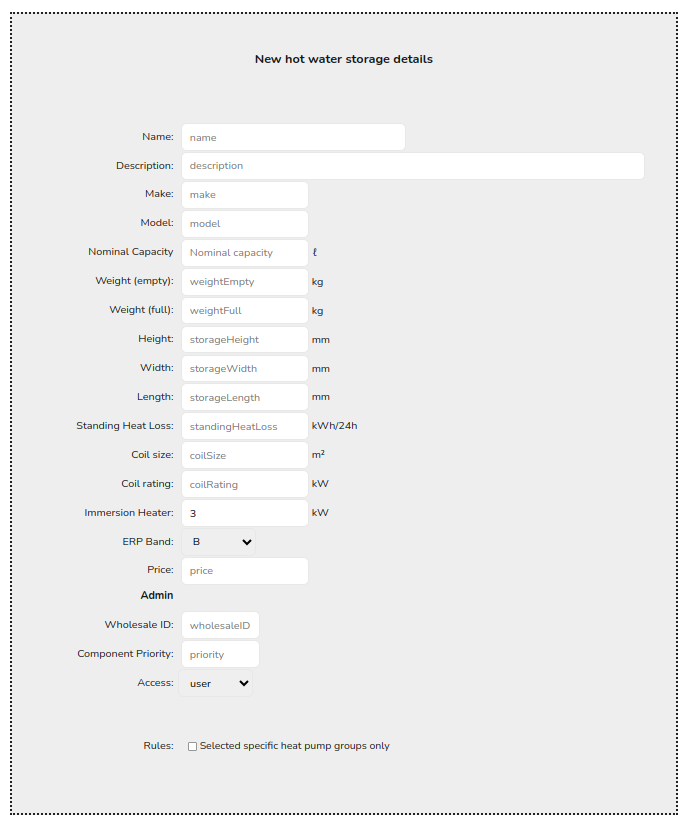
Below is a list of each value required to add a custom storage unit alongside some details for each.
|
Technical info |
Details |
|---|---|
|
Nominal output |
|
|
Weight (empty) |
|
|
Weight (full) |
|
|
Height |
|
|
Width |
|
|
Length |
|
|
Standing heat loss |
|
You should also add the following technical data, if available:
- Coil size (m2)
- Coil rating (kW)
- Immersion heater rating (kW)
- ERP band - this will autopopulate as B. You should edit as necessary.
Additional details
You can add a number of additional details as necessary:
- You can name the hot water storage unit you have created and add a short description. Both the name and description will show when choosing the storage unit as well as in your final customer proposal.
- You can add a photo of the storage unit. As with the name and description, this will show when choosing the storage unit as well as in the final customer proposal. To edit the image of the custom manufacturer or component, click on the default image and either upload from your files or paste a copied image.
- You can add a make and model of the storage unit.
- You can add a price for the storage unit. This will be the price that is used in your Heatpunk project.
Once you have added a hot water storage unit successfully - you’ll be able to select it in the list of storage units when creating a new project.
Sound Check (UK)
This guide applies to the heatpunk.co.uk version of Heatpunk. The information provided here does not apply to heatpunk.ie.
The sound check is part of the Heat Pump task and helps determine whether the planned installation position will generate excessive noise that could disturb neighbouring properties. The results of the sound check will be displayed in the customer proposal and technical reports.
Completing the sound assessment
When you create a new project you will be prompted to complete the sound check when you navigate to the heat pump task.
- Choose the assessment method suitable for your project. See below for guidance on which method to choose.
- Input the details about the heat pump position and assessment points.
- After selecting the kit you would like to use on the project, the results of the sound check will display on the left hand side of the page below the heat pump and cylinder details.
To edit the details of the sound check click the pencil icon to the top right of the results.
Choosing a method
There are currently two sound assessment calculation methods published by MCS. England's Permitted Development Rights now require you to use the 2025 calculation method which is based on MCS 020 a). Other UK nations, where they have not changed their Permitted Development Rights, may still require you to use the legacy calculation method based on MCS 020. Please contact your local planning authority if you are unsure which method to use.
When you start the sound check for your project you can choose between the 2025 calculation method or the legacy calculation method.
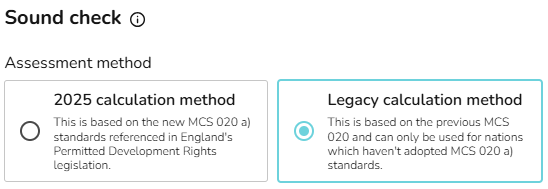
Using the 2025 calculation method - MCS 020 a)
To comply with MCS 020 a), the calculated noise level at each assessment position must be below 37 dB. Under MCS 020 a), it is vital to include multiple assessment positions, as more distant locations without a barrier may experience higher noise levels than closer positions that are shielded.
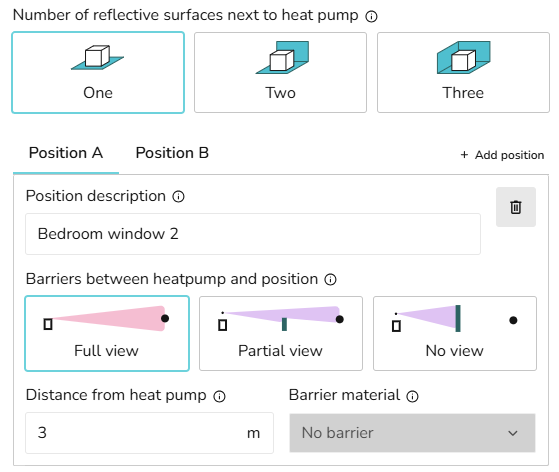
- In order to comply with MCS 020 a) standard, start by selecting the 2025 calculation method.
- Select the number of reflective surfaces next to the heat pump.
- Add details for the first assessment position, including the description, distance and details of any barriers.
- Add additional assessment positions by clicking + Add position.
- Delete any positions you no longer need using the dustbin icon.
- Click Confirm to view the sound check results.
See MCS guidelines for further information on the calculation.
Using the legacy calculation method - MCS 020
To comply with the legacy MCS 020 standard, the noise level at a single assessment position must be below 42 dB.
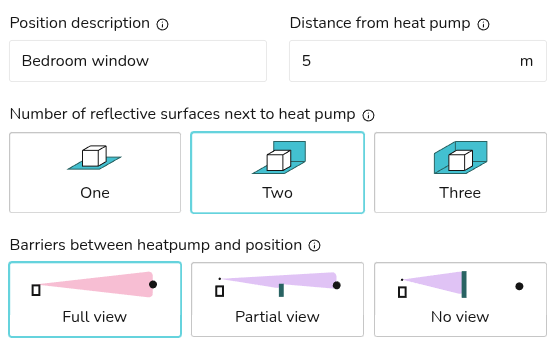
- In order to comply with the previous MCS 020 standards, select the legacy calculation method.
- Add details for the assessment position, including the description, distance, number of reflective surfaces and details of any barriers.
- Click Confirm to view the sound check results.
See MCS guidelines for further information on the calculation.
Ventilation Calculations in Heatpunk
This guide primarily applies to the UK version of Heatpunk. For the IE version, S.R.50-2021 (Legacy Method in this guide) is still the primary method used and will be selected by default. Information on the other two available methods can be found below but disclaimers about MCS and the Legacy method can be ignored.
Choosing a method
Ventilation calculations are completed at the start of the Heat pump task. In each project will you have the following options:
- Standard method: based on BS EN 12831-1:2017, using assumed values for measured air permeability.
- Measured air permeability: based on BS EN 12831-1:2017, using measured values for air permeability.
- Legacy calculation: based on BS EN 12831:2003.
Standard method and measured air permeability
When selecting either of these methods, you will be prompted to select 'How sheltered from the wind is the building?':

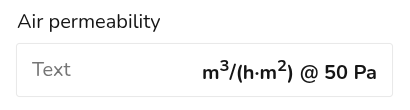
For the Measured air permeability option, you will also be asked to input an air tightness test result:
For the Standard method this value is assumed based on the minimum ventilation rate required for the number of bedrooms in the property.
Heatpunk will then execute the calculation detailed below.
Legacy method
For UK projects, MCS certification in accordance with MIS 3005-D now requires heat loss calculations comply with BS EN 12831-1:2017. Please only select this method when viewing old projects. For IE projects this is called S.R.50-2021 and is still the default option.
If opening a project created before Dec 2025, the Legacy method will be selected. This calculation is a sum of the individual ventilation losses of each room. For each room the following calculation is done:
Room ventilation losses = 0.33 * ACH * Volume * Temperature difference,
where the ACH was taken from Table 3.8 of the CIBSE Domestic Heating Design Guide (2021).
Editing selection
If you would like to see which method is being used on a project or alter any inputs, navigate to the Heat pump task. Scroll to the ventilation section on the left-hand side:

Click the pencil to re-open the ventilation losses menu and edit any inputs.
How are ventilation losses calculated?
Under BS EN 12831-1:2017, the ventilation losses for a building are not a simple sum of the ventilation losses for each room. Instead ventilation losses are calculated both at a room level (Equation 17) and then separately on a building (or zone) level (Equation 16):
This is because some of the air flow into a room may be pre-warmed from another room. Rooms facing the wind may have cold outside air pushed into them, but then the warm air from those rooms will flow into other internal rooms. This reduces the amount of cold air entering a room not facing the wind, so not all warm air is lost to the outside. This then reduces the overall ventilation heat loss for the building compared to the individual rooms.
What is a zone?
A zone is a group of rooms that are air-connected by design, such as by an internal door that complies with the requirements in Approved Document F: Ventilation, Volume 1 – Dwellings.
Homes are commonly single ventilation zones and Heatpunk assumes a building represents a single ventilation zone.
Whichever method is selected for specifying the air permeability, the BS EN 12831-1:2017 ventilation loss equations will yield the maximum of these two values:
- The loss computed using the measured air permeability or assumed ventilation rate.
- The loss computed using the room air change rates.
How does this impact my designs?
- Heat pump sizing: Heat pumps should be sized to meet the overall heat loss for the building. The ventilation losses for the building are generally half the sum of the individual room ventilation losses.
- Heat emitter sizing: The emitter for an individual room must meet the worst case ventilation heat loss. The room ventilation losses are not discounted by the volume flow ratio that is applied to the building as a whole.
Calculation assumptions
Read below for the various assumptions made for the standard and measured air permeability methods.
Standard method assumptions
Where a measured air permeability is not known, the whole-building infiltration rate is assumed based on the minimum ventilation rate required for the number of bedrooms in the property.
This data is derived from CIBSE Domestic Heating Design Guide (2021) Table 1.7. The ventilation rate (in L/s) is then converted to a whole-house air change rate (ACH or 1/h) based on the combined internal air volume of all rooms.
Measured air permeability assumptions
The air-tightness of the building can be tested using the methodology outlined in CIBSE TM23. The result is expressed in m³/m².hr at a specific pressure difference of 50Pa.
When the building air permeability has been measured, Heatpunk will apply a minimum air change rate of 0.5 ACH to all rooms. This minimum air change rate for habitable rooms is taken from Table B.7 of BS EN 12831-1:2017 and will replace the default values from Table 3.8 of the CIBSE Domestic Heating Design Guide (2021). This approach is intended to more accurately represent the actual air permeability of the building as measured. This may result in lower ventilation heat loss figures than using fixed default air change rates. Fixed default air changes rates can lead to a significant over estimation of ventilation heatloss, especially in older buildings.
You can choose to override the minimum air change rate of 0.5 ACH. Increasing the ACH for a room will only affect its ventilation loss if the ACH yields a larger loss than the loss computed using the measured air permeability.
By using Heatpunk, you are acknowledging and accepting this methodology.
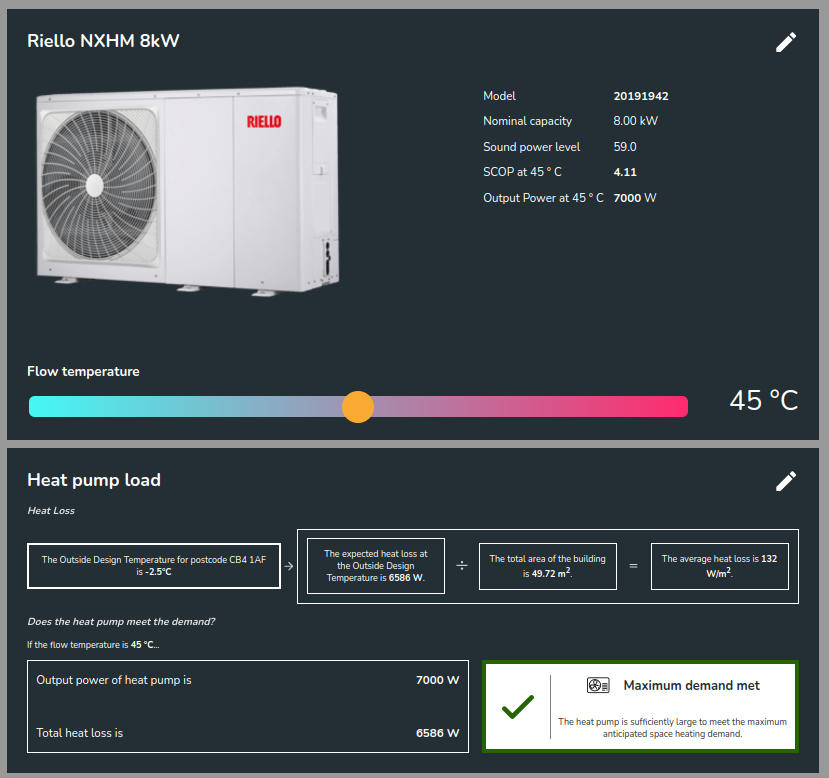
Heat Pump Load
In the Heat Pump task you can see the results of the heat loss calculation as well as information on the heat pump you have chosen. You can alter the flow temperature and see the impact of this on SCOP and output power. This is also given for each heat emitter as shown in the example below.
Hot Water Storage
Heatpunk helps you specify a hot water storage solution that's compatible with selected heat pump and sized based on property details. Once selected, you can view specs, domestic hot water (DHW) calculations and Legionella calculations. You can fine tune these calculations for the specific requirements of the installation and share these details with customer in the technical report and customer proposal.
Adding hot water storage to a project
Hot water storage is selected in the Heat Pump task. When you first enter the Heat Pump task, after selecting a heat pump you will be shown a list of recommended options.
If you initially did not include hot water storage in the project, navigate to the Heat Pump task, on the left below the 'Heat Pump Load' section you will see the 'Hot Water Storage' section. Click the pencil icon to add hot water storage.

Selecting a hot water storage option
When selecting hot water storage, you can select from the recommendations or scroll through the options on the left to pick from the pre-plumbed, standard, pre-plumbed slimline, slimline and horizontal cylinder options. Cylinders that are incompatible with the selected heat pump say 'incompatible with selected heat pump' in red text.
When you have an option selected, to the top right, you will see spec information and bottom right Midsummer stock information. If your account is connected to Midsummer, you will also see your specific pricing.
Hot water storage recommendations
Recommendations are based on compatibility with the heat pump and are sized according to the number of bedrooms and occupants. Adjust the number of bedrooms/occupants and click Recommend to get updated recommendations.

How is the recommended volume calculated?
This is calculated using the MCS method for DHW demand:
Recommended volume = 45 * N
where N is the greater of:
- The number of rooms + 1
- The number of known occupants
Editing hot water storage in a project
You will also have the following options to the top right of the Hot Water Storage section:
|
|
Pencil: Edit selection |
|
|
Cog: Edit hot water storage settings |
|
|
Bin: Remove hot water storage |


System details and DHW calculations
Once you've selected a hot water storage option, you can see the option in the Hot Water Storage section of the Heat Pump task. Here you will see all the specifications and the following calculations:
- Cylinder re-heat time (min)
- DHW energy demand (kWh/year)
- Vdraw/Mix down volume (ℓ)
- Legionella Purge Demand (kWh/year)
These details are then given in the 'Hot Water Calculations' page of the Technical report and Customer proposal for you to share with the customer.
How is DHW energy demand calculated?
DHW energy demand is calculated using the storage temperature, supply temperature, number of occupants and the water needed per person.
First the volume of water needed per year is calculated with the following calculation:
Volume per year = number of occupants * the water needed per person * 365
Noting that for water, volume (L) = mass (kg). Then using the specific heat capacity of water (kJ/kg°C), this is converted to kWh/year:
DHW energy demand = 4.2 * (1/3600) * mass per year * (storage temperature - supply temperature)
Adjusting DHW and Legionella calculations
These calculations can be fine tuned by editing the hot water storage settings. Clicking the cog icon will give you the following options to edit:
- DHW Storage Temperature (°C)
- Difference between flow temperature while providing hot water and storage temperature (°C)
- Flow Temperature while providing hot water (°C) (This is calculated based on the two previous inputs)
- Draw Water Temperature (°C)
- Supply Water Temperature (°C)
- Pipework Efficiency (%)
- Water used per person per day (ℓ)
Under 'Legionella', you then have the following options:
- Legionella purge required (Yes/No)
- Legionella purge frequency (Weekly/Daily)
- Legionella heat source (Immersion/Heat pump)
- Legionella purge temperature (°C)
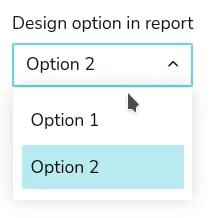
Design Options
You can add multiple design options to your project allowing you to review a range of solutions. Use the drop down in the top right to choose which option you wish to produce a report for. With this tool you can easily produce several proposals for your customer to review before choosing their preferred option.

Performance Task (UK)
The Performance Task in Heatpunk was updated on 17 March 2025 to be compliant with the new version MCS calculation methods outlined in the updated MCS 031: Heat Pump Pre-sale information and performance calculation standards.
Full details of the MCS standard can be found here: mcscertified.com/an-update-to-mcs-031-the-heat-pump-pre-sale-information-and-performance-calculation.
Compliance with this update is mandatory from 18 March 2025.
How this update affects existing projects
Any existing Heatpunk projects with completed MCS performance estimates prior to this date will remain unchanged within Heatpunk, with the option to switch to the new version: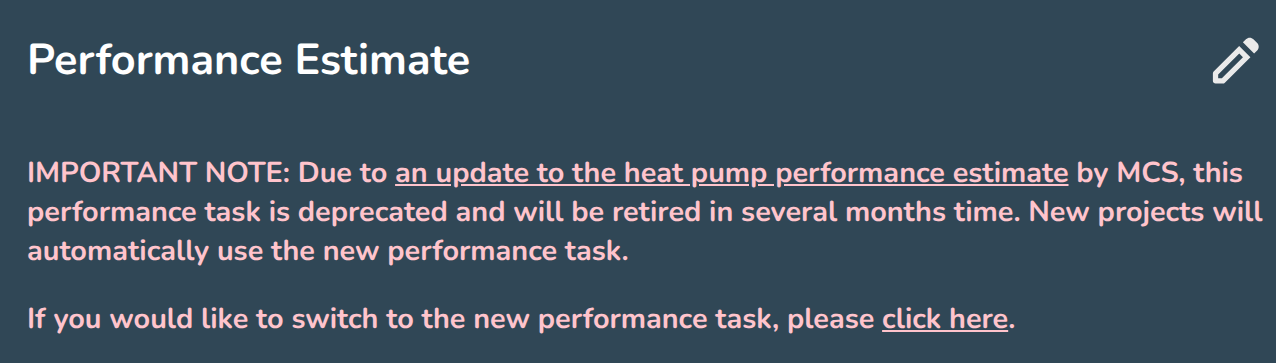
It's recommended that completed project reports are downloaded as PDFs and copies are kept for your records.
How the new task works:
Enter the performance task in your project:
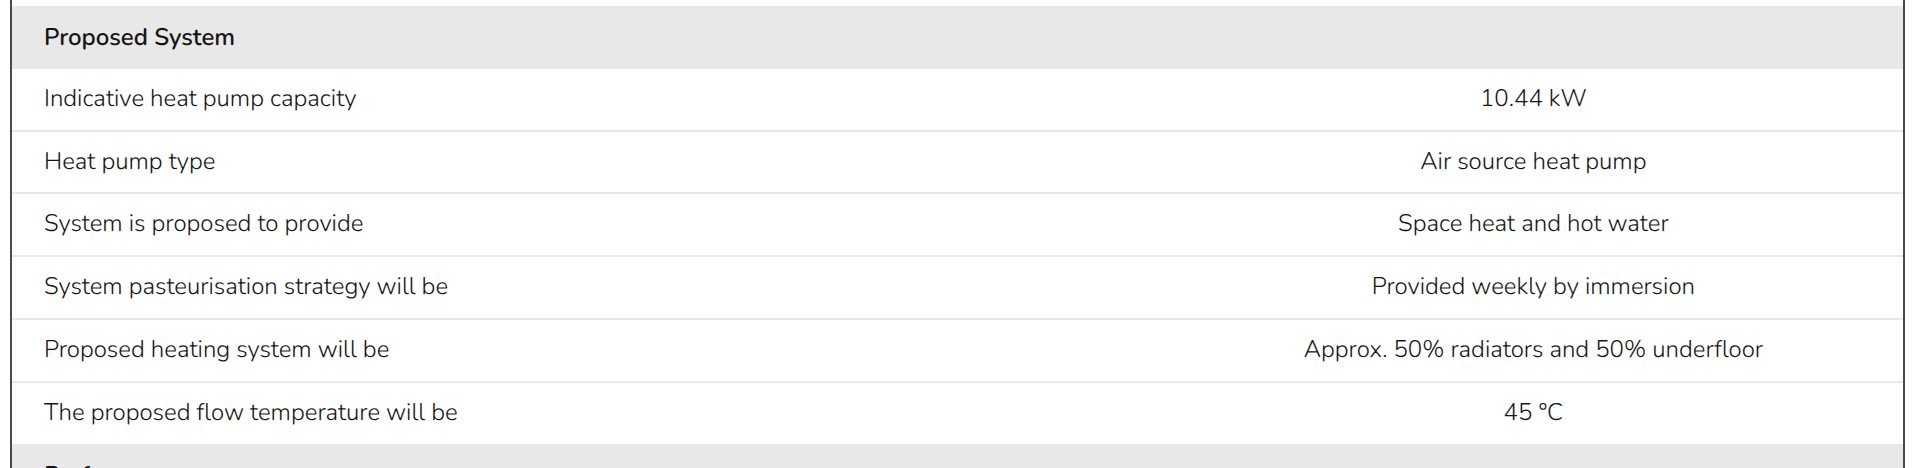
Step 1 - Proposed system:
- Set the purpose of the system: Heatpunk will set the default based on your project settings. If you have added a DHW cylinder then it will assume "space heating and hot water" but this can be overridden if the estimate is being performed prior to the full design being completed.
- Set the Emitter type(s): Again Heatpunk will default based on the emitters added to your design but if you are completing the performance calculation prior to the full design you can adjust this as needed:

- If UFH is selected you will then need to select a type:

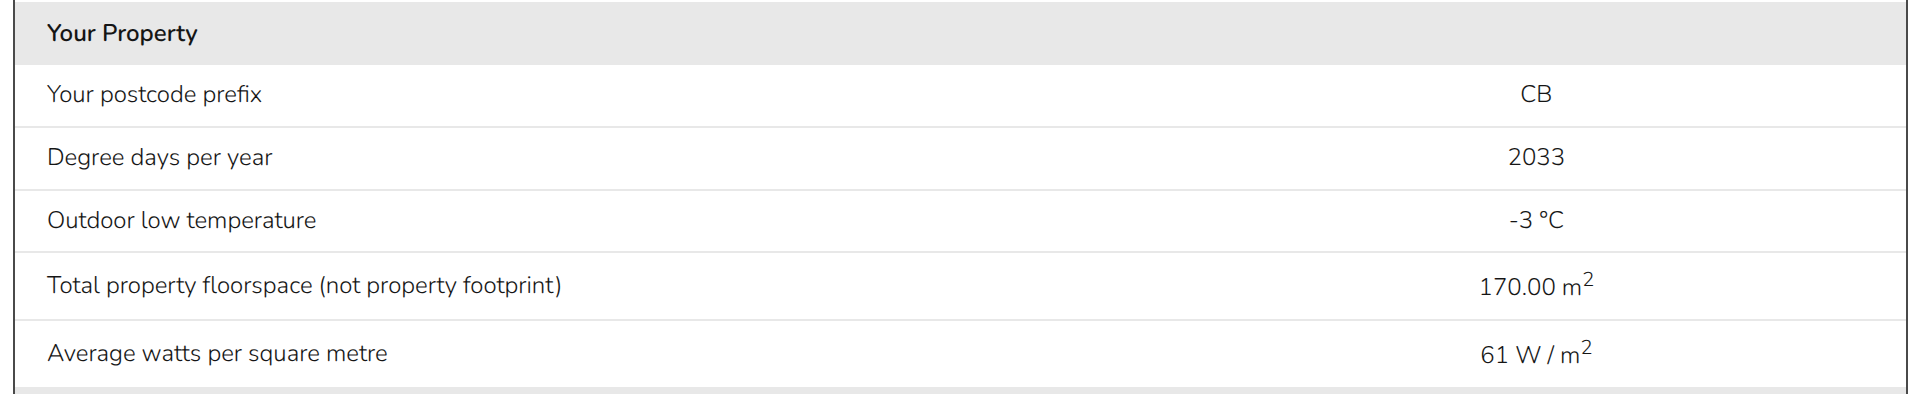
Step 2 - Property Details:
For MCS compliance this step needs to be completed using EPC data
Fill out the energy demand for space heating, hot water and total property floor-space from a valid EPC:
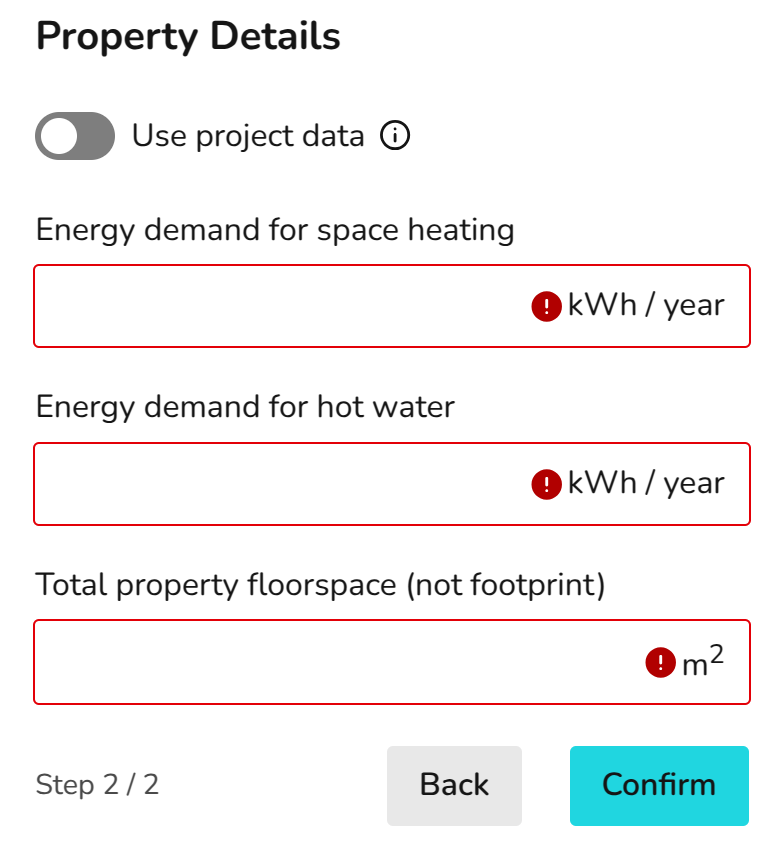
You may choose to switch to project data, doing this will populate the fields from Heatpunk, with a degree day calculation used to give the kWh "energy demand for space heating" figure, and the "energy demand for hot water" coming from the DHW storage selection. To comply with MCS, users must use EPC data to complete the performance calculation. You may then provide a subsequent performance estimate using project data, but you must explain the difference between the two estimates to the customer.
Step 3 - MCS Performance Results:
Heatpunk will do the rest! 
The MCS performance estimate uses 'Outdoor Low Temperature' from the CIBSE guide A 99.6th percentile. This may vary from the project ODT if it has been left on the default 99th percentile temperature. The average watts per square metre is calculated based on the kWh data provided (as per MCS 031) and so when using EPC data this will likely vary from the "project data" values calculated by Heatpunk.
The calculated watts per square metre is then used to give an indicative heat pump capacity, which again may be different than the from your Heatpunk project when using EPC data. If the full heat loss calcs have been done with Heatpunk and the project data has been used to give the estimate, then this value should be closer to the output power of the heat pump being used.
"System pasteurisation strategy" is pulled directly from the DHW storage settings in the heat pump task, and so can be adjust there. This also applies to the proposed flow temperature, with it being pulled from the flow temp slider in the same task.
Rather than using SCOPs as per the previous MCS performance calculation, the new version uses SPF (seasonal performance factor) which is pulled from Table 2: Heat emitter guide of MCS 031 depending on the property specific heat loss (W/m2) and the flow temperature.
This SPF will then be used give an estimate of electricity consumption for space heating. A set performance factor of 1.7 is used for water heating, and the method for system pasteurisation is detailed in MCS 031. The combined estimate of electricity consumption is then converted into a high and low estimate of +/- 10%.
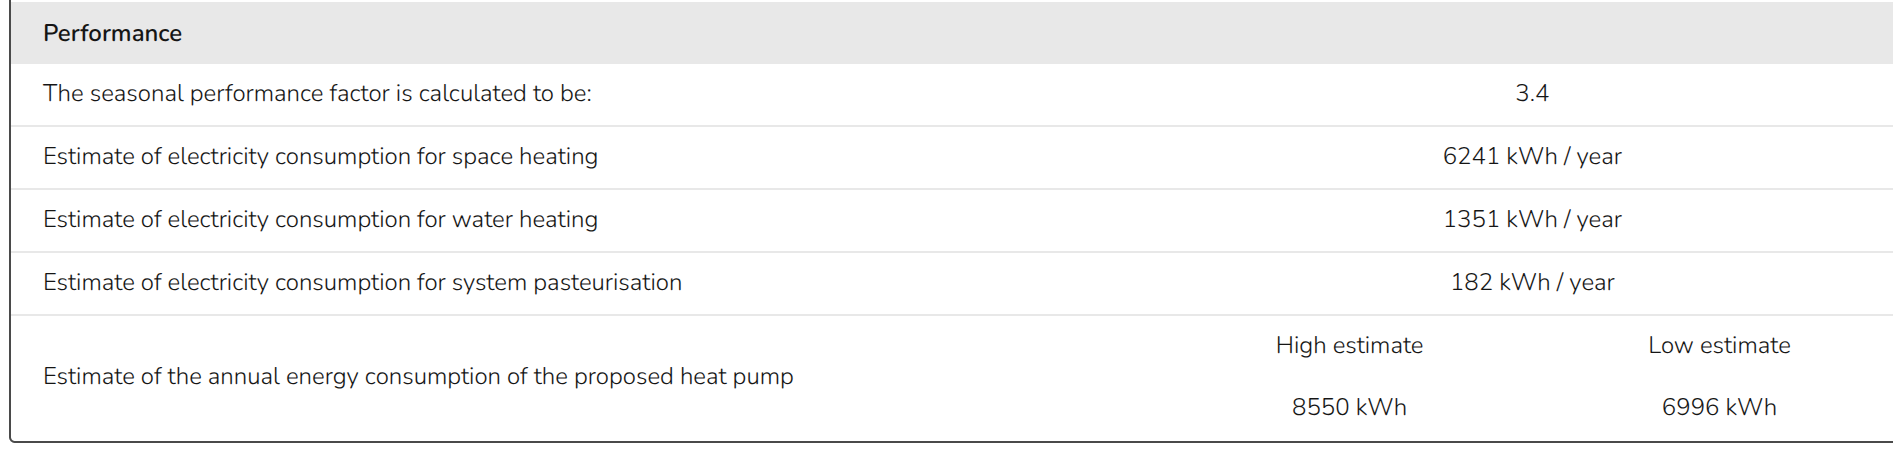
The results of this calculation will be given in the "MCS 031 Performance Calculation" report when using EPC data, as well as the technical report and customer proposal. If the task has been completed using project data, it will not generate the separate MCS 031 report but it will give a performance estimate in the technical report and customer proposal.
Notes
The full table (Table 2: heat emitter guide) is given on page 16 of MCS 031 standard (https://mcscertified.com/wp-content/uploads/2025/01/MCS-031-Heat-Pump-Pre-Sale-Information-and-Calculations-Issue-4.0.pdf).
On the right hand side of the performance task we will display any relevant notes about the system:
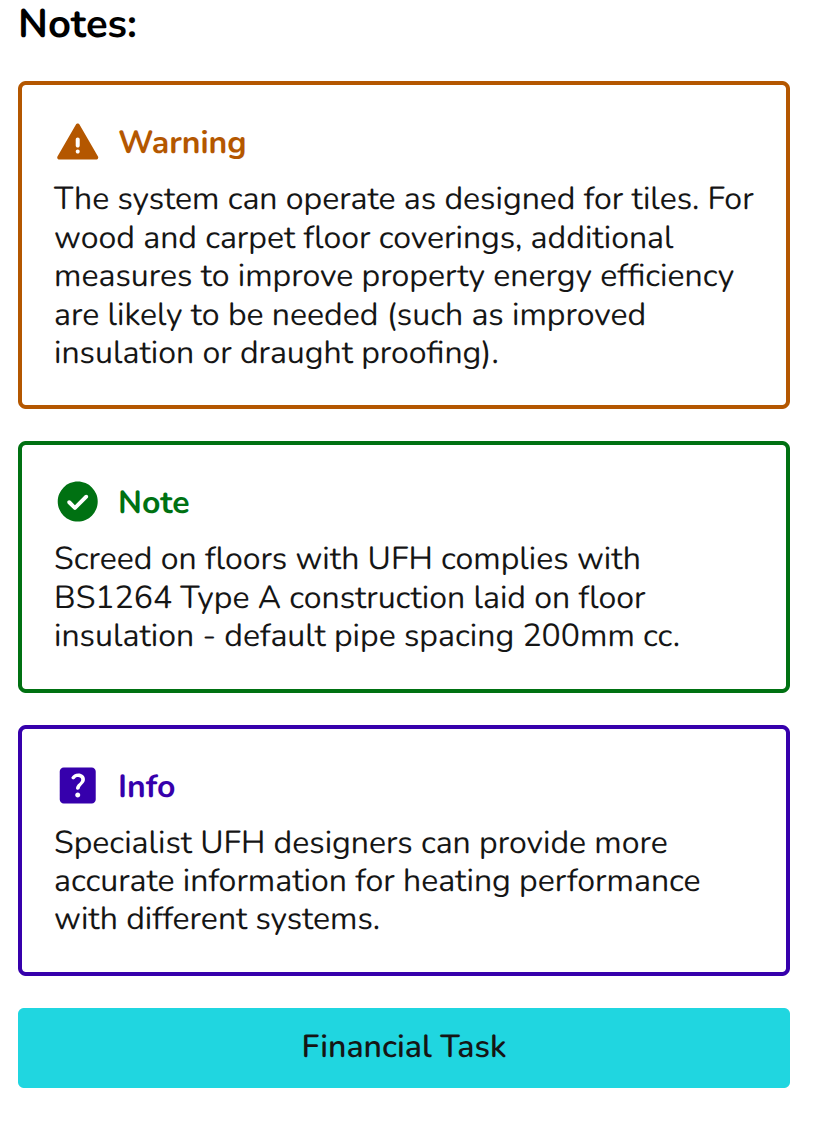
You may need to adjust the proposed flow temp, heat emitters used, or the lower the watts per square metre heat loss (improve building fabric) in order to generate a viable proposal.
Consumption task
The Consumption Task gives you a complete picture of how a customer’s energy use and running costs will change when switching to a heat pump – including optional modelling for solar PV and batteries. This will help you build trust, handle cost‑related questions with confidence, and present proposals that feel complete, transparent and genuinely helpful.
- Benchmark heat pump costs and savings against other energy sources
- Model how different tariffs affect costs and savings
- Include benefits when paired with solar PV and battery storage
- Forecast the long‑term costs and benefits
- Present clear, data‑driven projections that build confidence in your proposals.
Getting started with the Consumption task
You can access the consumption task via the 'Tasks' drop-down menu or from the task list to the left on the project overview page.
When the Consumption Task opens, a popup will appear. Here, you can configure the settings for calculating the new and old system's consumption. You also have the option to factor in any benefits from solar and a battery.

Navigating the Consumption task
Once you have completed the consumption task inputs, you can then view the insights on the left. In the top right you will also have the following options:
|
|
Edit inputs Update the electricity, hot water and space heating consumption, energy comparison and solar information |
|
|
Help Access this help page directly. |


The right-hand sidebar includes options to help you navigate through the different sections of insights.
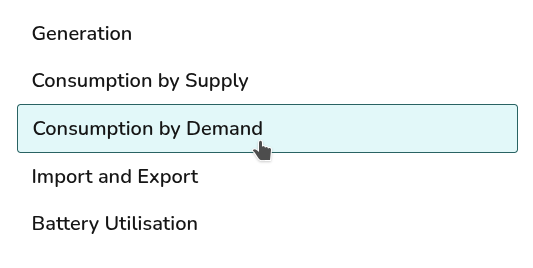
Where solar has not been included Consumption by Supply and Import and Export tabs will not display. Where a battery has not been included, Battery Utilisation will not display.
Consumption task inputs
Energy comparison
Select what you would like to compare the cost and energy usage of the heat pump against for space heating and hot water. You can also select whether you'd like to factor in a solar PV array and a battery.
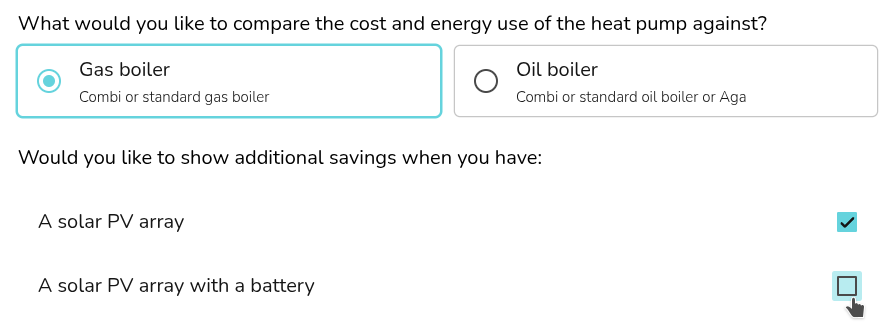
Details for the existing gas boiler and solar system are input in later sections.
UK users can select here whether you'd like to use the SCOP (based on the heat pump and flow temperature selected in the heat pump task) or the SPF (based on MCS 031 and calculated in the the performance task). For IE users, Heatpunk will use the SCoP.

In this section you can also edit your design option:
Electricity consumption
Annual electricity consumption
You can select from the following options to set the annual consumption:

Expand the sections below for more details on these options.
Annual usage
If you know the annual consumption in kWh (for example from an electricity bill) you can enter it here in the annual usage field.
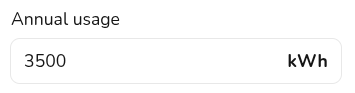
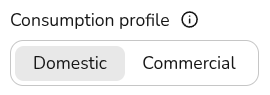
When you use this option you can choose from a variety of domestic and commercial consumption profiles, the consumption profile determines how the energy is used within a week and throughout the year.
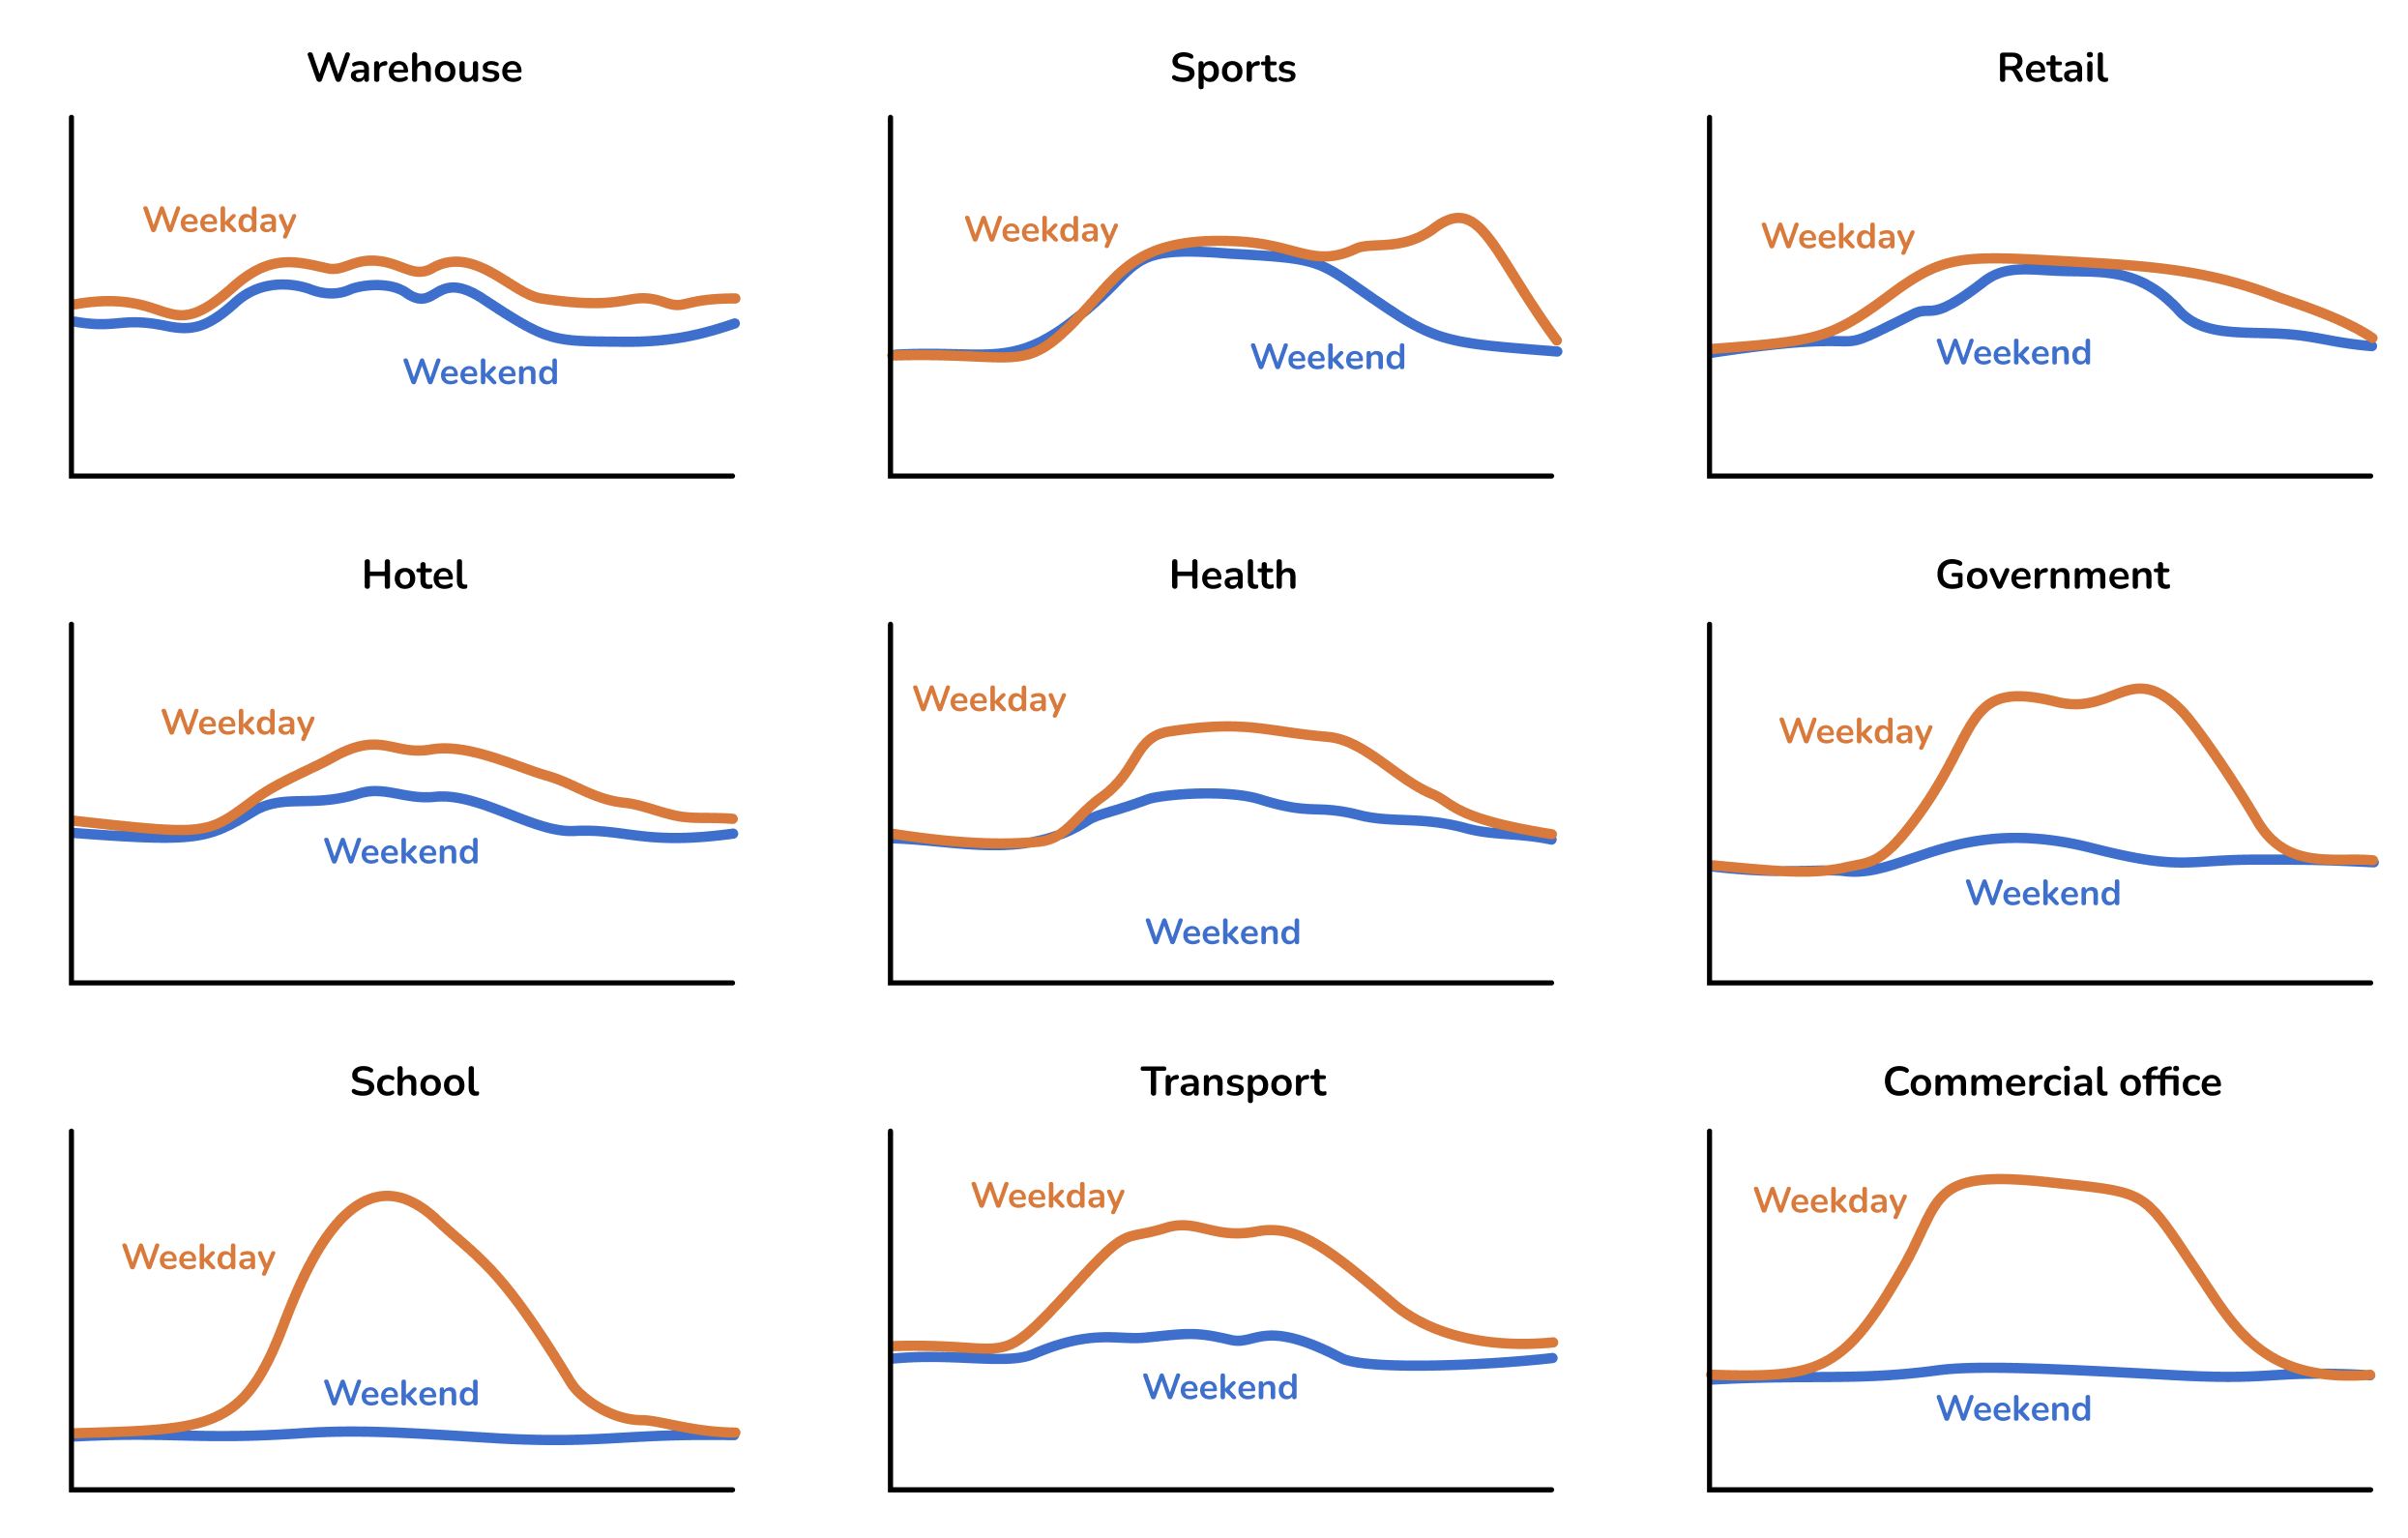
The following commercial profiles are available
Meter data
If the property has a smart meter you can upload half-hourly data to get a more accurate projections. The data should ideally span at least a year (but if it contains a minimum of 6 months our algorithm will automatically attempt to fill in gaps where they are detected).
The file must have a .csv file extension. If your data is in another format you can export it as csv from Excel, Google Sheets, Libreoffice or any other spreadsheet editor.
Note that there are many different CSV formats for smart meter data, and we don't support all of them yet. If your upload doesn't work, please send us the spreadsheet at help@easy-pv.co.uk or help@easy-pv.ie and we will see if we can add the format. You can also download our sample spreadsheet here and change your data into this format.
Not sure
If you don't know the electricity consumption in the property and it's domestic, you can use a typical values for the size of property provided here.

These options will assume a domestic consumption profile.
Tariffs
Here you should select the tariffs used. You can select from the drop down or you can create and select a new tariff by selecting + New import/export tariff. Read more about creating tariffs here.
Space heating
Choose the annual space heating demand using Heatpunk's heat loss model or by entering a custom value.

This, along with the relative efficiencies of the systems, will be used to estimate the annual electricity or gas consumption required for this level of heating.
Hot water use
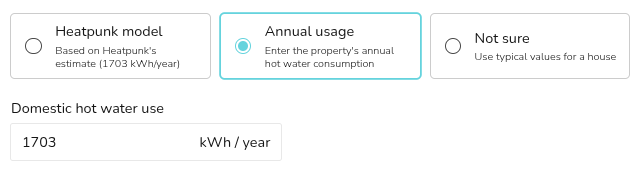
Choose between the Heatpunk model, inputting a custom value or selecting from typical values based on house size.
Boiler
In this section you are specifying important details about the existing system to help estimate the current running costs and potential savings. What displays here depends on what option you are comparing with.
- Gas tariff / Oil price: this will be used to estimate the customers current boiler running costs to be compared with the heat pump running costs.
- Boiler efficiency: this will be used to estimate how much gas/oil is needed to meet the space heating and hot water demand.
- Standing charge (optional, if comparing with gas boiler): this will be added as an additional saving if the customer will be able to disconnect from gas.
Solar
Here you can model a solar array and battery. Select these options under the Energy Comparisons tab if you would like to include them in the model.
For each roof, input the pitch, orientation, array size and level of shading. Add new solar arrays as necessary.
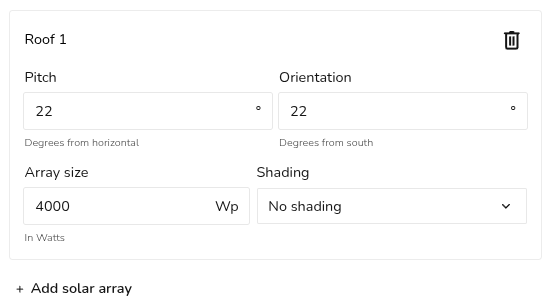
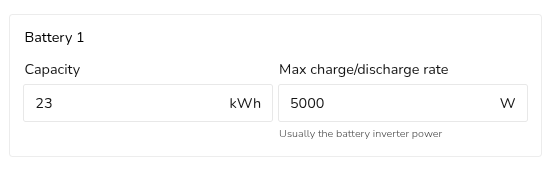
If a battery is being included, add the capacity and charge rate.
This will then be used to estimate the performance using the method stipulated in MCS 032. If you're using Easy PV - see where you can find these values here.
Editing and creating tariffs
Creating a new tariff
1. Set the name of tariff
This name will appear in the quote wording.
2. Set the scope of tariff
Set when you want to be able to use this tariff - just this project, in all projects or accessible to all team members if you're in a pro team.
Once the scope of the tariff has been set, this cannot be edited.
What is the scope of tariff for?
 |
Project level
|
 |
User level
|
 |
Team level
|
3. Input the price bands
Flat tariff: Input a value for the base rate and select save.
Variable tariff: Input each different tariff rate. The first band you enter will be used as the base rate - any time period that doesn't have a price band applied will be priced at this rate.
If you're using £, ensure you're putting this in in p. This value should be greater than 1 (so 15, not 0.15).
4. Set tariff periods (if using variable tariff)
In the tariffs period section you will be able to select the different price bands and indicate when they apply. For some tariffs different rates might apply at the weekend, you can select the days for which the tariff period applies.
Editing existing tariffs
You can view and edit your tariffs from within the consumption task in your projects. Click Edit tariffs on the right side-bar and then Manage tariffs. Then you will see the following options:
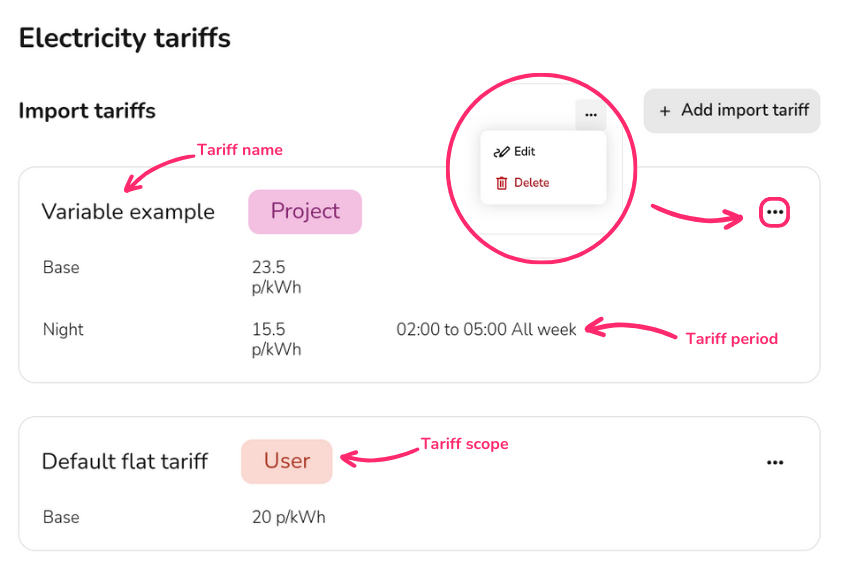
When editing tariffs you can change any of the details, except the tariff scope, but note that any changes you make will affect previous projects that use these tariffs.