Heatpunk App
These guides walk users through how to use the Heatpunk App - from connecting your device and creating your first survey, through to uploading this survey to your Heatpunk Pro account. Available now on the App Store.
- 1. Getting started & connecting your device
- 2. Starting a new survey
- 3. Scanning & measuring rooms (LiDAR & AR)
- 4. Completing room details, radiators & photos
- 5. Editing the floor plan & aligning floors
- 6. Drawing floor & ceiling regions, rooflights & dormers
- 7. Survey questions & photo markups
- 8. Confirming house materials (Fabric)
- 9. Checking & sending your survey to Heatpunk
- 10. Managing surveys, troubleshooting & FAQs
1. Getting started & connecting your device
To survey properties on site using the Heatpunk App, you first need to install it and link it to your Heatpunk Pro account. You only need to do this once per device.
What you need
- A Heatpunk Pro account: The app can only connect and send surveys to a Heatpunk Pro account
- An iPhone or iPad: Running iOS 26 or later. (Note: LiDAR Scan requires an iPhone 12 Pro or newer Pro model, or an iPad Pro. All other compatible iPhones can use AR Measure)
- A device passcode: Required so the app can securely store your account key
- A computer: To log into the Heatpunk web portal and generate your connection QR code
- Internet connection: Required only to connect the app and upload completed surveys. You can carry out full surveys completely offline
Note: You can connect up to 2 devices to a single Heatpunk account.
1. Download the app & allow permissions
-
Open the App Store on your iPhone or iPad, search for Heatpunk, and tap
Get. - Open the app and tap
Allowwhen prompted for Camera access (required to scan rooms and read your QR code). - When prompted later during surveys, allow Microphone and Speech Recognition (to dictate room notes — recordings stay locally on your phone) and Photos (to save floor plan images).
2. Generate your QR code on a computer
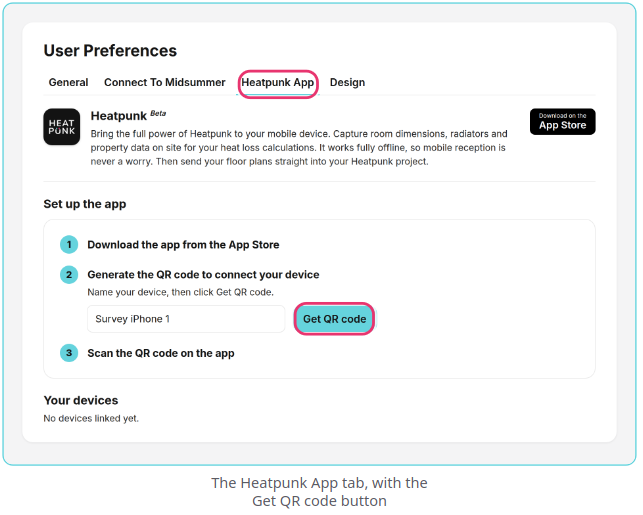
- Log in to heatpunk.co.uk on a computer and go to
My Account>Preferences>Heatpunk App. - Under Set up the app, enter a name for your device (e.g., Survey iPhone 1), click
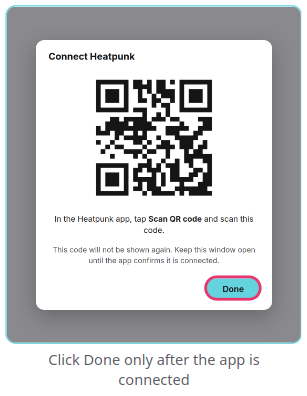
Get QR code, and clickOK. - Keep the Connect Heatpunk QR code window open on your screen.
Warning: Your QR code is displayed only once. Do not share it, as anyone who scans it can view and edit your projects.
3. Scan the code to connect
- On the app's Connect to Heatpunk screen, tap the round blue
QRbutton at the bottom right. - Point your camera at the QR code on your computer screen.
- Once verified, the app will automatically open the Home screen. You can now click
Doneon your computer.
Expand the sections below for information on issues related to connecting your device
Already have 2 devices connected?
If the website says "You can add up to 2 devices," go to Your devices on the website and click Remove next to a device you no longer use. That device will no longer be able to send surveys until you reconnect it with a new QR code.
What if the app shows a red error message when connecting?
- "That QR code isn't a Heatpunk key.": You scanned a different QR code—point the camera at the code under
My Account>Preferences>Heatpunk Appon the website - "Heatpunk did not accept this key.": The code was removed or already used—generate a new QR code on the website and scan it
- "Connecting needs a connection.": Your device has no signal—try again once you have mobile signal or Wi-Fi
- "Set a passcode on this iPhone to connect.": Add a device passcode in your iPhone's
Settings, then generate and scan a new QR code - "Camera access is off.": Turn on camera access in your device's
Settings>Heatpunk, then try again
Navigating the Home screen & Settings
-
Tabs: Switch between
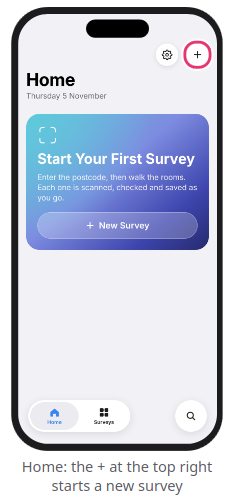
Home,Surveys, andSearchat the bottom of the screen (or via the sidebar on iPad) - Start a survey: Tap
+at the top right to begin a new survey - Settings: Tap the
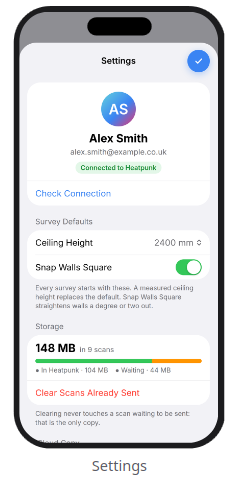
gearicon at the top right to check your connection status, set your default Ceiling Height (2400 mm default), toggleSnap Walls Square, manage iCloud Copy backups, or tapClear Scans Already Sentto free up phone storage
Not backed up to iCloud? If your Home screen shows Not Backed Up to iCloud, your surveys are stored only on your phone. Tap the card to open your iCloud Copy settings.
Still Need Help?
Contact Support: If you've got further questions, get in touch with our support team at help@heatpunk.co.uk (UK) or help@heatpunk.ie (IE). If you are experiencing a bug, to help us look into your issue faster, please include the email address of your account, the name of the project and screenshots of any unexpected behaviour.
2. Starting a new survey
Before scanning rooms, set up the property details, measurement method, and ventilation settings.
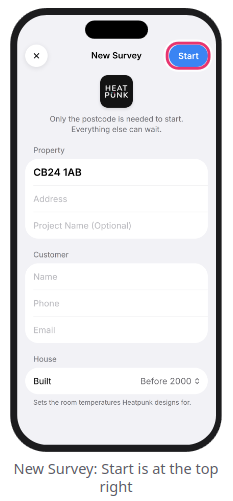
1. Create the survey
- From the Home screen, tap
+(or+ New Survey). - Enter the full UK postcode (e.g.,
CB24 1AB). This is the only mandatory field to begin. - Optionally enter the Address, Project Name (defaults to the postcode if left blank), Customer contact details, and the House Built era (
Before 2000,2000-2006, orAfter 2006). - Tap
Startat the top right.
2. Choose your measurement method
You choose one measurement method for the entire survey, then tap the blue arrow at the bottom right to continue.
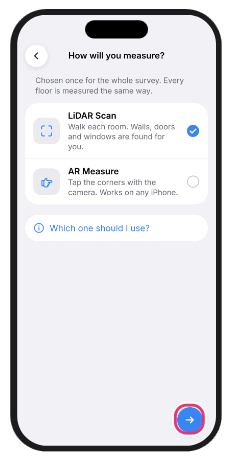
Expand the sections below for information on which measurement mode to choose
LiDAR Scan (iPhone Pro & iPad Pro)
- Compatible devices: iPhone 12 Pro or later Pro models, and iPad Pro
- How it works: Walk slowly around each room (~1 minute per room); walls, doors, windows, and a 3D model are detected automatically
- Best for: Most rooms that are quick, furnished, and have ordinary shapes
- Watch out for: Mirrors, large expanses of glass, and very dark rooms
AR Measure (Any compatible iPhone)
- Compatible devices: Any compatible iPhone
- How it works: Aim the screen ring at and tap each floor corner, ceiling height, door, window, and radiator (2–3 minutes per room)
- Best for: Lofts, awkward shapes, rooms a LiDAR scan gets wrong, and phones without LiDAR
- Watch out for: Plain shiny floors and dim lighting
3. Pick your starting floor
- Select the floor you want to survey first (
Ground flooris selected by default, though you can scan floors in any order). - Skip
Atticunless it is a converted habitable space, and only selectBasementif it is heated. - Once the green Sensor ready (or Camera ready) indicator appears, tap
Start.
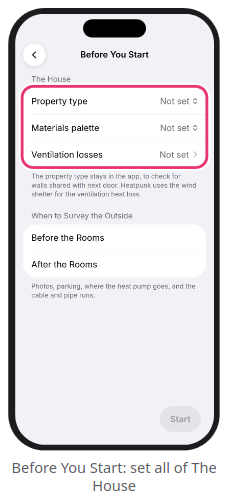
4. Complete Before You Start
Configure these four settings before the camera opens:
- Property type: Tap
Property typeand pickDetached,Semi-detached,End of terrace,Mid-terrace, orFlat(used locally to prompt you for shared party walls). - Materials palette: Tap
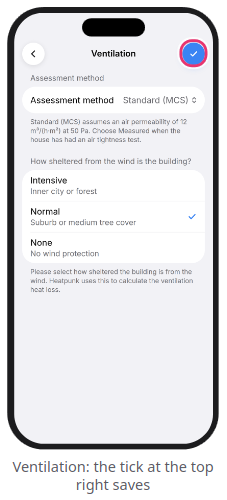
Materials paletteand select one of your Heatpunk account palettes orBlank palette (standard materials). - Ventilation losses: Tap
Ventilation losses, chooseStandard (MCS)(12 m³/(h·m²) at 50 Pa) orMeasured Air Permeability(if an air tightness test was performed), select the wind shelter (Intensive,Normal, orNone), and tap theblue tick. - When to Survey the Outside: Choose
Before the Roomsto answer external survey questions first (Property Details, Access, Heat Pump Location, Wiring, and Pipe runs), orAfter the Roomsto jump straight into scanning. - Tap
Start(orStart Scanningif you completed outside questions first) to begin.
Warning: If the app warns that your phone has less than 1 GB of free space, clear some storage before scanning or you risk losing what you record.
Still Need Help?
Contact Support: If you've got further questions, get in touch with our support team at help@heatpunk.co.uk (UK) or help@heatpunk.ie (IE). If you are experiencing a bug, to help us look into your issue faster, please include the email address of your account, the name of the project and screenshots of any unexpected behaviour.
3. Scanning & measuring rooms (LiDAR & AR)
Each room is measured one at a time and automatically joins onto your floor plan.
Tips for a clean scan
-
Close internal doors and turn on lights: Open doors can cause LiDAR to merge two rooms into one
- Ignore furniture: Sofas, tables, and kitchen units are automatically filtered out—only walls, doors, windows, and radiators are sent to Heatpunk
- Keep the phone held up between rooms: Moving with the camera upright helps the app track your position so the next room snaps neatly beside the previous one
Method A: Scanning with LiDAR
-
Stand close to a wall, point the phone at it, and tap the
round blue buttonat the bottom. - Walk slowly around the perimeter (roughly one step per second), sweeping the camera from floor to ceiling across every wall, door, and window.
- Mark radiators (optional): Tap directly on any radiator on your screen while scanning to place a marker on the nearest wall.
- Once you have scanned all walls (and at least 3 walls are detected), tap the
round blue buttonagain to finish and open the Room Steps.
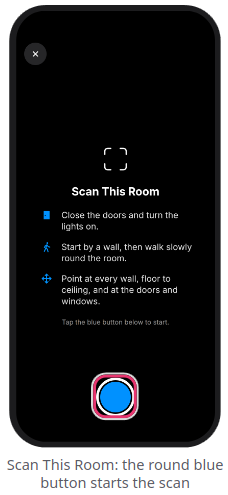
Warning: Tapping X at the top left immediately ends the current scan without asking for confirmation, and the room you are scanning will not be saved.
Method B: Measuring with AR Measure
-
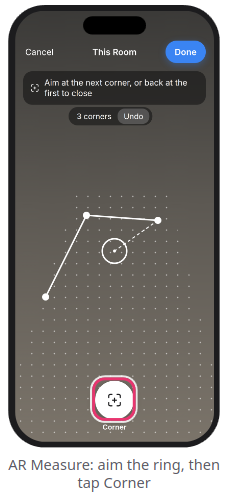
Move your phone slowly over the floor until the dotted grid appears.
- Aim the centre ring at a floor corner and tap
Corner. Repeat around the room, then aim back at the first corner and tapCorneragain to close the room. - Set Ceiling Height: Switch to the
Heighttab, aim where a wall meets the ceiling above a corner, and tapSet(or tapSame as last room). - Add Doors, Windows & Radiators: Use the
Door,Window, andRadiatortabs at the bottom to aim and tap opposite corners or edges for each opening or radiator. - Tap
Doneat the top right (useUndoat the top if you misplace a point).
Moving between rooms & troubleshooting
- Next room or floor: After completing a room's steps, tap
Next Roomto keep scanning, or tapMore>Next Floorwhen a floor is finished - Rescan or add a missed room: Tap
...>Rescan Roomor...>Add a Missed Room
Expand the sections below for information on issues while scanning
What if the phone loses its place during a scan?
A phone call, screen lock, or switching to another app can cause the phone to lose track of its position. Your previously completed rooms remain saved, though the room you were actively scanning must be measured again.
- Find your place: The screen displays a photo of where your last scan finished. Walk back there and point the camera at the walls of a room you already scanned until the phone buzzes and
Scan This Roomreappears. - Or tap
Place by Hand: If the phone cannot re-lock onto a previous room, tapPlace by Handat the bottom and scan the room as normal. - Drag the room into place: After scanning, the floor plan opens so you can drag the room into position (it snaps automatically to surrounding walls). Use
Turnto rotate it, orLine Up Doorto align a shared doorway, then tapPlaceat the top right.
Common messages while scanning or measuring
LiDAR Scan messages:
- "Your phone is hot. Give it a minute to cool down.": Stop between rooms for a minute to let the device cool down, then carry on
- "The phone is low on memory. Finish this room soon.": Stop the current scan soon so the room saves properly
- "This room is taking a while.": Stop here and scan the remainder of the space as a separate room
- "That scan is of a room already on this floor.": Walk into the next unmeasured room before starting the scan
- "The scan stopped." / "The phone lost its place." / "This scan got too big.": Your previously completed rooms are saved—scan the current room again
AR Measure messages:
- "Move your phone slowly over the floor": The app has not detected the floor plane yet—keep moving the camera slowly
- "Get closer / Aim at the floor": Move nearer to the corner and angle the camera lower
- "More light, or aim at something with a pattern": Turn on more lights—plain, shiny floors are difficult for the camera to track
- "That wall would cross another": The corner was placed in the wrong spot—tap
Undoand try again - "Point back at the last corner you placed": The phone lost tracking—aim back at the previous corner to re-lock
Still Need Help?
Contact Support: If you've got further questions, get in touch with our support team at help@heatpunk.co.uk (UK) or help@heatpunk.ie (IE). If you are experiencing a bug, to help us look into your issue faster, please include the email address of your account, the name of the project and screenshots of any unexpected behaviour.
4. Completing room details, radiators & photos
Immediately after scanning a room, a 5-step card workflow opens at the bottom of the screen (or in the right-hand panel on iPad).
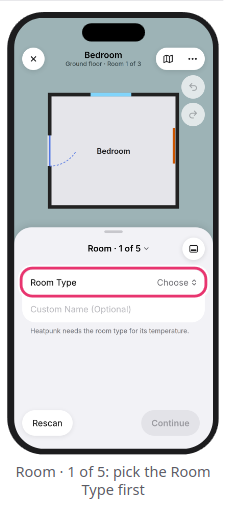
Room type, name & shape (Step 1 of 5)
-
Room Type & Name: Tap
Room Typeand select the room's function (Heatpunk uses this to set design room temperatures; selectUnheatedif the room has no heating). Optionally add aCustom Name(e.g., Front Bedroom), then tapContinue. - Check the Shape: Compare the room outline against the real room.
- Drag corner dots to adjust angles or wall dots to move walls, or tap a wall to type its exact length in mm.
- Tap
Looks Rightto continue.
Radiators (Step 2 of 5)
Every radiator must have a measured size before you send the survey to Heatpunk.
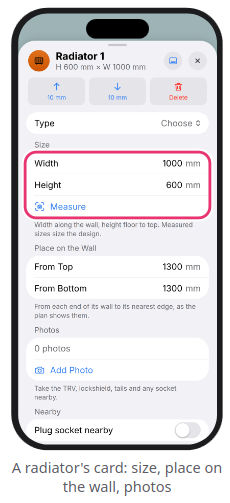
- Tap
+ Add Radiator(or tap a radiator you marked during the LiDAR scan). -
Choose how to record its dimensions:
-
Tap the Radiator(LiDAR only): Point the camera at the middle of the radiator to auto-measure, then tapUse This Tap Two Corners(LiDAR only): Aim at two opposite corners with the cameraEnter Manually: Select the wall, pick the radiator type, and enter Width and Height in mm
-
- Tap
Add Photoon the radiator row to photograph the TRV, lockshield, pipe tails, and any nearby plug socket. - Tap
Continue(swipe left on a radiator row toDeleteit).
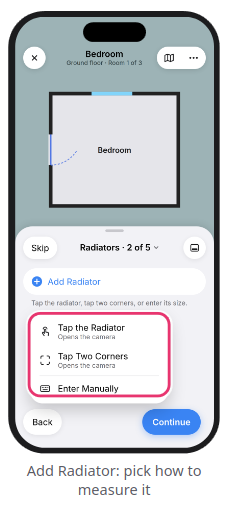
Warning: Every radiator must have a measured size before you send the survey—Heatpunk will leave out any radiator that has no size.
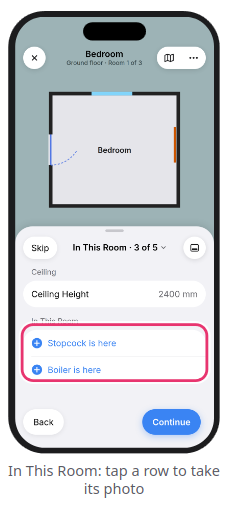
In This Room (Step 3 of 5)
-
Verify the Ceiling Height in mm.
- If applicable, tap
Stopcock is hereorBoiler is hereto take a photo. - If the scan detected a fireplace, specify whether its chimney is open (
No flue,Flue with a throat, orFlue with no throat). - Answer any room-specific prompts (such as vents, hot water cylinder, or consumer unit) by tapping
Here(to take a photo) orNot Here, then tapContinue.
Photos & Notes (Steps 4 & 5 of 5)
-
Photos (4 of 5): Tap
Take Photosto capture general room photos, then tapDone. - Notes (5 of 5): Type notes into the text box, or tap
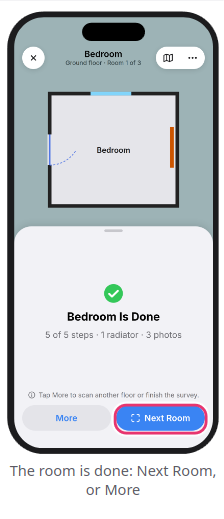
Tap to Dictateto record a voice note. - Tap
Doneto finish the room, then selectNext RoomorMore.
Need to skip a step? You can tap Skip on Steps 2–5 to come back later. Any skipped items are automatically flagged in Before You Leave before you upload the survey.
Still Need Help?
Contact Support: If you've got further questions, get in touch with our support team at help@heatpunk.co.uk (UK) or help@heatpunk.ie (IE). If you are experiencing a bug, to help us look into your issue faster, please include the email address of your account, the name of the project and screenshots of any unexpected behaviour.
5. Editing the floor plan & aligning floors
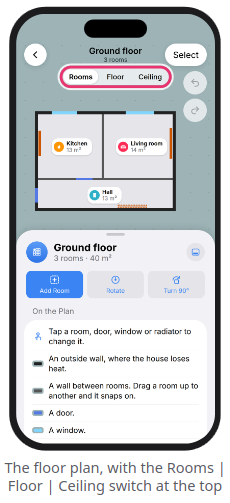
You can view and refine your floor plan at any time by tapping the Plan (map) icon during a room walk, or tapping Open next to Floor Plan on the survey's page.
Understanding floor plan colours
- Thick black wall: External wall (heat loss boundary)
- Thin grey wall: Internal partition wall between two scanned rooms
- Dark blue line: Door
- Light blue line: Window
- Orange edge: Room still needing a Room Type
- Orange bar: Radiator (solid once sized; pale and dashed if unmeasured)
Moving, rotating & squaring up rooms
-
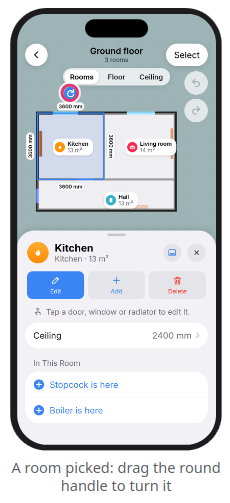
Move a room: Tap a room to select it, then drag inside it—it will snap automatically to neighbouring rooms
- Rotate a room: Drag the round blue handle above a selected room, or tap
Square Upon the room card to straighten walls that are slightly off-square - Move multiple rooms: Tap
Selectat the top right, tap each room you want to group, and drag or rotate them together - Rotate the whole floor: With no room selected, use
RotateorTurn 90°on the bottom card
Editing a room's shape & wall boundaries
-
Select a room and tap
Editto open the Room Editor. - Reshape walls: Drag pink corner squares (fixed angle), pink circles (free angle), or pink wall bars. Drag a small teal dot to add a new corner, or tap any wall length to type an exact measurement in mm.
- Set What's Behind each wall: Tap a wall (or open
Wallsin the card list) and setWhat's BehindtoOutside,Heated,Unheated(e.g., an attached garage),Ground, orNeighbour's Home(essential for semi-detached and terraced party walls). - Tap the
blue tickat the top right to save.
What do the different "What's Behind" wall options mean?
Outside: The wall is an external wall (this is the default for unshared walls)Heated: Another heated space is on the other sideUnheated: An unheated space is on the other side, such as an attached garageGround: Earth is on the other side, such as a basement retaining wallNeighbour's Home: The wall is a party wall shared with an adjoining property—be sure to set this on semi-detached or terraced houses so Heatpunk does not treat it as an external heat-loss wall


Adding or editing doors, windows & radiators
-
Add: Select a room, tap
+ Add, and chooseDoor,Window, orRadiator. Enter the dimensions and wall, then drag it into position - Edit: Select a room, tap the door, window, or radiator on the plan, and use the card to adjust dimensions, toggle
Plug socket nearby(for radiators), or nudge its position in 10 mm increments - Add a missed room: With no room selected, tap
Add Room, choose the room type, and selectScan It(LiDAR),Measure with Taps(AR), orEnter Size(manual rectangle)
Lining up multiple floors
If the property has two or more floors, you must align them before sending the survey.
- Open the floor plan with no room selected and tap
Line Up(or select...>Line Floors Upon the survey page). - Tap
Auto Alignto snap the upper floor over the floor below (shown in blue). - Fine-tune using drag,
Nudge 50 mm, orRotateif needed. - Tap
Alignedat the top right.
Warning: Always tap Aligned rather than Back when you finish aligning floors—tapping Back keeps your position changes but will not mark the floors as aligned for upload.
Still Need Help?
Contact Support: If you've got further questions, get in touch with our support team at help@heatpunk.co.uk (UK) or help@heatpunk.ie (IE). If you are experiencing a bug, to help us look into your issue faster, please include the email address of your account, the name of the project and screenshots of any unexpected behaviour.
6. Drawing floor & ceiling regions, rooflights & dormers
By default, Heatpunk assumes the lowest floor sits on the ground and the highest ceiling is a standard flat roof. You only need to use the Floor and Ceiling layers when part of a property differs—such as a room over an unheated garage, a suspended timber floor, a flat roof extension, or a room in the roof. For more background on how regions work on the web, see the Floor and ceiling regions guide in the Plans task.
Warning: Regions on the same layer must not overlap by more than 0.5 m², or you will not be able to send the survey.
Adding a floor or ceiling region
-
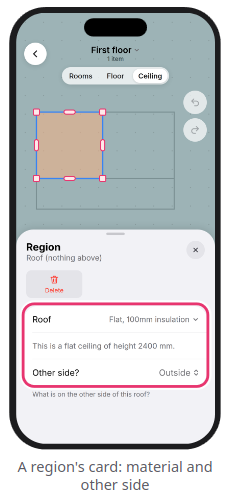
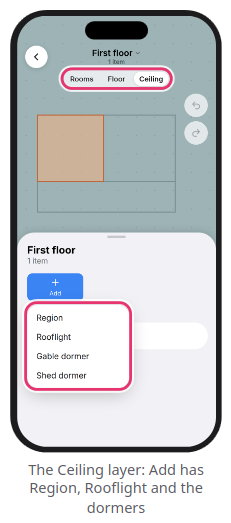
Open the floor plan, select the relevant floor at the top, and toggle the top switch from
RoomstoFloor(between this floor and the floor below) orCeiling(between this floor and the floor above). - Tap
+ Add>Region. - Drag the region and use its corner and edge handles to snap it over the relevant area.
- On the region card, select the Material build-up and set
Other side?(Ground,Outside,Unheated Space, orHeated Space).
Drawing a sloped ceiling (room in the roof)
-
On the
Ceilinglayer, draw aRegioncovering the sloped portion of the ceiling. - Select the region, tap a corner dot, and enter the ceiling height at that corner in mm. Tap the
tickto confirm. - Repeat for the remaining corners—a red arrow will appear on the plan pointing down the slope. (All corner heights must form a single flat plane.)
Adding rooflights and dormers
-
Rooflight: On the top floor's
Ceilinglayer, tap+ Add>Rooflight, drag it onto the roof region, and set its glazing material,Aspect(PlanorRoof), and dimensions in mm - Dormer: First draw the sloped ceiling region, then tap
+ Add>Gable dormerorShed dormer. Drag it wholly inside the sloped ceiling region, enter the roof and wall materials, gutter height (A), and ridge height (B), then tap the dormer window strip to set the window size
Adding a material not in your palette
If a wall, floor, roof, or window build-up is missing from your dropdown list, scroll to the bottom and tap + Add material to search Heatpunk's full material library and add it to the current survey.
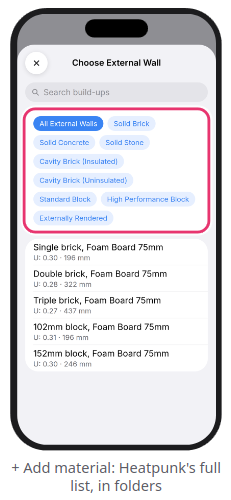
Note: Adding a material via + Add material adds it only to the current survey—it does not change your saved palettes on the Heatpunk website.
Still Need Help?
Contact Support: If you've got further questions, get in touch with our support team at help@heatpunk.co.uk (UK) or help@heatpunk.ie (IE). If you are experiencing a bug, to help us look into your issue faster, please include the email address of your account, the name of the project and screenshots of any unexpected behaviour.
7. Survey questions & photo markups
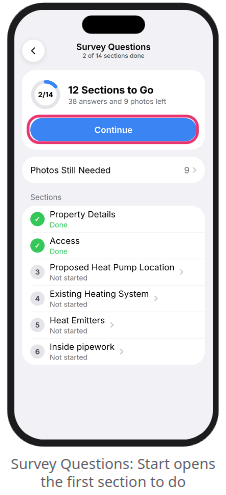
The app includes all 14 standard Heatpunk survey sections. You can complete them on site without signal, and your answers save automatically.
Answering survey questions
- Open the survey's page and tap the
Survey Questionscard (or tap...>Surveyduring a room walk). - Tap
StartorContinueto work through the remaining sections in order, or tap any individual section from the list. - For photo questions, tap
Take Phototo capture a new image, orFrom Projectto reuse a photo you already took during the room walk. - Tap
Photos Still Neededat the top of the Survey Questions screen to view a checklist of any missing photos.
List of the 14 survey sections
-
Property Details (Outside)
-
Access (Outside)
-
Proposed Heat Pump Location (Outside)
-
Existing Heating System
-
Heat Emitters
-
Inside pipework
-
Domestic Hot Water Supply
-
Proposed cylinder location
-
Energy Use
-
Electrical System
-
Wiring route (Outside)
-
Pipe runs (Outside)
-
Vents (optional)
-
Additional information
Marking up photos & drawing pipework
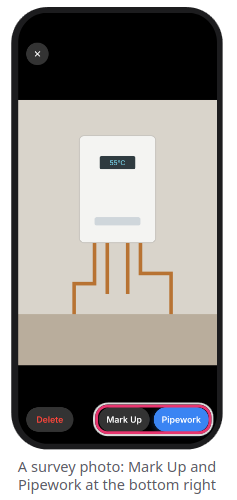
You can annotate photos to clearly show installers where equipment, pipe runs, and cables will go.
- Tap any photo to open it full-screen.
- General annotations: Tap
Mark Upto draw freehand or add shapes and text using Apple's markup tools, then tapDone(a clean original is always preserved in the background). - Pipework & cable routing (available on survey question, radiator, boiler, and stopcock photos):
- Tap
Pipeworkat the bottom right - Tap
Route, select the pipe or cable type (Flow & Return,Hot Water,Cold Main,Condensate,Power Cable,Controls Cable, etc.) and diameter (e.g.,22 mm), then tap along the photo to plot each bend and tapFinish - Tap
Markto place icons forHeat Pump,Core Hole,Cylinder,Isolator,Consumer Unit,Valve, or aNote - Tap
Doneat the top right to save the annotated image
- Tap
Note: Deleting a photo from a room removes it from the entire survey and any linked questions. Deleting a photo from a survey question removes it only from that question.
Still Need Help?
Contact Support: If you've got further questions, get in touch with our support team at help@heatpunk.co.uk (UK) or help@heatpunk.ie (IE). If you are experiencing a bug, to help us look into your issue faster, please include the email address of your account, the name of the project and screenshots of any unexpected behaviour.
8. Confirming house materials (Fabric)
Before leaving the property, review and confirm the default construction materials for the whole house. To manage your saved palettes on the web, see the Material library and palettes guide in the Plans task.
Confirming whole-house materials
-
On the survey's page, scroll down to House and tap
Walls, Floors & Windows(marked Not Confirmed in orange). -
Review each category and its U-value:
-
Walls:
External walls,Internal walls - Floor and roof:
Ground floor,Intermediate floor,Roof - Glazing and doors:
Windows,Doors
-
- Tap any row to change its build-up—changing a material here updates every room in the survey unless you have overridden a specific wall or window individually.
- Tap
Confirm fabricat the bottom right.
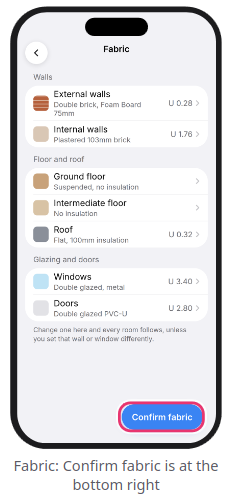
Note: If you change a material after tapping Confirm fabric, the fabric status resets to unconfirmed—remember to tap Confirm fabric again before leaving.
Overriding a single wall or window
If an extension or specific wall is built differently from the rest of the property:
-
Open the wall in the Room Editor (or during Step 1 of the room walk).
- Tap
Built Ofand select the new material. - When prompted, select
Just This Wall(selectingChange Every Outside Wallupdates the whole house).
Still Need Help?
Contact Support: If you've got further questions, get in touch with our support team at help@heatpunk.co.uk (UK) or help@heatpunk.ie (IE). If you are experiencing a bug, to help us look into your issue faster, please include the email address of your account, the name of the project and screenshots of any unexpected behaviour.
9. Checking & sending your survey to Heatpunk
Once your rooms, floor plans, and survey questions are complete, run a final check before uploading the project to your Heatpunk account.
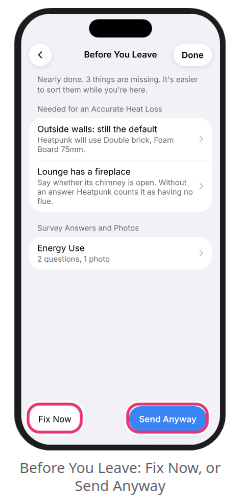
1. Review Before You Leave
- Tap
More>Finish Surveyafter your last room, or tapSend to Heatpunkon the survey's page. - Review the floor plan for each floor and tap
Nextat the top right to open Before You Leave. - Any missing items are grouped into three sections:
- Needed to Send (Blocking): Issues that must be resolved before uploading (e.g., unaligned floors, a room missing a Room Type, a radiator with no size, overlapping regions, or a dormer extending outside a sloped roof). Tap any row or tap
Fix Nowto jump straight to the fix - Needed for an Accurate Heat Loss (Warning): Non-blocking reminders (e.g., unconfirmed fabric materials, an unanswered fireplace flue, or a missing party wall)
- Survey Answers and Photos (Warning): Lists any unfinished survey sections
- Needed to Send (Blocking): Issues that must be resolved before uploading (e.g., unaligned floors, a room missing a Room Type, a radiator with no size, overlapping regions, or a dormer extending outside a sloped roof). Tap any row or tap
Common "Needed to Send" errors and how to fix them
-
"[Room] needs a type": Open the room and assign a
Room Type -
"A radiator in [Room] has no size": Type or camera-measure the radiator's dimensions
-
"The floors are not lined up": Align your floors on the floor plan and tap
Alignedat the top right -
"Regions overlap by ... m²": Move or reshape your floor or ceiling regions so they do not overlap
-
"This dormer is not fully contained in a sloped roof": Move the dormer completely inside a sloped ceiling region
-
"The project details are missing": Open
...>Edit Detailsand add the full postcode and house build era -
"How sheltered the house is from the wind": Select a wind shelter option on the
Ventilationscreen -
"The measured air permeability": Enter the air tightness test result on the
Ventilationscreen
2. Send the survey
- Tap
Send to Heatpunk(orSend Anywayif only non-blocking warnings remain). - Keep the app open while your rooms and photos upload.
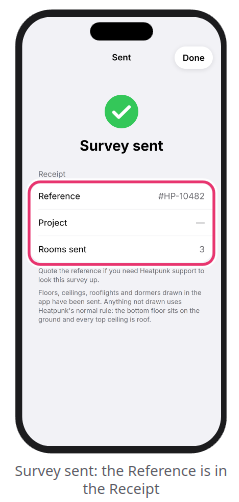
- When complete, the Survey sent receipt screen displays your unique Reference (e.g.,
#HP-10482) - quote this reference if you ever need Heatpunk Support to look up the upload. - Tap
Done. Your project is now ready in your Heatpunk web account.
3. Making changes after sending
- Updated survey answers or photos: Open the survey's page and tap
Send Updateon the Survey Questions card to update the existing project in Heatpunk - Updated floor plan, rooms, or property details: Tap
Send Againon the survey's page
Note: Heatpunk never overwrites an existing floor plan once sent. Tapping Send Again creates a second project in your web account (defaulting to the name Postcode (revised)).
Still Need Help?
Contact Support: If you've got further questions, get in touch with our support team at help@heatpunk.co.uk (UK) or help@heatpunk.ie (IE). If you are experiencing a bug, to help us look into your issue faster, please include the email address of your account, the name of the project and screenshots of any unexpected behaviour.
10. Managing surveys, troubleshooting & FAQs
Managing surveys on your device
- Find & filter: Open the
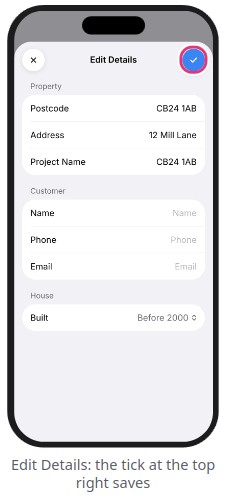
Surveystab to filter by status (Not Scanned,Needs Attention,Ready to Send,Sent), toggle between Gallery and List views, or use theSearchtab to find a postcode or customer name - Edit details: Open a survey, tap
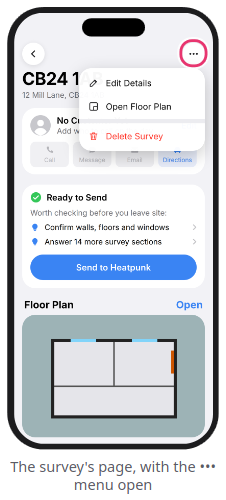
...>Edit Details, make your changes, and tap theblue tick - Delete surveys: Open a survey and tap
...>Delete Survey(or tap...>Select Surveyson the Surveys tab to bulk delete). Surveys already markedSentremain safely in your Heatpunk web account when deleted from your phone
Warning: Deleting a survey that has never been sent to Heatpunk permanently erases it—always upload your survey first.
FAQs
Expand the sections below for information on common scanning, sending, and account questions
❓Two rooms merged into one during a LiDAR scan
Wide openings between spaces or very cluttered floors can cause two rooms to read as one. Fix this on the floor plan by resizing the room in the Room Editor, or close the door between the rooms and re-scan them separately.
❓The floor plan looks slightly skewed
Scans can occasionally drift by a degree or two, and the app automatically straightens slight offsets. Deliberately angled walls (such as bay windows) are left angled on purpose. If a room is still slightly off-square, select it on the floor plan and tap Square Up on the room card.
❓Inner walls are missing when I open the project on the Heatpunk website
Your rooms uploaded properly—the web floor plan simply calculates internal partition walls after a room is adjusted. On the Heatpunk website's floor plan, drag any room slightly and drop it back into place; all internal walls will appear.
❓The app says "Key not accepted" or asks me to "Reconnect"
Your device key was removed on the website or your Pro subscription ended. Generate a new QR code under My Account > Preferences > Heatpunk App on a computer, then open Settings in the app and tap Reconnect. Your existing surveys remain safely on your phone.
❓I got a new phone
First, send any unsent surveys from your old phone—they are stored locally on that device and are not in Heatpunk yet. Then log in to the Heatpunk website, click Remove next to your old phone under Your devices, and generate a new QR code to connect your new phone.
Reporting issues & contacting support
-
In-app tips: Go to
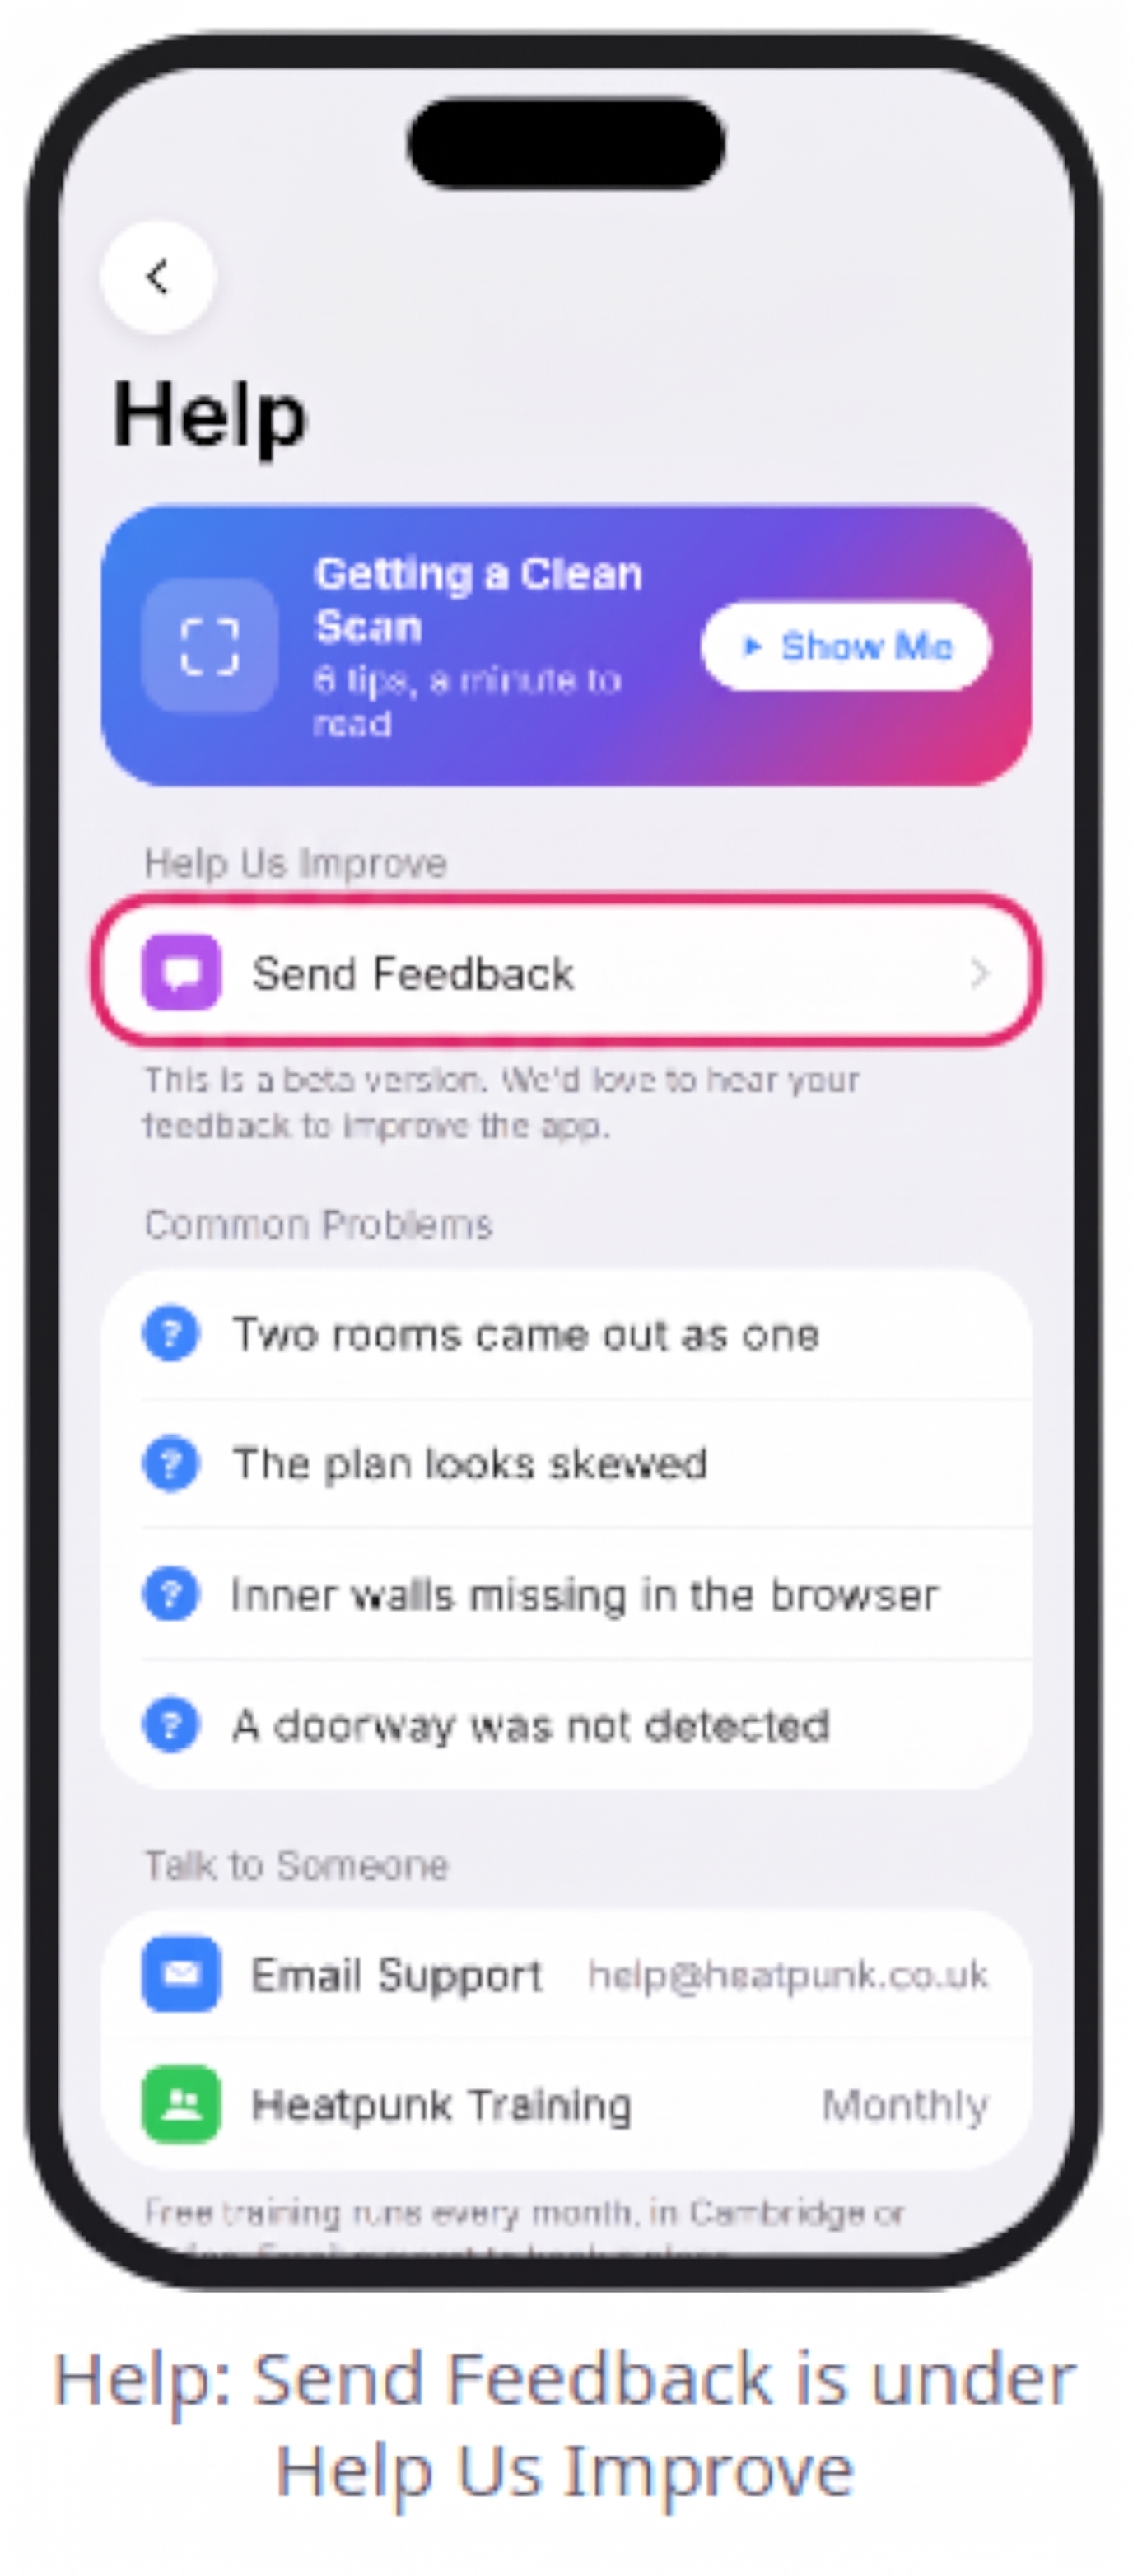
Settings>Help & Support>Getting a Clean Scan>Show Mefor a quick 6-step refresher - Send Feedback / Report a Bad Scan: In
Settings>Help & Support, tapSend Feedback(to attach diagnostic logs) orReport a Bad Scan(to attach the raw scan.zipfile). Neither report includes customer personal details - Email Support: Contact help@heatpunk.co.uk with your account email, survey Reference (
#HP-...), device model, and the app Version (found inSettings)
Still Need Help?
Contact Support: If you've got further questions, get in touch with our support team at help@heatpunk.co.uk (UK) or help@heatpunk.ie (IE). If you are experiencing a bug, to help us look into your issue faster, please include the email address of your account, the name of the project and screenshots of any unexpected behaviour.