# Heatpunk App

# 1. Getting started & connecting your device

<span data-path-to-node="8,0">To survey properties on site using the Heatpunk App, you first need to install it and link it to your Heatpunk Pro account</span><span data-path-to-node="8,1"><sup class="superscript"></sup></span><span data-path-to-node="8,2">. You only need to do this once per device</span><span data-path-to-node="8,3"><sup class="superscript"></sup></span><span data-path-to-node="8,4">.</span>

---

### What you need

- **A Heatpunk Pro account:** The app can only connect and send surveys to a Heatpunk Pro account
- **An iPhone or iPad:** Running iOS 26 or later. (Note: LiDAR Scan <span data-path-to-node="10,1,0,2">requires an iPhone 12 Pro or newer Pro model, or an iPad Pro</span><span data-path-to-node="10,1,0,3"><sup class="superscript"></sup></span><span data-path-to-node="10,1,0,4">. All other compatible iPhones can use AR Measure</span><span data-path-to-node="10,1,0,6">)</span>
- **<span data-path-to-node="10,1,0,6"><span data-path-to-node="10,2,0,0">**A device passcode:** </span></span>**<span data-path-to-node="10,1,0,6"><span data-path-to-node="10,2,0,0">Required so the app can securely store your account key</span></span>
- <span data-path-to-node="10,1,0,6"><span data-path-to-node="10,3,0,0">**A computer:** To log into the Heatpunk web portal and generate your connection QR code</span><span data-path-to-node="10,3,0,1"><sup class="superscript"></sup></span></span>
- <span data-path-to-node="10,1,0,6"><span data-path-to-node="10,3,0,2"><span data-path-to-node="10,4,0,0">**Internet connection:** Required only to connect the app and upload completed surveys</span><span data-path-to-node="10,4,0,1"><sup class="superscript"></sup></span><span data-path-to-node="10,4,0,2">. You can carry out full surveys completely offline</span><span data-path-to-node="10,4,0,3"><sup class="superscript"></sup></span></span></span>

<p class="callout info"><span data-path-to-node="10,1,0,6"><span data-path-to-node="10,3,0,2"><span data-path-to-node="10,4,0,4"><span data-path-to-node="11,0,0">**Note:** *You can connect up to **2 devices** to a single Heatpunk account*</span>*<span data-path-to-node="11,0,1"><sup class="superscript"></sup></span><span data-path-to-node="11,0,2">.</span>*</span></span></span></p>

---

### 1. Download the app &amp; allow permissions

1. <span data-path-to-node="9,0,0,0">Open the **App Store** on your iPhone or iPad, search for **Heatpunk**, and tap `Get`</span><span class="" data-path-to-node="9,0,0,1"><sup class="superscript"></sup></span><span data-path-to-node="9,0,0,2">.</span>
2. <span data-path-to-node="9,0,0,2"><span data-path-to-node="9,1,0,0">Open the app and tap `Allow` when prompted for **Camera** access (required to scan rooms and read your QR code)</span><span class="" data-path-to-node="9,1,0,1"><sup class="superscript"></sup></span><span data-path-to-node="9,1,0,2">.</span></span>
3. <span data-path-to-node="9,0,0,2"><span data-path-to-node="9,1,0,2"><span data-path-to-node="9,2,0,0">When prompted later during surveys, allow **Microphone** and **Speech Recognition** (to dictate room notes — recordings stay locally on your phone) and **Photos** (to save floor plan images)</span><span class="" data-path-to-node="9,2,0,1"><sup class="superscript"></sup></span><span data-path-to-node="9,2,0,2">.</span></span></span>

### <span data-path-to-node="9,0,0,2"><span data-path-to-node="9,1,0,2"><span data-path-to-node="9,2,0,2">2. Generate your QR code on a computer</span></span></span>

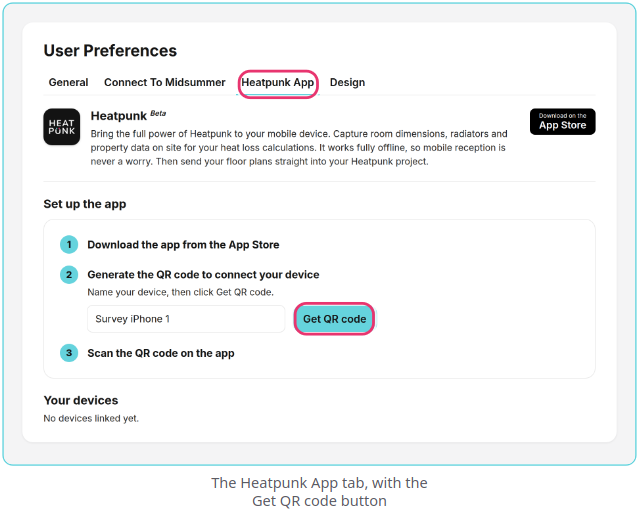
1. <span data-path-to-node="9,0,0,2"><span data-path-to-node="9,1,0,2"><span data-path-to-node="9,2,0,2"><span class="" data-path-to-node="11,0,0,0">Log in to [heatpunk.co.uk](https://heatpunk.co.uk) on a computer and go to `My Account` &gt; `Preferences` &gt; `Heatpunk App`</span><span class="" data-path-to-node="11,0,0,1"><sup class="superscript"></sup></span><span data-path-to-node="11,0,0,2">.</span></span></span></span>
2. <span data-path-to-node="9,0,0,2"><span data-path-to-node="9,1,0,2"><span data-path-to-node="9,2,0,2"><span data-path-to-node="11,0,0,2"><span data-path-to-node="11,1,0,0">Under *Set up the app*, enter a name for your device (e.g., *Survey iPhone 1*), click `Get QR code`, and click `OK`</span><span class="" data-path-to-node="11,1,0,1"><sup class="superscript"></sup></span><span data-path-to-node="11,1,0,2">.</span></span></span></span></span>
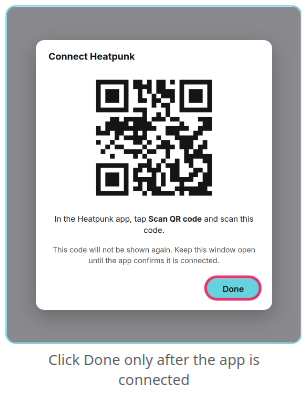
3. <span data-path-to-node="9,0,0,2"><span data-path-to-node="9,1,0,2"><span data-path-to-node="9,2,0,2"><span data-path-to-node="11,0,0,2"><span data-path-to-node="11,1,0,2"><span data-path-to-node="11,2,0,0">Keep the **Connect Heatpunk** QR code window open on your screen</span><span class="" data-path-to-node="11,2,0,1"><sup class="superscript"></sup></span><span data-path-to-node="11,2,0,2">.</span> </span></span></span></span></span>

<p class="callout warning"><span data-path-to-node="9,0,0,2"><span data-path-to-node="9,1,0,2"><span data-path-to-node="9,2,0,2"><span data-path-to-node="11,0,0,2"><span data-path-to-node="11,1,0,2"><span data-path-to-node="11,2,0,2"><span data-path-to-node="6,1,1,0,0">**Warning:** Your QR code is displayed only once</span><span data-path-to-node="6,1,1,0,1"><sup class="superscript"></sup></span><span data-path-to-node="6,1,1,0,2">. Do not share it, as anyone who scans it can view and edit your projects</span><span data-path-to-node="6,1,1,0,3"><sup class="superscript"></sup></span><span data-path-to-node="6,1,1,0,4">.</span> </span></span></span></span></span></span></p>

<span data-path-to-node="9,0,0,2"><span data-path-to-node="9,1,0,2"><span data-path-to-node="9,2,0,2"><span data-path-to-node="11,0,0,2"><span data-path-to-node="11,1,0,2">[![Screenshot_20261119_130904.png](https://help.heatpunk.co.uk/uploads/images/gallery/2026-11/scaled-1680-/2aKge1ahwtJARbHI-screenshot-20261119-130904.png)](https://help.heatpunk.co.uk/uploads/images/gallery/2026-11/2aKge1ahwtJARbHI-screenshot-20261119-130904.png)</span></span></span></span></span>

### <span data-path-to-node="9,0,0,2"><span data-path-to-node="9,1,0,2"><span data-path-to-node="9,2,0,2"><span data-path-to-node="11,0,0,2"><span data-path-to-node="11,1,0,2">3. Scan the code to connect</span></span></span></span></span>

1. <span data-path-to-node="9,0,0,2"><span data-path-to-node="9,1,0,2"><span data-path-to-node="9,2,0,2"><span data-path-to-node="11,0,0,2"><span data-path-to-node="11,1,0,2"><span data-path-to-node="13,0,0,0">On the app's **Connect to Heatpunk** screen, tap the round blue `QR` button at the bottom right</span><span class="" data-path-to-node="13,0,0,1"><sup class="superscript"></sup></span><span data-path-to-node="13,0,0,2">.</span> </span></span></span></span></span>
2. <span data-path-to-node="9,0,0,2"><span data-path-to-node="9,1,0,2"><span data-path-to-node="9,2,0,2"><span data-path-to-node="11,0,0,2"><span data-path-to-node="11,1,0,2"><span data-path-to-node="13,1,0,0">Point your camera at the QR code on your computer screen</span><span class="" data-path-to-node="13,1,0,1"><sup class="superscript"></sup></span><span data-path-to-node="13,1,0,2">.</span></span></span></span></span></span>
3. <span data-path-to-node="9,0,0,2"><span data-path-to-node="9,1,0,2"><span data-path-to-node="9,2,0,2"><span data-path-to-node="11,0,0,2"><span data-path-to-node="11,1,0,2"><span data-path-to-node="13,1,0,2"><span data-path-to-node="13,2,0,0">Once verified, the app will automatically open the **Home** screen</span><span class="" data-path-to-node="13,2,0,1"><sup class="superscript"></sup></span><span data-path-to-node="13,2,0,2">. You can now click `Done` on your computer</span><span class="" data-path-to-node="13,2,0,3"><sup class="superscript"></sup></span><span data-path-to-node="13,2,0,4">.</span></span></span></span></span></span></span>

*<span data-path-to-node="9,0,0,2"><span data-path-to-node="9,1,0,2"><span data-path-to-node="9,2,0,2"><span data-path-to-node="11,0,0,2"><span data-path-to-node="11,1,0,2"><span data-path-to-node="13,1,0,2"><span data-path-to-node="13,2,0,4">[![Screenshot_20261119_131144.png](https://help.heatpunk.co.uk/uploads/images/gallery/2026-11/scaled-1680-/sjyc47Ta2KgCOcKH-screenshot-20261119-131144.png)](https://help.heatpunk.co.uk/uploads/images/gallery/2026-11/sjyc47Ta2KgCOcKH-screenshot-20261119-131144.png)</span></span></span></span></span></span></span>*

*<span data-path-to-node="9,0,0,2"><span data-path-to-node="9,1,0,2"><span data-path-to-node="9,2,0,2"><span data-path-to-node="11,0,0,2"><span data-path-to-node="11,1,0,2"><span data-path-to-node="13,1,0,2"><span data-path-to-node="13,2,0,4"><span class="corp-icon material-symbols-rounded icon-expand mceNonEditable" style="user-select: none;">​</span>Expand the sections below for information on issues related to connecting your device</span></span></span></span></span></span></span>*

<details id="bkmrk-already-have-2-devic"><summary>Already have 2 devices connected?</summary>

<span data-path-to-node="5,1,0,0">If the website says "You can add up to 2 devices," go to **Your devices** on the website and click `Remove` next to a device you no longer use</span><span class="" data-path-to-node="5,1,0,1"><sup class="superscript"></sup></span><span data-path-to-node="5,1,0,2">. That device will no longer be able to send surveys until you reconnect it with a new QR code</span><span class="" data-path-to-node="5,1,0,3"><sup class="superscript"></sup></span><span data-path-to-node="5,1,0,4">.</span>

</details><details id="bkmrk-what-if-the-app-show"><summary>What if the app shows a red error message when connecting?</summary>

- <span data-path-to-node="7,1,1,0,0,0">**"That QR code isn't a Heatpunk key.":** You scanned a different QR code—point the camera at the code under `My Account` &gt; `Preferences` &gt; `Heatpunk App` on the website</span><span class="" data-path-to-node="7,1,1,0,0,1"><sup class="superscript"></sup></span>
- <span class="" data-path-to-node="7,1,1,0,0,1"><span data-path-to-node="7,1,1,1,0,0">**"Heatpunk did not accept this key.":** The code was removed or already used—generate a new QR code on the website and scan it</span><span class="" data-path-to-node="7,1,1,1,0,1"><sup class="superscript"></sup></span></span>
- <span class="" data-path-to-node="7,1,1,0,0,1"><span class="" data-path-to-node="7,1,1,1,0,1"><span data-path-to-node="7,1,1,2,0,0">**"Connecting needs a connection.":** Your device has no signal—try again once you have mobile signal or Wi-Fi</span><span class="" data-path-to-node="7,1,1,2,0,1"><sup class="superscript"></sup></span></span></span>
- <span class="" data-path-to-node="7,1,1,0,0,1"><span class="" data-path-to-node="7,1,1,1,0,1"><span class="" data-path-to-node="7,1,1,2,0,1"><span data-path-to-node="7,1,1,3,0,0">**"Set a passcode on this iPhone to connect.":** Add a device passcode in your iPhone's `Settings`, then generate and scan a new QR code</span><span class="" data-path-to-node="7,1,1,3,0,1"><sup class="superscript"></sup></span></span></span></span>
- <span class="" data-path-to-node="7,1,1,0,0,1"><span class="" data-path-to-node="7,1,1,1,0,1"><span class="" data-path-to-node="7,1,1,2,0,1"><span class="" data-path-to-node="7,1,1,3,0,1"><span data-path-to-node="7,1,1,4,0,0">**"Camera access is off.":** Turn on camera access in your device's `Settings` &gt; `Heatpunk`, then try again</span><span class="" data-path-to-node="7,1,1,4,0,1"><sup class="superscript"></sup></span></span></span></span></span>

</details>---

### Navigating the Home screen &amp; Settings

- <span data-path-to-node="16,0,0,0">**Tabs:** Switch between `Home`, `Surveys`, and `Search` at the bottom of the screen (or via the sidebar on iPad)</span><span class="" data-path-to-node="16,0,0,1"><sup class="superscript"></sup></span>
- <span class="" data-path-to-node="16,0,0,1">**Start a survey:** Tap `+` at the top right to begin a new survey</span>
- <span class="" data-path-to-node="16,0,0,1"><span data-path-to-node="16,2,0,0">**Settings:** Tap the `gear` icon at the top right to check your connection status, set your default **Ceiling Height** (2400 mm default), toggle `Snap Walls Square`, manage **iCloud Copy** backups, or tap `Clear Scans Already Sent` to free up phone storage</span><span class="" data-path-to-node="16,2,0,1"><sup class="superscript"></sup></span> </span>

[![Screenshot_20261119_131822.png](https://help.heatpunk.co.uk/uploads/images/gallery/2026-11/scaled-1680-/JhlsuDpstkvZS2uR-screenshot-20261119-131822.png)](https://help.heatpunk.co.uk/uploads/images/gallery/2026-11/JhlsuDpstkvZS2uR-screenshot-20261119-131822.png)[ ![Screenshot_20261119_131833.png](https://help.heatpunk.co.uk/uploads/images/gallery/2026-11/scaled-1680-/4DMEpoqydALMTswn-screenshot-20261119-131833.png)](https://help.heatpunk.co.uk/uploads/images/gallery/2026-11/4DMEpoqydALMTswn-screenshot-20261119-131833.png)

<p class="callout info"><span class="" data-path-to-node="16,0,0,1"><span data-path-to-node="16,2,0,0"><span data-path-to-node="6,2,1,0,0">**Not backed up to iCloud?** If your Home screen shows *Not Backed Up to iCloud*, your surveys are stored only on your phone</span><span data-path-to-node="6,2,1,0,1"><sup class="superscript"></sup></span><span data-path-to-node="6,2,1,0,2">. Tap the card to open your iCloud Copy settings</span><span data-path-to-node="6,2,1,0,3"><sup class="superscript"></sup></span><span data-path-to-node="6,2,1,0,4">.</span></span></span></p>

---


### <span class="corp-icon material-symbols-rounded icon-support mceNonEditable" style="user-select: none;">​</span>Still Need Help?

**Contact Support:** If you've got further questions, get in touch with our support team at **help@heatpunk.co.uk** (UK) or **help@heatpunk.ie** (IE). *If you are experiencing a bug, to help us look into your issue faster, please include the email address of your account, the name of the project and screenshots of any unexpected behaviour.*

# 2. Starting a new survey

<span data-path-to-node="19,0">Before scanning rooms, set up the property details, measurement method, and ventilation settings</span><span class="" data-path-to-node="19,1"><sup class="superscript"></sup></span><span data-path-to-node="19,2">.</span>

---

### 1. Create the survey

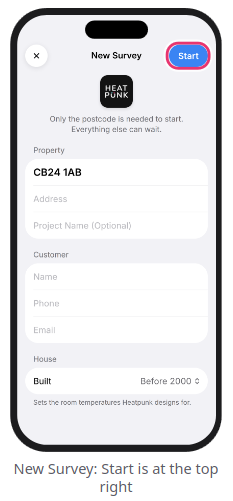
1. <span data-path-to-node="21,0,0,0">From the **Home** screen, tap `+` (or `+ New Survey`)</span><span class="" data-path-to-node="21,0,0,1"><sup class="superscript"></sup></span><span data-path-to-node="21,0,0,2">.</span>
2. <span data-path-to-node="21,0,0,2"><span data-path-to-node="21,1,0,0">Enter the **full UK postcode** (e.g., `CB24 1AB`)</span><span class="" data-path-to-node="21,1,0,1"><sup class="superscript"></sup></span><span data-path-to-node="21,1,0,2">. This is the only mandatory field to begin</span><span class="" data-path-to-node="21,1,0,3"><sup class="superscript"></sup></span><span data-path-to-node="21,1,0,4">.</span> </span>
3. <span data-path-to-node="21,0,0,2"><span data-path-to-node="21,2,0,0">Optionally enter the **Address**, **Project Name** (defaults to the postcode if left blank), **Customer** contact details, and the **House Built** era (`Before 2000`, `2000-2006`, or `After 2006`)</span><span class="" data-path-to-node="21,2,0,1"><sup class="superscript"></sup></span><span data-path-to-node="21,2,0,2">.</span></span>
4. <span data-path-to-node="21,0,0,2"><span data-path-to-node="21,2,0,2"><span data-path-to-node="21,3,0,0">Tap `Start` at the top right</span><span class="" data-path-to-node="21,3,0,1"><sup class="superscript"></sup></span><span data-path-to-node="21,3,0,2">.</span></span></span>

<span data-path-to-node="21,0,0,2"><span data-path-to-node="21,2,0,2"><span data-path-to-node="21,3,0,2">[![Screenshot_20261119_132153.png](https://help.heatpunk.co.uk/uploads/images/gallery/2026-11/scaled-1680-/l9P869LdrFpVf8UZ-screenshot-20261119-132153.png)](https://help.heatpunk.co.uk/uploads/images/gallery/2026-11/l9P869LdrFpVf8UZ-screenshot-20261119-132153.png)</span></span></span>

### <span data-path-to-node="21,0,0,2"><span data-path-to-node="21,2,0,2"><span data-path-to-node="21,3,0,2">2. Choose your measurement method</span></span></span>

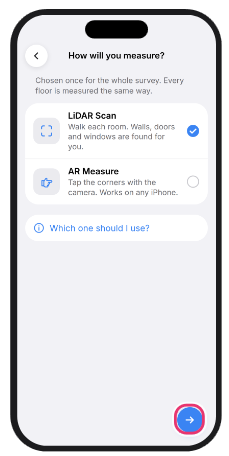
<span data-path-to-node="21,0,0,2"><span data-path-to-node="21,2,0,2"><span data-path-to-node="21,3,0,2"><span data-path-to-node="23,0">You choose one measurement method for the entire survey, then tap the `blue arrow` at the bottom right to continue</span><span class="" data-path-to-node="23,1"><sup class="superscript"></sup></span><span data-path-to-node="23,2">.</span></span></span></span>

[![image.png](https://help.heatpunk.co.uk/uploads/images/gallery/2026-11/scaled-1680-/2YbtN9puIx9pNK1d-image.png)](https://help.heatpunk.co.uk/uploads/images/gallery/2026-11/2YbtN9puIx9pNK1d-image.png)

<span data-path-to-node="21,0,0,2"><span data-path-to-node="21,2,0,2"><span data-path-to-node="21,3,0,2"><span data-path-to-node="23,2"><span data-path-to-node="24,0">**<span class="corp-icon material-symbols-rounded icon-expand mceNonEditable" style="user-select: none;">​</span>*Expand the sections below for information on which measurement mode to choose*</span><span class="" data-path-to-node="24,1"><sup class="superscript"></sup></span></span></span></span></span>

<details id="bkmrk-lidar-scan-%28iphone-p"><summary>LiDAR Scan (iPhone Pro &amp; iPad Pro)</summary>

- <span data-path-to-node="11,1,1,0,0,0">**Compatible devices:** iPhone 12 Pro or later Pro models, and iPad Pro</span><span class="" data-path-to-node="11,1,1,0,0,1"><sup class="superscript"></sup></span>
- **How it works:** Walk slowly around each room (~1 minute per room); walls, doors, windows, and a 3D model are detected automatically
- **Best for:** Most rooms that are quick, furnished, and have ordinary shapes
- **Watch out for:** Mirrors, large expanses of glass, and very dark rooms

</details><details id="bkmrk-ar-measure-%28any-comp"><summary>AR Measure (Any compatible iPhone)</summary>

- **Compatible devices:** Any compatible iPhone
- **How it works:** Aim the screen ring at and tap each floor corner, ceiling height, door, window, and radiator (2–3 minutes per room)
- **Best for:** Lofts, awkward shapes, rooms a LiDAR scan gets wrong, and phones without LiDAR
- **Watch out for:** Plain shiny floors and dim lighting

</details>### <span data-path-to-node="21,0,0,2"><span data-path-to-node="21,2,0,2"><span data-path-to-node="21,3,0,2"><span data-path-to-node="23,2"><span data-path-to-node="24,0">3. Pick your starting floor</span></span></span></span></span>

1. <span data-path-to-node="21,0,0,2"><span data-path-to-node="21,2,0,2"><span data-path-to-node="21,3,0,2"><span data-path-to-node="23,2"><span data-path-to-node="24,0"><span data-path-to-node="26,0,0,0">Select the floor you want to survey first (`Ground floor` is selected by default, though you can scan floors in any order)</span><span data-path-to-node="26,0,0,2">.</span></span></span></span></span></span>
2. <span data-path-to-node="21,0,0,2"><span data-path-to-node="21,2,0,2"><span data-path-to-node="21,3,0,2"><span data-path-to-node="23,2"><span data-path-to-node="24,0"><span data-path-to-node="26,0,0,2"><span data-path-to-node="26,1,0,0">Skip `Attic` unless it is a converted habitable space, and only select `Basement` if it is heated</span><span data-path-to-node="26,1,0,2">.</span></span></span></span></span></span></span>
3. <span data-path-to-node="21,0,0,2"><span data-path-to-node="21,2,0,2"><span data-path-to-node="21,3,0,2"><span data-path-to-node="23,2"><span data-path-to-node="24,0"><span data-path-to-node="26,0,0,2"><span data-path-to-node="26,1,0,2"><span data-path-to-node="26,2,0,0">Once the green **Sensor ready** (or **Camera ready**) indicator appears, tap `Start`</span><span data-path-to-node="26,2,0,2">.</span> </span></span></span></span></span></span></span>

### <span data-path-to-node="21,0,0,2"><span data-path-to-node="21,2,0,2"><span data-path-to-node="21,3,0,2"><span data-path-to-node="23,2"><span data-path-to-node="24,0"><span data-path-to-node="26,0,0,2"><span data-path-to-node="26,1,0,2">4. Complete Before You Start</span></span></span></span></span></span></span>

<span data-path-to-node="21,0,0,2"><span data-path-to-node="21,2,0,2"><span data-path-to-node="21,3,0,2"><span data-path-to-node="23,2"><span data-path-to-node="24,0"><span data-path-to-node="26,0,0,2"><span data-path-to-node="26,1,0,2"><span data-path-to-node="28,0">Configure these four settings before the camera opens</span><span class="" data-path-to-node="28,1"><sup class="superscript"></sup></span><span data-path-to-node="28,2">:</span></span></span></span></span></span></span></span>

1. <span data-path-to-node="21,0,0,2"><span data-path-to-node="21,2,0,2"><span data-path-to-node="21,3,0,2"><span data-path-to-node="23,2"><span data-path-to-node="24,0"><span data-path-to-node="26,0,0,2"><span data-path-to-node="26,1,0,2"><span data-path-to-node="28,2"><span data-path-to-node="29,0,0,0">**Property type:** Tap `Property type` and pick `Detached`, `Semi-detached`, `End of terrace`, `Mid-terrace`, or `Flat` (used locally to prompt you for shared party walls)</span><span class="" data-path-to-node="29,0,0,1"><sup class="superscript"></sup></span><span data-path-to-node="29,0,0,2">.</span></span></span></span></span></span></span></span></span>
2. <span data-path-to-node="21,0,0,2"><span data-path-to-node="21,2,0,2"><span data-path-to-node="21,3,0,2"><span data-path-to-node="23,2"><span data-path-to-node="24,0"><span data-path-to-node="26,0,0,2"><span data-path-to-node="26,1,0,2"><span data-path-to-node="28,2"><span data-path-to-node="29,0,0,2"><span data-path-to-node="29,1,0,0">**Materials palette:** Tap `Materials palette` and select one of your Heatpunk account palettes or `Blank palette (standard materials)`</span><span class="" data-path-to-node="29,1,0,1"><sup class="superscript"></sup></span><span data-path-to-node="29,1,0,2">.</span></span></span></span></span></span></span></span></span></span>
3. <span data-path-to-node="21,0,0,2"><span data-path-to-node="21,2,0,2"><span data-path-to-node="21,3,0,2"><span data-path-to-node="23,2"><span data-path-to-node="24,0"><span data-path-to-node="26,0,0,2"><span data-path-to-node="26,1,0,2"><span data-path-to-node="28,2"><span data-path-to-node="29,0,0,2"><span data-path-to-node="29,1,0,2"><span data-path-to-node="29,2,0,0">**Ventilation losses:** Tap `Ventilation losses`, choose `Standard (MCS)` (12 m³/(h·m²) at 50 Pa) or `Measured Air Permeability` (if an air tightness test was performed), select the wind shelter (`Intensive`, `Normal`, or `None`), and tap the `blue tick`</span><span class="" data-path-to-node="29,2,0,1"><sup class="superscript"></sup></span><span data-path-to-node="29,2,0,2">.</span> </span></span></span></span></span></span></span></span></span></span>
4. <span data-path-to-node="21,0,0,2"><span data-path-to-node="21,2,0,2"><span data-path-to-node="21,3,0,2"><span data-path-to-node="23,2"><span data-path-to-node="24,0"><span data-path-to-node="26,0,0,2"><span data-path-to-node="26,1,0,2"><span data-path-to-node="28,2"><span data-path-to-node="29,0,0,2"><span data-path-to-node="29,1,0,2"><span data-path-to-node="29,3,0,0">**When to Survey the Outside:** Choose `Before the Rooms` to answer external survey questions first (Property Details, Access, Heat Pump Location, Wiring, and Pipe runs), or `After the Rooms` to jump straight into scanning</span><span class="" data-path-to-node="29,3,0,1"><sup class="superscript"></sup></span><span data-path-to-node="29,3,0,2">.</span></span></span></span></span></span></span></span></span></span></span>
5. <span data-path-to-node="21,0,0,2"><span data-path-to-node="21,2,0,2"><span data-path-to-node="21,3,0,2"><span data-path-to-node="23,2"><span data-path-to-node="24,0"><span data-path-to-node="26,0,0,2"><span data-path-to-node="26,1,0,2"><span data-path-to-node="28,2"><span data-path-to-node="29,0,0,2"><span data-path-to-node="29,1,0,2"><span data-path-to-node="29,3,0,2"><span data-path-to-node="29,4,0,0">Tap `Start` (or `Start Scanning` if you completed outside questions first) to begin</span><span class="" data-path-to-node="29,4,0,1"><sup class="superscript"></sup></span><span data-path-to-node="29,4,0,2">.</span> </span></span></span></span></span></span></span></span></span></span></span>

[![Screenshot_20261119_133034.png](https://help.heatpunk.co.uk/uploads/images/gallery/2026-11/scaled-1680-/RFyaHlWG00DXxzGH-screenshot-20261119-133034.png) ](https://help.heatpunk.co.uk/uploads/images/gallery/2026-11/RFyaHlWG00DXxzGH-screenshot-20261119-133034.png)[![Screenshot_20261119_133012.png](https://help.heatpunk.co.uk/uploads/images/gallery/2026-11/scaled-1680-/W4AVEyaImLwb8Af4-screenshot-20261119-133012.png)](https://help.heatpunk.co.uk/uploads/images/gallery/2026-11/W4AVEyaImLwb8Af4-screenshot-20261119-133012.png)

<p class="callout warning"><span data-path-to-node="21,0,0,2"><span data-path-to-node="21,2,0,2"><span data-path-to-node="21,3,0,2"><span data-path-to-node="23,2"><span data-path-to-node="24,0"><span data-path-to-node="26,0,0,2"><span data-path-to-node="26,1,0,2"><span data-path-to-node="28,2"><span data-path-to-node="29,0,0,2"><span data-path-to-node="29,1,0,2"><span data-path-to-node="29,3,0,2"><span data-path-to-node="29,4,0,2"><span data-path-to-node="9,0,1,0,0">**Warning:** If the app warns that your phone has less than 1 GB of free space, clear some storage before scanning or you risk losing what you record</span><span data-path-to-node="9,0,1,0,1"><sup class="superscript"></sup></span><span data-path-to-node="9,0,1,0,2">.</span></span></span></span></span></span></span></span></span></span></span></span></span></p>

---

### <span class="corp-icon material-symbols-rounded icon-support mceNonEditable" style="user-select: none;">​</span>Still Need Help?

**Contact Support:** If you've got further questions, get in touch with our support team at **help@heatpunk.co.uk** (UK) or **help@heatpunk.ie** (IE). *If you are experiencing a bug, to help us look into your issue faster, please include the email address of your account, the name of the project and screenshots of any unexpected behaviour.*

# 3. Scanning & measuring rooms (LiDAR & AR)

<span data-path-to-node="32,0">Each room is measured one at a time and automatically joins onto your floor plan</span><span class="" data-path-to-node="32,1"><sup class="superscript"></sup></span><span data-path-to-node="32,2">.</span>

---

### Tips for a clean scan

- <span data-path-to-node="34,0,0,0">**Close internal doors and turn on lights:** Open doors can cause LiDAR to merge two rooms into one</span><span class="" data-path-to-node="34,0,0,1"><sup class="superscript"></sup></span>
- <span class="" data-path-to-node="34,0,0,1">**Ignore furniture:** Sofas, tables, and kitchen units are automatically filtered out—only walls, doors, windows, and radiators are sent to Heatpunk</span>
- <span class="" data-path-to-node="34,0,0,1"><span data-path-to-node="34,2,0,0">**Keep the phone held up between rooms:** Moving with the camera upright helps the app track your position so the next room snaps neatly beside the previous one</span></span>

---

### Method A: Scanning with LiDAR

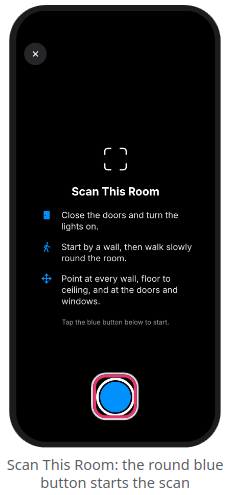
1. <span data-path-to-node="37,0,0,0">Stand close to a wall, point the phone at it, and tap the `round blue button` at the bottom</span><span class="" data-path-to-node="37,0,0,1"><sup class="superscript"></sup></span><span data-path-to-node="37,0,0,2">.</span>
2. <span data-path-to-node="37,0,0,2"><span data-path-to-node="37,1,0,0">Walk slowly around the perimeter (roughly one step per second), sweeping the camera from **floor to ceiling** across every wall, door, and window</span><span class="" data-path-to-node="37,1,0,1"><sup class="superscript"></sup></span><span data-path-to-node="37,1,0,2">.</span></span>
3. <span data-path-to-node="37,0,0,2"><span data-path-to-node="37,1,0,2"><span data-path-to-node="37,2,0,0">**Mark radiators (optional):** Tap directly on any radiator on your screen while scanning to place a marker on the nearest wall</span><span class="" data-path-to-node="37,2,0,1"><sup class="superscript"></sup></span><span data-path-to-node="37,2,0,2">.</span></span></span>
4. <span data-path-to-node="37,0,0,2"><span data-path-to-node="37,1,0,2"><span data-path-to-node="37,2,0,2"><span data-path-to-node="37,3,0,0">Once you have scanned all walls (and at least 3 walls are detected), tap the `round blue button` again to finish and open the Room Steps</span><span class="" data-path-to-node="37,3,0,1"><sup class="superscript"></sup></span><span data-path-to-node="37,3,0,2">.</span></span></span></span>

<span data-path-to-node="37,0,0,2"><span data-path-to-node="37,1,0,2"><span data-path-to-node="37,2,0,2"><span data-path-to-node="37,3,0,2">[![Screenshot_20261119_133242.png](https://help.heatpunk.co.uk/uploads/images/gallery/2026-11/scaled-1680-/2ADfTmXVG5zAsk8R-screenshot-20261119-133242.png)](https://help.heatpunk.co.uk/uploads/images/gallery/2026-11/2ADfTmXVG5zAsk8R-screenshot-20261119-133242.png)</span></span></span></span>

<p class="callout warning"><span data-path-to-node="37,0,0,2"><span data-path-to-node="37,1,0,2"><span data-path-to-node="37,2,0,2"><span data-path-to-node="37,3,0,2"><span data-path-to-node="12,0,1,0,0">**Warning:** Tapping `X` at the top left immediately ends the current scan without asking for confirmation, and the room you are scanning will not be saved</span><span data-path-to-node="12,0,1,0,1"><sup class="superscript"></sup></span><span data-path-to-node="12,0,1,0,2">.</span></span></span></span></span></p>

### Method B: Measuring with AR Measure

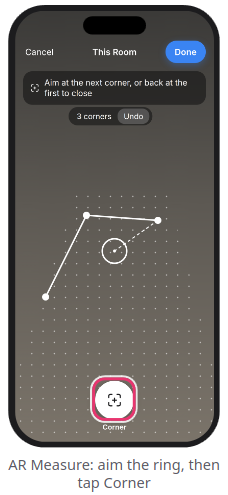
1. <span data-path-to-node="39,0,0,0">Move your phone slowly over the floor until the dotted grid appears</span><span class="" data-path-to-node="39,0,0,1"><sup class="superscript"></sup></span><span data-path-to-node="39,0,0,2">.</span>
2. <span data-path-to-node="39,1,0,0">Aim the centre ring at a floor corner and tap `Corner`</span><span class="" data-path-to-node="39,1,0,1"><sup class="superscript"></sup></span><span data-path-to-node="39,1,0,2">. Repeat around the room, then aim back at the **first corner** and tap `Corner` again to close the room</span><span class="" data-path-to-node="39,1,0,3"><sup class="superscript"></sup></span><span data-path-to-node="39,1,0,4">.</span>
3. <span data-path-to-node="39,2,0,0">**Set Ceiling Height:** Switch to the `Height` tab, aim where a wall meets the ceiling above a corner, and tap `Set` (or tap `Same as last room`)</span><span class="" data-path-to-node="39,2,0,1"><sup class="superscript"></sup></span><span data-path-to-node="39,2,0,2">.</span>
4. <span data-path-to-node="39,2,0,2"><span data-path-to-node="39,3,0,0">**Add Doors, Windows &amp; Radiators:** Use the `Door`, `Window`, and `Radiator` tabs at the bottom to aim and tap opposite corners or edges for each opening or radiator</span><span class="" data-path-to-node="39,3,0,1"><sup class="superscript"></sup></span><span data-path-to-node="39,3,0,2">.</span> </span>
5. <span data-path-to-node="39,2,0,2"><span data-path-to-node="39,4,0,0">Tap `Done` at the top right (use `Undo` at the top if you misplace a point)</span><span class="" data-path-to-node="39,4,0,1"><sup class="superscript"></sup></span><span data-path-to-node="39,4,0,2">.</span> </span>

<span data-path-to-node="39,2,0,2"><span data-path-to-node="39,4,0,2">[![Screenshot_20261119_133300.png](https://help.heatpunk.co.uk/uploads/images/gallery/2026-11/scaled-1680-/muJV71VEyCwILajg-screenshot-20261119-133300.png)](https://help.heatpunk.co.uk/uploads/images/gallery/2026-11/muJV71VEyCwILajg-screenshot-20261119-133300.png)</span></span>

### <span data-path-to-node="39,2,0,2"><span data-path-to-node="39,4,0,2">Moving between rooms &amp; troubleshooting</span></span>

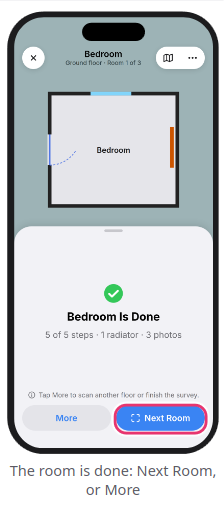
- <span data-path-to-node="39,2,0,2"><span data-path-to-node="39,4,0,2"><span data-path-to-node="42,0,0,0">**Next room or floor:** After completing a room's steps, tap `Next Room` to keep scanning, or tap `More` &gt; `Next Floor` when a floor is finished</span><span class="" data-path-to-node="42,0,0,1"><sup class="superscript"></sup></span></span></span>
- <span data-path-to-node="39,2,0,2"><span data-path-to-node="39,4,0,2"><span class="" data-path-to-node="42,0,0,1"><span data-path-to-node="42,1,0,0">**Rescan or add a missed room:** Tap `...` &gt; `Rescan Room` or `...` &gt; `Add a Missed Room`</span><span class="" data-path-to-node="42,1,0,1"><sup class="superscript"></sup></span></span></span></span>

<span data-path-to-node="39,2,0,2"><span data-path-to-node="39,4,0,2"><span class="" data-path-to-node="42,0,0,1"><span data-path-to-node="42,1,0,0">*<span data-path-to-node="9,0,0,2"><span data-path-to-node="9,1,0,2"><span data-path-to-node="9,2,0,2"><span data-path-to-node="11,0,0,2"><span data-path-to-node="11,1,0,2"><span data-path-to-node="13,1,0,2"><span data-path-to-node="13,2,0,4"><span class="corp-icon material-symbols-rounded icon-expand mceNonEditable" style="user-select: none;">​</span>Expand the sections below for information on issues while scanning</span></span></span></span></span></span></span>*</span></span></span></span>

<details id="bkmrk-what-if-the-phone-lo"><summary>What if the phone loses its place during a scan?</summary>

<span data-path-to-node="17,1,0,0">A phone call, screen lock, or switching to another app can cause the phone to lose track of its position</span><span class="" data-path-to-node="17,1,0,1"><sup class="superscript"></sup></span><span data-path-to-node="17,1,0,2">. Your previously completed rooms remain saved, though the room you were actively scanning must be measured again</span><span class="" data-path-to-node="17,1,0,3"><sup class="superscript"></sup></span><span data-path-to-node="17,1,0,4">.</span>

1. <span data-path-to-node="17,1,0,4"><span data-path-to-node="17,1,1,0,0,0">**Find your place:** The screen displays a photo of where your last scan finished</span><span class="" data-path-to-node="17,1,1,0,0,1"><sup class="superscript"></sup></span><span data-path-to-node="17,1,1,0,0,2">. Walk back there and point the camera at the walls of a room you already scanned until the phone buzzes and `Scan This Room` reappears</span><span class="" data-path-to-node="17,1,1,0,0,3"><sup class="superscript"></sup></span><span data-path-to-node="17,1,1,0,0,4">.</span></span>
2. <span data-path-to-node="17,1,0,4"><span data-path-to-node="17,1,1,0,0,4"><span data-path-to-node="17,1,1,1,0,0">**Or tap `Place by Hand`:** If the phone cannot re-lock onto a previous room, tap `Place by Hand` at the bottom and scan the room as normal</span><span class="" data-path-to-node="17,1,1,1,0,1"><sup class="superscript"></sup></span><span data-path-to-node="17,1,1,1,0,2">.</span> </span></span>
3. <span data-path-to-node="17,1,0,4"><span data-path-to-node="17,1,1,0,0,4"><span data-path-to-node="17,1,1,2,0,0">**Drag the room into place:** After scanning, the floor plan opens so you can drag the room into position (it snaps automatically to surrounding walls)</span><span class="" data-path-to-node="17,1,1,2,0,1"><sup class="superscript"></sup></span><span data-path-to-node="17,1,1,2,0,2">. Use `Turn` to rotate it, or `Line Up Door` to align a shared doorway, then tap `Place` at the top right</span><span class="" data-path-to-node="17,1,1,2,0,3"><sup class="superscript"></sup></span><span data-path-to-node="17,1,1,2,0,4">.</span> </span></span>

</details><details id="bkmrk-common-messages-whil"><summary>Common messages while scanning or measuring</summary>

LiDAR Scan messages:

- **"Your phone is hot. Give it a minute to cool down.":** Stop between rooms for a minute to let the device cool down, then carry on
- **"The phone is low on memory. Finish this room soon.":** Stop the current scan soon so the room saves properly
- <span data-path-to-node="19,1,1,2,0,0">**"This room is taking a while.":** Stop here and scan the remainder of the space as a separate room</span><span class="" data-path-to-node="19,1,1,2,0,1"><sup class="superscript"></sup></span>
- <span class="" data-path-to-node="19,1,1,2,0,1"><span data-path-to-node="19,1,1,3,0,0">**"That scan is of a room already on this floor.":** Walk into the next unmeasured room before starting the scan</span><span class="" data-path-to-node="19,1,1,3,0,1"><sup class="superscript"></sup></span></span>
- <span class="" data-path-to-node="19,1,1,2,0,1"><span class="" data-path-to-node="19,1,1,3,0,1"><span data-path-to-node="19,1,1,4,0,0">**"The scan stopped." / "The phone lost its place." / "This scan got too big.":** Your previously completed rooms are saved—scan the current room again</span><span class="" data-path-to-node="19,1,1,4,0,1"><sup class="superscript"></sup></span></span></span>

<span class="" data-path-to-node="19,1,1,2,0,1"><span class="" data-path-to-node="19,1,1,3,0,1"><span class="" data-path-to-node="19,1,1,4,0,1">AR Measure messages:</span></span></span>

- <span class="" data-path-to-node="19,1,1,2,0,1"><span class="" data-path-to-node="19,1,1,3,0,1"><span class="" data-path-to-node="19,1,1,4,0,1">**"Move your phone slowly over the floor":** The app has not detected the floor plane yet—keep moving the camera slowly</span></span></span>
- <span class="" data-path-to-node="19,1,1,2,0,1"><span class="" data-path-to-node="19,1,1,3,0,1"><span class="" data-path-to-node="19,1,1,4,0,1"><span data-path-to-node="19,1,3,1,0,0">**"Get closer / Aim at the floor":** Move nearer to the corner and angle the camera lower</span><span class="" data-path-to-node="19,1,3,1,0,1"><sup class="superscript"></sup></span></span></span></span>
- <span class="" data-path-to-node="19,1,1,2,0,1"><span class="" data-path-to-node="19,1,1,3,0,1"><span class="" data-path-to-node="19,1,1,4,0,1"><span class="" data-path-to-node="19,1,3,1,0,1"><span data-path-to-node="19,1,3,2,0,0">**"More light, or aim at something with a pattern":** Turn on more lights—plain, shiny floors are difficult for the camera to track</span><span class="" data-path-to-node="19,1,3,2,0,1"><sup class="superscript"></sup></span></span></span></span></span>
- <span class="" data-path-to-node="19,1,1,2,0,1"><span class="" data-path-to-node="19,1,1,3,0,1"><span class="" data-path-to-node="19,1,1,4,0,1"><span class="" data-path-to-node="19,1,3,1,0,1"><span class="" data-path-to-node="19,1,3,2,0,1"><span data-path-to-node="19,1,3,3,0,0">**"That wall would cross another":** The corner was placed in the wrong spot—tap `Undo` and try again</span><span class="" data-path-to-node="19,1,3,3,0,1"><sup class="superscript"></sup></span></span></span></span></span></span>
- <span class="" data-path-to-node="19,1,1,2,0,1"><span class="" data-path-to-node="19,1,1,3,0,1"><span class="" data-path-to-node="19,1,1,4,0,1"><span class="" data-path-to-node="19,1,3,1,0,1"><span class="" data-path-to-node="19,1,3,2,0,1"><span class="" data-path-to-node="19,1,3,3,0,1"><span data-path-to-node="19,1,3,4,0,0">**"Point back at the last corner you placed":** The phone lost tracking—aim back at the previous corner to re-lock</span><span class="" data-path-to-node="19,1,3,4,0,1"><sup class="superscript"></sup></span></span></span></span></span></span></span>

</details>---

### <span class="corp-icon material-symbols-rounded icon-support mceNonEditable" style="user-select: none;">​</span>Still Need Help?

**Contact Support:** If you've got further questions, get in touch with our support team at **help@heatpunk.co.uk** (UK) or **help@heatpunk.ie** (IE). *If you are experiencing a bug, to help us look into your issue faster, please include the email address of your account, the name of the project and screenshots of any unexpected behaviour.*

# 4. Completing room details, radiators & photos

<span data-path-to-node="45,0">Immediately after scanning a room, a 5-step card workflow opens at the bottom of the screen (or in the right-hand panel on iPad)</span><span class="" data-path-to-node="45,1"><sup class="superscript"></sup></span><span data-path-to-node="45,2">.</span>

---

### Room type, name &amp; shape (Step 1 of 5)

1. <span data-path-to-node="47,0,0,0">**Room Type &amp; Name:** Tap `Room Type` and select the room's function (Heatpunk uses this to set design room temperatures; select `Unheated` if the room has no heating)</span><span class="" data-path-to-node="47,0,0,1"><sup class="superscript"></sup></span><span data-path-to-node="47,0,0,2">. Optionally add a `Custom Name` (e.g., *Front Bedroom*), then tap `Continue`</span><span class="" data-path-to-node="47,0,0,3"><sup class="superscript"></sup></span><span data-path-to-node="47,0,0,4">.</span>
2. <span data-path-to-node="47,0,0,4"><span data-path-to-node="47,1,0,0">**Check the Shape:** Compare the room outline against the real room</span><span class="" data-path-to-node="47,1,0,1"><sup class="superscript"></sup></span><span data-path-to-node="47,1,0,2">.</span> </span>
3. <span data-path-to-node="47,0,0,4"><span data-path-to-node="47,2,0,0">Drag corner dots to adjust angles or wall dots to move walls, or tap a wall to type its exact length in **mm**</span><span class="" data-path-to-node="47,2,0,1"><sup class="superscript"></sup></span><span data-path-to-node="47,2,0,2">.</span></span>
4. <span data-path-to-node="47,0,0,4"><span data-path-to-node="47,2,0,2"><span data-path-to-node="47,3,0,0">Tap `Looks Right` to continue</span><span class="" data-path-to-node="47,3,0,1"><sup class="superscript"></sup></span><span data-path-to-node="47,3,0,2">.</span></span></span>

<span data-path-to-node="47,0,0,4"><span data-path-to-node="47,2,0,2"><span data-path-to-node="47,3,0,2">[![Screenshot_20261119_134031.png](https://help.heatpunk.co.uk/uploads/images/gallery/2026-11/scaled-1680-/80LDxBe2ghd3VGxd-screenshot-20261119-134031.png)](https://help.heatpunk.co.uk/uploads/images/gallery/2026-11/80LDxBe2ghd3VGxd-screenshot-20261119-134031.png)</span></span></span>

### <span data-path-to-node="47,0,0,4"><span data-path-to-node="47,2,0,2"><span data-path-to-node="47,3,0,2">Radiators (Step 2 of 5)</span></span></span>

<span data-path-to-node="47,0,0,4"><span data-path-to-node="47,2,0,2"><span data-path-to-node="47,3,0,2"><span data-path-to-node="49,0">Every radiator must have a measured size before you send the survey to Heatpunk</span><span class="" data-path-to-node="49,1"><sup class="superscript"></sup></span><span data-path-to-node="49,2">.</span> </span></span></span>

1. <span data-path-to-node="47,0,0,4"><span data-path-to-node="47,2,0,2"><span data-path-to-node="47,3,0,2"><span data-path-to-node="50,0,0,0">Tap `+ Add Radiator` (or tap a radiator you marked during the LiDAR scan)</span><span class="" data-path-to-node="50,0,0,1"><sup class="superscript"></sup></span><span data-path-to-node="50,0,0,2">.</span> </span></span></span>
2. Choose how to record its dimensions:
    
    
    - <span data-path-to-node="50,1,1,0,0,0">`Tap the Radiator` (LiDAR only): Point the camera at the middle of the radiator to auto-measure, then tap `Use This`</span><span class="" data-path-to-node="50,1,1,0,0,1"><sup class="superscript"></sup></span>
    - <span class="" data-path-to-node="50,1,1,0,0,1"><span data-path-to-node="50,1,1,1,0,0">`Tap Two Corners` (LiDAR only): Aim at two opposite corners with the camera</span><span class="" data-path-to-node="50,1,1,1,0,1"><sup class="superscript"></sup></span></span>
    - <span class="" data-path-to-node="50,1,1,0,0,1"><span class="" data-path-to-node="50,1,1,1,0,1"><span data-path-to-node="50,1,1,2,0,0">`Enter Manually`: Select the wall, pick the radiator type, and enter **Width** and **Height** in **mm**</span><span class="" data-path-to-node="50,1,1,2,0,1"><sup class="superscript"></sup></span></span></span>
3. <span class="" data-path-to-node="50,1,1,0,0,1"><span class="" data-path-to-node="50,1,1,1,0,1"><span class="" data-path-to-node="50,1,1,2,0,1"><span data-path-to-node="50,2,0,0">Tap `Add Photo` on the radiator row to photograph the TRV, lockshield, pipe tails, and any nearby plug socket</span><span class="" data-path-to-node="50,2,0,1"><sup class="superscript"></sup></span><span data-path-to-node="50,2,0,2">.</span></span></span></span>
4. <span class="" data-path-to-node="50,1,1,0,0,1"><span class="" data-path-to-node="50,1,1,1,0,1"><span class="" data-path-to-node="50,1,1,2,0,1"><span data-path-to-node="50,2,0,2"><span data-path-to-node="50,3,0,0">Tap `Continue` (swipe left on a radiator row to `Delete` it)</span><span class="" data-path-to-node="50,3,0,1"><sup class="superscript"></sup></span><span data-path-to-node="50,3,0,2">.</span></span></span></span></span>

<span class="" data-path-to-node="50,1,1,0,0,1"><span class="" data-path-to-node="50,1,1,1,0,1"><span class="" data-path-to-node="50,1,1,2,0,1"><span data-path-to-node="50,2,0,2"><span data-path-to-node="50,3,0,2">[![Screenshot_20261119_134047.png](https://help.heatpunk.co.uk/uploads/images/gallery/2026-11/scaled-1680-/tq6iONy2e4XB8scS-screenshot-20261119-134047.png)](https://help.heatpunk.co.uk/uploads/images/gallery/2026-11/tq6iONy2e4XB8scS-screenshot-20261119-134047.png)</span></span></span></span></span>

<p class="callout warning"><span class="" data-path-to-node="50,1,1,0,0,1"><span class="" data-path-to-node="50,1,1,1,0,1"><span class="" data-path-to-node="50,1,1,2,0,1"><span data-path-to-node="50,2,0,2"><span data-path-to-node="50,3,0,2"><span data-path-to-node="15,1,1,0,0">**Warning:** Every radiator must have a measured size before you send the survey—Heatpunk will leave out any radiator that has no size</span><span data-path-to-node="15,1,1,0,1"><sup class="superscript"></sup></span><span data-path-to-node="15,1,1,0,2">.</span></span></span></span></span></span></p>

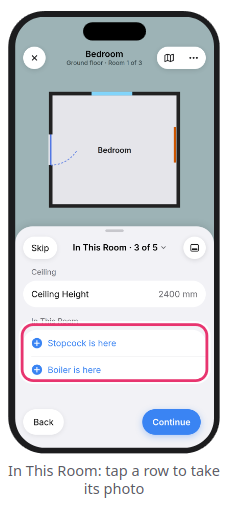
### In This Room (Step 3 of 5)

1. <span data-path-to-node="52,0,0,0">Verify the **Ceiling Height** in **mm**</span><span class="" data-path-to-node="52,0,0,1"><sup class="superscript"></sup></span><span data-path-to-node="52,0,0,2">.</span>
2. <span data-path-to-node="52,0,0,2"><span data-path-to-node="52,1,0,0">If applicable, tap `Stopcock is here` or `Boiler is here` to take a photo</span><span class="" data-path-to-node="52,1,0,1"><sup class="superscript"></sup></span><span data-path-to-node="52,1,0,2">.</span> </span>
3. <span data-path-to-node="52,0,0,2"><span data-path-to-node="52,2,0,0">If the scan detected a fireplace, specify whether its chimney is open (`No flue`, `Flue with a throat`, or `Flue with no throat`)</span><span class="" data-path-to-node="52,2,0,1"><sup class="superscript"></sup></span><span data-path-to-node="52,2,0,2">.</span></span>
4. <span data-path-to-node="52,0,0,2"><span data-path-to-node="52,2,0,2"><span data-path-to-node="52,3,0,0">Answer any room-specific prompts (such as vents, hot water cylinder, or consumer unit) by tapping `Here` (to take a photo) or `Not Here`, then tap `Continue`</span><span class="" data-path-to-node="52,3,0,1"><sup class="superscript"></sup></span><span data-path-to-node="52,3,0,2">.</span> </span></span>

<span data-path-to-node="52,0,0,2"><span data-path-to-node="52,2,0,2"><span data-path-to-node="52,3,0,2">[![Screenshot_20261119_134058.png](https://help.heatpunk.co.uk/uploads/images/gallery/2026-11/scaled-1680-/8hlajaEa5qireseO-screenshot-20261119-134058.png)](https://help.heatpunk.co.uk/uploads/images/gallery/2026-11/8hlajaEa5qireseO-screenshot-20261119-134058.png)</span></span></span>

### Photos &amp; Notes (Steps 4 &amp; 5 of 5)

1. <span data-path-to-node="54,0,0,0">**Photos (4 of 5):** Tap `Take Photos` to capture general room photos, then tap `Done`</span><span class="" data-path-to-node="54,0,0,1"><sup class="superscript"></sup></span><span data-path-to-node="54,0,0,2">.</span>
2. <span data-path-to-node="54,1,0,0">**Notes (5 of 5):** Type notes into the text box, or tap `Tap to Dictate` to record a voice note</span><span class="" data-path-to-node="54,1,0,1"><sup class="superscript"></sup></span><span data-path-to-node="54,1,0,2">.</span>
3. <span data-path-to-node="54,1,0,2"><span data-path-to-node="54,2,0,0">Tap `Done` to finish the room, then select `Next Room` or `More`</span><span class="" data-path-to-node="54,2,0,1"><sup class="superscript"></sup></span><span data-path-to-node="54,2,0,2">.</span> </span>

<span data-path-to-node="54,1,0,2"><span data-path-to-node="54,2,0,2">[![Screenshot_20261119_134119.png](https://help.heatpunk.co.uk/uploads/images/gallery/2026-11/scaled-1680-/FnONTr6dROA3Gz65-screenshot-20261119-134119.png)](https://help.heatpunk.co.uk/uploads/images/gallery/2026-11/FnONTr6dROA3Gz65-screenshot-20261119-134119.png)</span></span>

<p class="callout info"><span data-path-to-node="54,1,0,2"><span data-path-to-node="54,2,0,2"><span data-path-to-node="15,0,1,0,0">**Need to skip a step?** You can tap `Skip` on Steps 2–5 to come back later</span><span data-path-to-node="15,0,1,0,1"><sup class="superscript"></sup></span><span data-path-to-node="15,0,1,0,2">. Any skipped items are automatically flagged in **Before You Leave** before you upload the survey</span><span data-path-to-node="15,0,1,0,3"><sup class="superscript"></sup></span><span data-path-to-node="15,0,1,0,4">.</span></span></span></p>


---

### <span class="corp-icon material-symbols-rounded icon-support mceNonEditable" style="user-select: none;">​</span>Still Need Help?

**Contact Support:** If you've got further questions, get in touch with our support team at **help@heatpunk.co.uk** (UK) or **help@heatpunk.ie** (IE). *If you are experiencing a bug, to help us look into your issue faster, please include the email address of your account, the name of the project and screenshots of any unexpected behaviour.*

# 5. Editing the floor plan & aligning floors

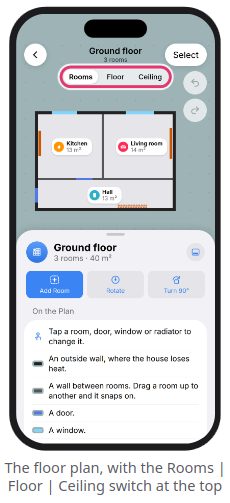
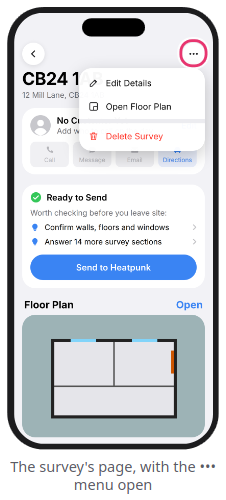
<span data-path-to-node="57,0">You can view and refine your floor plan at any time by tapping the `Plan` (map) icon during a room walk, or tapping `Open` next to Floor Plan on the survey's page</span><span class="" data-path-to-node="57,1"><sup class="superscript"></sup></span><span data-path-to-node="57,2">.</span>

---

### Understanding floor plan colours

- **Thick black wall:** External wall (heat loss boundary)
- <span data-path-to-node="59,1,0,0">**Thin grey wall:** Internal partition wall between two scanned rooms</span><span class="" data-path-to-node="59,1,0,1"><sup class="superscript"></sup></span>
- **Dark blue line:** Door
- **Light blue line:** Window
- **Orange edge:** Room still needing a Room Type
- <span data-path-to-node="59,5,0,0">**Orange bar:** Radiator (solid once sized; pale and dashed if unmeasured)</span><span class="" data-path-to-node="59,5,0,1"><sup class="superscript"></sup></span>

<span data-path-to-node="59,5,0,0">[![Screenshot_20261119_134351.png](https://help.heatpunk.co.uk/uploads/images/gallery/2026-11/scaled-1680-/M3qR5WmldUmkUWmR-screenshot-20261119-134351.png)](https://help.heatpunk.co.uk/uploads/images/gallery/2026-11/M3qR5WmldUmkUWmR-screenshot-20261119-134351.png)</span>

### Moving, rotating &amp; squaring up rooms

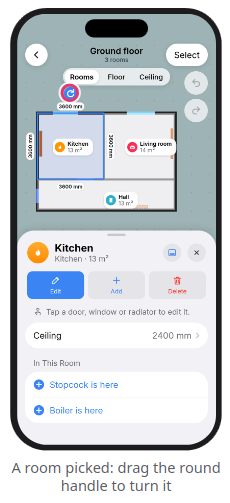
- **Move a room:** Tap a room to select it, then drag inside it—it will snap automatically to neighbouring rooms
- **Rotate a room:** Drag the round blue handle above a selected room, or tap `Square Up` on the room card to straighten walls that are slightly off-square
- **Move multiple rooms:** Tap `Select` at the top right, tap each room you want to group, and drag or rotate them together
- **Rotate the whole floor:** With no room selected, use `Rotate` or `Turn 90°` on the bottom card

[![Screenshot_20261119_134409.png](https://help.heatpunk.co.uk/uploads/images/gallery/2026-11/scaled-1680-/r7hDx33CK3kwhtly-screenshot-20261119-134409.png)](https://help.heatpunk.co.uk/uploads/images/gallery/2026-11/r7hDx33CK3kwhtly-screenshot-20261119-134409.png)
### Editing a room's shape &amp; wall boundaries

1. <span class="" data-path-to-node="63,0,0,0">Select a room and tap `Edit` to open the **Room Editor**</span><span class="" data-path-to-node="63,0,0,1"><sup class="superscript"></sup></span><span data-path-to-node="63,0,0,2">.</span>
2. <span data-path-to-node="63,0,0,2"><span data-path-to-node="63,1,0,0">**Reshape walls:** Drag pink corner squares (fixed angle), pink circles (free angle), or pink wall bars</span><span class="" data-path-to-node="63,1,0,1"><sup class="superscript"></sup></span><span data-path-to-node="63,1,0,2">. Drag a small teal dot to add a new corner, or tap any wall length to type an exact measurement in **mm**</span><span class="" data-path-to-node="63,1,0,3"><sup class="superscript"></sup></span><span data-path-to-node="63,1,0,4">.</span></span>
3. <span data-path-to-node="63,0,0,2"><span data-path-to-node="63,1,0,4"><span data-path-to-node="63,2,0,0">**Set What's Behind each wall:** Tap a wall (or open `Walls` in the card list) and set `What's Behind` to `Outside`, `Heated`, `Unheated` (e.g., an attached garage), `Ground`, or `Neighbour's Home` (essential for semi-detached and terraced party walls)</span><span class="" data-path-to-node="63,2,0,1"><sup class="superscript"></sup></span><span data-path-to-node="63,2,0,2">.</span> </span></span>
4. <span data-path-to-node="63,0,0,2"><span data-path-to-node="63,1,0,4"><span data-path-to-node="63,3,0,0">Tap the `blue tick` at the top right to save</span><span class="" data-path-to-node="63,3,0,1"><sup class="superscript"></sup></span><span data-path-to-node="63,3,0,2">.</span></span></span>

<details id="bkmrk-what-do-the-differen"><summary>What do the different "What's Behind" wall options mean?</summary>

- <span data-path-to-node="23,1,1,0,0,0">**`Outside`:** The wall is an external wall (this is the default for unshared walls)</span><span class="" data-path-to-node="23,1,1,0,0,1"><sup class="superscript"></sup></span>
- **`Heated`:** Another heated space is on the other side
- <span data-path-to-node="23,1,1,2,0,0">**`Unheated`:** An unheated space is on the other side, such as an attached garage</span><span class="" data-path-to-node="23,1,1,2,0,1"><sup class="superscript"></sup></span>
- <span data-path-to-node="23,1,1,3,0,0">**`Ground`:** Earth is on the other side, such as a basement retaining wall</span><span class="" data-path-to-node="23,1,1,3,0,1"><sup class="superscript"></sup></span>
- <span data-path-to-node="23,1,1,3,0,0"><span data-path-to-node="23,1,1,4,0,0">**`Neighbour's Home`:** The wall is a party wall shared with an adjoining property—be sure to set this on semi-detached or terraced houses so Heatpunk does not treat it as an external heat-loss wall</span><span class="" data-path-to-node="23,1,1,4,0,1"><sup class="superscript"></sup></span></span>

</details>![Screenshot_20261119_134429.png](https://help.heatpunk.co.uk/uploads/images/gallery/2026-11/scaled-1680-/KWUsN4sIdtpKeJCY-screenshot-20261119-134429.png) <span data-path-to-node="59,5,0,0">![download.gif](https://help.heatpunk.co.uk/uploads/images/gallery/2026-11/Nod6NuUEYBlxiC3g-download.gif)</span>

### Adding or editing doors, windows &amp; radiators

- <span data-path-to-node="65,0,0,0">**Add:** Select a room, tap `+ Add`, and choose `Door`, `Window`, or `Radiator`</span><span class="" data-path-to-node="65,0,0,1"><sup class="superscript"></sup></span><span data-path-to-node="65,0,0,2">. Enter the dimensions and wall, then drag it into position</span><span class="" data-path-to-node="65,0,0,3"><sup class="superscript"></sup></span>
- <span class="" data-path-to-node="65,0,0,3"><span data-path-to-node="65,1,0,0">**Edit:** Select a room, tap the door, window, or radiator on the plan, and use the card to adjust dimensions, toggle `Plug socket nearby` (for radiators), or nudge its position in **10 mm** increments</span><span class="" data-path-to-node="65,1,0,1"><sup class="superscript"></sup></span></span>
- <span class="" data-path-to-node="65,0,0,3"><span class="" data-path-to-node="65,1,0,1"><span data-path-to-node="65,2,0,0">**Add a missed room:** With no room selected, tap `Add Room`, choose the room type, and select `Scan It` (LiDAR), `Measure with Taps` (AR), or `Enter Size` (manual rectangle)</span><span class="" data-path-to-node="65,2,0,1"><sup class="superscript"></sup></span> </span></span>

<span class="" data-path-to-node="65,0,0,3"><span class="" data-path-to-node="65,1,0,1"><span data-path-to-node="65,2,0,0">[![Screenshot_20261119_134503.png](https://help.heatpunk.co.uk/uploads/images/gallery/2026-11/scaled-1680-/vLj1H4U41QOs98WQ-screenshot-20261119-134503.png)](https://help.heatpunk.co.uk/uploads/images/gallery/2026-11/vLj1H4U41QOs98WQ-screenshot-20261119-134503.png)</span></span></span>

### Lining up multiple floors

<span data-path-to-node="68,0">If the property has two or more floors, you **must** align them before sending the survey</span><span class="" data-path-to-node="68,1"><sup class="superscript"></sup></span><span data-path-to-node="68,2">.</span>

1. <span data-path-to-node="69,0,0,0">Open the floor plan with no room selected and tap `Line Up` (or select `...` &gt; `Line Floors Up` on the survey page)</span><span class="" data-path-to-node="69,0,0,1"><sup class="superscript"></sup></span><span data-path-to-node="69,0,0,2">.</span>
2. <span data-path-to-node="69,0,0,2"><span data-path-to-node="69,1,0,0">Tap `Auto Align` to snap the upper floor over the floor below (shown in blue)</span><span class="" data-path-to-node="69,1,0,1"><sup class="superscript"></sup></span><span data-path-to-node="69,1,0,2">.</span> </span>
3. <span data-path-to-node="69,0,0,2"><span data-path-to-node="69,2,0,0">Fine-tune using drag, `Nudge 50 mm`, or `Rotate` if needed</span><span class="" data-path-to-node="69,2,0,1"><sup class="superscript"></sup></span><span data-path-to-node="69,2,0,2">.</span></span>
4. <span data-path-to-node="69,0,0,2"><span data-path-to-node="69,2,0,2"><span data-path-to-node="69,3,0,0">Tap `Aligned` at the top right</span><span class="" data-path-to-node="69,3,0,1"><sup class="superscript"></sup></span><span data-path-to-node="69,3,0,2">.</span></span></span>

<p class="callout warning"><span data-path-to-node="69,0,0,2"><span data-path-to-node="69,2,0,2"><span data-path-to-node="69,3,0,2"><span data-path-to-node="18,0,1,0,0">**Warning:** Always tap `Aligned` rather than `Back` when you finish aligning floors—tapping `Back` keeps your position changes but will not mark the floors as aligned for upload</span><span data-path-to-node="18,0,1,0,1"><sup class="superscript"></sup></span><span data-path-to-node="18,0,1,0,2">.</span></span></span></span></p>

---

### <span class="corp-icon material-symbols-rounded icon-support mceNonEditable" style="user-select: none;">​</span>Still Need Help?

**Contact Support:** If you've got further questions, get in touch with our support team at **help@heatpunk.co.uk** (UK) or **help@heatpunk.ie** (IE). *If you are experiencing a bug, to help us look into your issue faster, please include the email address of your account, the name of the project and screenshots of any unexpected behaviour.*

# 6. Drawing floor & ceiling regions, rooflights & dormers

<span data-path-to-node="72,0">By default, Heatpunk assumes the lowest floor sits on the ground and the highest ceiling is a standard flat roof</span><span class="" data-path-to-node="72,1"><sup class="superscript"></sup></span><span data-path-to-node="72,2">. You only need to use the **Floor** and **Ceiling** layers when part of a property differs—such as a room over an unheated garage, a suspended timber floor, a flat roof extension, or a room in the roof</span><span class="" data-path-to-node="72,3"><sup class="superscript"></sup></span><span class="" data-path-to-node="72,4">. For more background on how regions work on the web, see the [Floor and ceiling regions](https://help.heatpunk.co.uk/books/plans-task/page/floor-and-ceiling-regions) guide in the **Plans task**</span><span class="" data-path-to-node="72,5"><sup class="superscript"></sup></span><span data-path-to-node="72,6">.</span>

---

<p class="callout warning"><span data-path-to-node="21,0,1,0,0">**Warning:** Regions on the same layer must not overlap by more than 0.5 m², or you will not be able to send the survey</span><span data-path-to-node="21,0,1,0,1"><sup class="superscript"></sup></span><span data-path-to-node="21,0,1,0,2">.</span> </p>

### Adding a floor or ceiling region

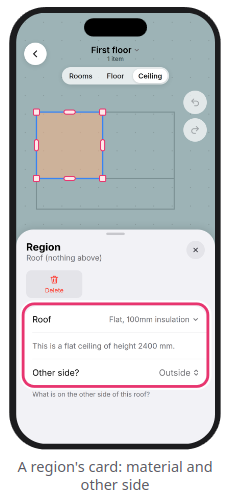
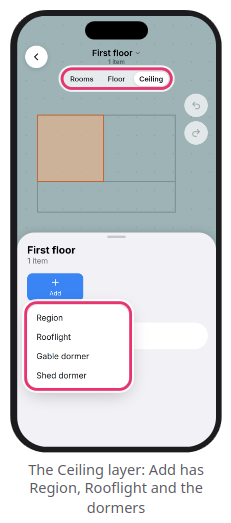
1. <span data-path-to-node="74,0,0,0">Open the floor plan, select the relevant floor at the top, and toggle the top switch from `Rooms` to `Floor` (between this floor and the floor below) or `Ceiling` (between this floor and the floor above)</span><span class="" data-path-to-node="74,0,0,1"><sup class="superscript"></sup></span><span data-path-to-node="74,0,0,2">.</span>
2. <span data-path-to-node="74,0,0,2"><span class="" data-path-to-node="74,1,0,0">Tap `+ Add` &gt; `Region`</span><span class="" data-path-to-node="74,1,0,1"><sup class="superscript"></sup></span><span class="" data-path-to-node="74,1,0,2">.</span></span>
3. <span data-path-to-node="74,0,0,2"><span class="" data-path-to-node="74,1,0,2"><span data-path-to-node="74,2,0,0">Drag the region and use its corner and edge handles to snap it over the relevant area</span><span class="" data-path-to-node="74,2,0,1"><sup class="superscript"></sup></span><span data-path-to-node="74,2,0,2">.</span></span></span>
4. <span data-path-to-node="74,0,0,2"><span class="" data-path-to-node="74,1,0,2"><span data-path-to-node="74,2,0,2"><span data-path-to-node="74,3,0,0">On the region card, select the **Material** build-up and set `Other side?` (`Ground`, `Outside`, `Unheated Space`, or `Heated Space`)</span><span class="" data-path-to-node="74,3,0,1"><sup class="superscript"></sup></span><span data-path-to-node="74,3,0,2">.</span></span></span></span>

[![Screenshot_20261119_135342.png](https://help.heatpunk.co.uk/uploads/images/gallery/2026-11/scaled-1680-/KvAPAV9eAljW0Qaq-screenshot-20261119-135342.png)](https://help.heatpunk.co.uk/uploads/images/gallery/2026-11/KvAPAV9eAljW0Qaq-screenshot-20261119-135342.png)

### Drawing a sloped ceiling (room in the roof)

1. <span class="" data-path-to-node="76,0,0,0">On the `Ceiling` layer, draw a `Region` covering the sloped portion of the ceiling</span><span class="" data-path-to-node="76,0,0,1"><sup class="superscript"></sup></span><span class="" data-path-to-node="76,0,0,2">.</span>
2. <span data-path-to-node="76,1,0,0">Select the region, tap a **corner dot**, and enter the ceiling height at that corner in **mm**</span><span class="" data-path-to-node="76,1,0,1"><sup class="superscript"></sup></span><span data-path-to-node="76,1,0,2">. Tap the `tick` to confirm</span><span class="" data-path-to-node="76,1,0,3"><sup class="superscript"></sup></span><span data-path-to-node="76,1,0,4">.</span>
3. <span data-path-to-node="76,1,0,4"><span class="" data-path-to-node="76,2,0,0">Repeat for the remaining corners—a red arrow will appear on the plan pointing down the slope</span><span class="" data-path-to-node="76,2,0,1"><sup class="superscript"></sup></span><span data-path-to-node="76,2,0,2">. (All corner heights must form a single flat plane</span><span class="" data-path-to-node="76,2,0,3"><sup class="superscript"></sup></span><span data-path-to-node="76,2,0,4">.)</span></span>

### Adding rooflights and dormers

- <span data-path-to-node="78,0,0,0">**Rooflight:** On the top floor's `Ceiling` layer, tap `+ Add` &gt; `Rooflight`, drag it onto the roof region, and set its glazing material, `Aspect` (`Plan` or `Roof`), and dimensions in **mm**</span><span class="" data-path-to-node="78,0,0,1"><sup class="superscript"></sup></span>
- <span class="" data-path-to-node="78,0,0,1"><span data-path-to-node="78,1,0,0">**Dormer:** First draw the sloped ceiling region, then tap `+ Add` &gt; `Gable dormer` or `Shed dormer`</span><span class="" data-path-to-node="78,1,0,1"><sup class="superscript"></sup></span><span class="" data-path-to-node="78,1,0,2">. Drag it **wholly inside** the sloped ceiling region, enter the roof and wall materials, gutter height (`A`), and ridge height (`B`), then tap the dormer window strip to set the window size</span><span class="" data-path-to-node="78,1,0,3"><sup class="superscript"></sup></span></span>

<span class="" data-path-to-node="78,0,0,1"><span class="" data-path-to-node="78,1,0,2">[![Screenshot_20261119_135307.png](https://help.heatpunk.co.uk/uploads/images/gallery/2026-11/scaled-1680-/KLDkOSpF1QtC7ZgI-screenshot-20261119-135307.png)](https://help.heatpunk.co.uk/uploads/images/gallery/2026-11/KLDkOSpF1QtC7ZgI-screenshot-20261119-135307.png)</span></span>

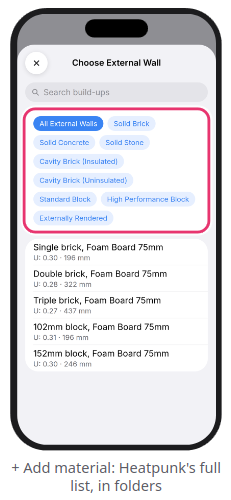
### Adding a material not in your palette

<span data-path-to-node="80,0">If a wall, floor, roof, or window build-up is missing from your dropdown list, scroll to the bottom and tap `+ Add material` to search Heatpunk's full material library and add it to the current survey</span><span class="" data-path-to-node="80,1"><sup class="superscript"></sup></span><span data-path-to-node="80,2">.  
</span>

<span data-path-to-node="80,2">[![Screenshot_20261119_135359.png](https://help.heatpunk.co.uk/uploads/images/gallery/2026-11/scaled-1680-/L9tpeZbcWslX6iJJ-screenshot-20261119-135359.png)](https://help.heatpunk.co.uk/uploads/images/gallery/2026-11/L9tpeZbcWslX6iJJ-screenshot-20261119-135359.png)</span>

<p class="callout info"><span data-path-to-node="80,2"><span data-path-to-node="21,1,1,0,0">**Note:** Adding a material via `+ Add material` adds it only to the current survey—it does not change your saved palettes on the Heatpunk website</span><span data-path-to-node="21,1,1,0,1"><sup class="superscript"></sup></span><span data-path-to-node="21,1,1,0,2">.</span></span></p>

---

### <span class="corp-icon material-symbols-rounded icon-support mceNonEditable" style="user-select: none;">​</span>Still Need Help?

**Contact Support:** If you've got further questions, get in touch with our support team at **help@heatpunk.co.uk** (UK) or **help@heatpunk.ie** (IE). *If you are experiencing a bug, to help us look into your issue faster, please include the email address of your account, the name of the project and screenshots of any unexpected behaviour.*

# 7. Survey questions & photo markups

<span data-path-to-node="83,0">The app includes all **14 standard Heatpunk survey sections**</span><span class="" data-path-to-node="83,1"><sup class="superscript"></sup></span><span data-path-to-node="83,2">. You can complete them on site without signal, and your answers save automatically</span><span class="" data-path-to-node="83,3"><sup class="superscript"></sup></span><span data-path-to-node="83,4">.</span>

---

### Answering survey questions

1. <span class="" data-path-to-node="85,0,0,0">Open the survey's page and tap the `Survey Questions` card (or tap `...` &gt; `Survey` during a room walk)</span><span class="" data-path-to-node="85,0,0,1"><sup class="superscript"></sup></span><span data-path-to-node="85,0,0,2">.</span>
2. <span data-path-to-node="85,0,0,2"><span data-path-to-node="85,1,0,0">Tap `Start` or `Continue` to work through the remaining sections in order, or tap any individual section from the list</span><span class="" data-path-to-node="85,1,0,1"><sup class="superscript"></sup></span><span data-path-to-node="85,1,0,2">.</span></span>
3. <span data-path-to-node="85,0,0,2"><span data-path-to-node="85,1,0,2"><span class="" data-path-to-node="85,2,0,0">For photo questions, tap `Take Photo` to capture a new image, or `From Project` to reuse a photo you already took during the room walk</span><span class="" data-path-to-node="85,2,0,1"><sup class="superscript"></sup></span><span data-path-to-node="85,2,0,2">.</span></span></span>
4. <span data-path-to-node="85,0,0,2"><span data-path-to-node="85,1,0,2"><span data-path-to-node="85,2,0,2"><span class="" data-path-to-node="85,3,0,0">Tap `Photos Still Needed` at the top of the Survey Questions screen to view a checklist of any missing photos</span><span class="" data-path-to-node="85,3,0,1"><sup class="superscript"></sup></span><span class="" data-path-to-node="85,3,0,2">.</span></span></span></span>

<details id="bkmrk-list-of-the-14-surve"><summary>List of the 14 survey sections</summary>

1. <span data-path-to-node="27,1,1,0,0,0">Property Details *(Outside)*</span><span class="" data-path-to-node="27,1,1,0,0,1"><sup class="superscript"></sup></span>
2. <span data-path-to-node="27,1,1,1,0,0">Access *(Outside)*</span><span class="" data-path-to-node="27,1,1,1,0,1"><sup class="superscript"></sup></span>
3. <span data-path-to-node="27,1,1,2,0,0">Proposed Heat Pump Location *(Outside)*</span><span class="" data-path-to-node="27,1,1,2,0,1"><sup class="superscript"></sup></span>
4. <span data-path-to-node="27,1,1,3,0,0">Existing Heating System</span><span class="" data-path-to-node="27,1,1,3,0,1"><sup class="superscript"></sup></span>
5. <span data-path-to-node="27,1,1,4,0,0">Heat Emitters</span><span class="" data-path-to-node="27,1,1,4,0,1"><sup class="superscript"></sup></span>
6. <span data-path-to-node="27,1,1,5,0,0">Inside pipework</span><span class="" data-path-to-node="27,1,1,5,0,1"><sup class="superscript"></sup></span>
7. <span data-path-to-node="27,1,1,6,0,0">Domestic Hot Water Supply</span><span class="" data-path-to-node="27,1,1,6,0,1"><sup class="superscript"></sup></span>
8. <span data-path-to-node="27,1,1,7,0,0">Proposed cylinder location</span><span class="" data-path-to-node="27,1,1,7,0,1"><sup class="superscript"></sup></span>
9. <span data-path-to-node="27,1,1,8,0,0">Energy Use</span><span class="" data-path-to-node="27,1,1,8,0,1"><sup class="superscript"></sup></span>
10. <span data-path-to-node="27,1,1,9,0,0">Electrical System</span><span class="" data-path-to-node="27,1,1,9,0,1"><sup class="superscript"></sup></span>
11. <span data-path-to-node="27,1,1,10,0,0">Wiring route *(Outside)*</span><span class="" data-path-to-node="27,1,1,10,0,1"><sup class="superscript"></sup></span>
12. <span data-path-to-node="27,1,1,11,0,0">Pipe runs *(Outside)*</span><span class="" data-path-to-node="27,1,1,11,0,1"><sup class="superscript"></sup></span>
13. <span data-path-to-node="27,1,1,12,0,0">Vents *(optional)*</span><span class="" data-path-to-node="27,1,1,12,0,1"><sup class="superscript"></sup></span>
14. <span data-path-to-node="27,1,1,13,0,0">Additional information</span><span class="" data-path-to-node="27,1,1,13,0,1"><sup class="superscript"></sup></span>

</details>[![Screenshot_20261119_135816.png](https://help.heatpunk.co.uk/uploads/images/gallery/2026-11/scaled-1680-/AuJCrp9IC4co4aOB-screenshot-20261119-135816.png)](https://help.heatpunk.co.uk/uploads/images/gallery/2026-11/AuJCrp9IC4co4aOB-screenshot-20261119-135816.png)

### Marking up photos &amp; drawing pipework

<span data-path-to-node="89,0">You can annotate photos to clearly show installers where equipment, pipe runs, and cables will go</span><span class="" data-path-to-node="89,1"><sup class="superscript"></sup></span><span data-path-to-node="89,2">.</span>

1. <span data-path-to-node="89,2"><span data-path-to-node="90,0,0,0">Tap any photo to open it full-screen</span><span class="" data-path-to-node="90,0,0,1"><sup class="superscript"></sup></span><span data-path-to-node="90,0,0,2">.</span></span>
2. <span data-path-to-node="89,2"><span data-path-to-node="90,0,0,2"><span data-path-to-node="90,1,0,0">**General annotations:** Tap `Mark Up` to draw freehand or add shapes and text using Apple's markup tools, then tap `Done` (a clean original is always preserved in the background)</span><span class="" data-path-to-node="90,1,0,1"><sup class="superscript"></sup></span><span data-path-to-node="90,1,0,2">.</span></span></span>
3. <span data-path-to-node="89,2"><span data-path-to-node="90,0,0,2"><span data-path-to-node="90,1,0,2"><span data-path-to-node="90,2,0,0">**Pipework &amp; cable routing** (available on survey question, radiator, boiler, and stopcock photos)</span><span class="" data-path-to-node="90,2,0,1"><sup class="superscript"></sup></span><span data-path-to-node="90,2,0,2">:</span></span></span></span>
    - <span data-path-to-node="89,2"><span data-path-to-node="90,0,0,2"><span data-path-to-node="90,1,0,2"><span data-path-to-node="90,2,0,2"><span data-path-to-node="90,2,1,0,0,0">Tap `Pipework` at the bottom right</span><span class="" data-path-to-node="90,2,1,0,0,1"><sup class="superscript"></sup></span></span></span></span></span>
    - <span data-path-to-node="89,2"><span data-path-to-node="90,0,0,2"><span data-path-to-node="90,1,0,2"><span data-path-to-node="90,2,0,2"><span class="" data-path-to-node="90,2,1,0,0,1"><span data-path-to-node="90,2,1,1,0,0">Tap `Route`, select the pipe or cable type (`Flow & Return`, `Hot Water`, `Cold Main`, `Condensate`, `Power Cable`, `Controls Cable`, etc.) and diameter (e.g., `22 mm`), then tap along the photo to plot each bend and tap `Finish`</span><span class="" data-path-to-node="90,2,1,1,0,1"><sup class="superscript"></sup></span> </span></span></span></span></span>
    - <span data-path-to-node="89,2"><span data-path-to-node="90,0,0,2"><span data-path-to-node="90,1,0,2"><span data-path-to-node="90,2,0,2"><span class="" data-path-to-node="90,2,1,0,0,1">Tap `Mark` to place icons for `Heat Pump`, `Core Hole`, `Cylinder`, `Isolator`, `Consumer Unit`, `Valve`, or a `Note`</span></span></span></span></span>
    - Tap `Done` at the top right to save the annotated image

[![Screenshot_20261119_135842.png](https://help.heatpunk.co.uk/uploads/images/gallery/2026-11/scaled-1680-/eFRQZyhqxw0yFrbb-screenshot-20261119-135842.png)](https://help.heatpunk.co.uk/uploads/images/gallery/2026-11/eFRQZyhqxw0yFrbb-screenshot-20261119-135842.png)

<p class="callout info"><span data-path-to-node="24,0,1,0,0">**Note:** Deleting a photo from a room removes it from the entire survey and any linked questions</span><span data-path-to-node="24,0,1,0,1"><sup class="superscript"></sup></span><span data-path-to-node="24,0,1,0,2">. Deleting a photo from a survey question removes it only from that question</span><span data-path-to-node="24,0,1,0,3"><sup class="superscript"></sup></span><span data-path-to-node="24,0,1,0,4">.</span></p>

---

### <span class="corp-icon material-symbols-rounded icon-support mceNonEditable" style="user-select: none;">​</span>Still Need Help?

**Contact Support:** If you've got further questions, get in touch with our support team at **help@heatpunk.co.uk** (UK) or **help@heatpunk.ie** (IE). *If you are experiencing a bug, to help us look into your issue faster, please include the email address of your account, the name of the project and screenshots of any unexpected behaviour.*

# 8. Confirming house materials (Fabric)

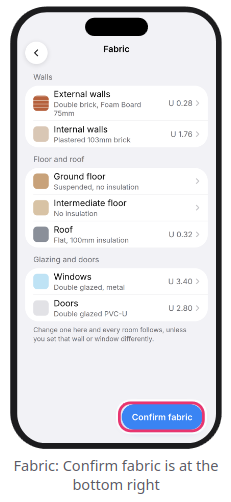
<span data-path-to-node="93,0">Before leaving the property, review and confirm the default construction materials for the whole house</span><span class="" data-path-to-node="93,1"><sup class="superscript"></sup></span><span class="" data-path-to-node="93,2">. To manage your saved palettes on the web, see the [Material library and palettes](https://help.heatpunk.co.uk/books/plans-task/chapter/material-library-and-palettes) guide in the **Plans task**</span><span class="" data-path-to-node="93,3"><sup class="superscript"></sup></span><span data-path-to-node="93,4">.</span>

---

### Confirming whole-house materials

1. <span data-path-to-node="95,0,0,0">On the survey's page, scroll down to **House** and tap `Walls, Floors & Windows` (marked *Not Confirmed* in orange)</span><span class="" data-path-to-node="95,0,0,1"><sup class="superscript"></sup></span><span data-path-to-node="95,0,0,2">.</span>
2. Review each category and its U-value:
    
    
    - <span data-path-to-node="95,1,1,0,0,0">**Walls:** `External walls`, `Internal walls`</span><span class="" data-path-to-node="95,1,1,0,0,1"><sup class="superscript"></sup></span>
    - <span class="" data-path-to-node="95,1,1,0,0,1"><span data-path-to-node="95,1,1,1,0,0">**Floor and roof:** `Ground floor`, `Intermediate floor`, `Roof`</span><span class="" data-path-to-node="95,1,1,1,0,1"><sup class="superscript"></sup></span> </span>
    - <span class="" data-path-to-node="95,1,1,0,0,1"><span data-path-to-node="95,1,1,2,0,0">**Glazing and doors:** `Windows`, `Doors`</span><span class="" data-path-to-node="95,1,1,2,0,1"><sup class="superscript"></sup></span></span>
3. <span class="" data-path-to-node="95,1,1,0,0,1"><span class="" data-path-to-node="95,1,1,2,0,1"><span class="" data-path-to-node="95,2,0,0">Tap any row to change its build-up—changing a material here updates every room in the survey unless you have overridden a specific wall or window individually</span><span class="" data-path-to-node="95,2,0,1"><sup class="superscript"></sup></span><span data-path-to-node="95,2,0,2">.</span> </span></span>
4. <span class="" data-path-to-node="95,1,1,0,0,1"><span class="" data-path-to-node="95,1,1,2,0,1"><span data-path-to-node="95,3,0,0">Tap `Confirm fabric` at the bottom right</span><span class="" data-path-to-node="95,3,0,1"><sup class="superscript"></sup></span><span data-path-to-node="95,3,0,2">.</span></span></span>

<span class="" data-path-to-node="95,1,1,0,0,1"><span class="" data-path-to-node="95,1,1,2,0,1"><span data-path-to-node="95,3,0,2">[![Screenshot_20261119_140257.png](https://help.heatpunk.co.uk/uploads/images/gallery/2026-11/scaled-1680-/8BsyJdV5Yt87ut8s-screenshot-20261119-140257.png)](https://help.heatpunk.co.uk/uploads/images/gallery/2026-11/8BsyJdV5Yt87ut8s-screenshot-20261119-140257.png)</span></span></span>

<p class="callout info"><span class="" data-path-to-node="95,1,1,0,0,1"><span class="" data-path-to-node="95,1,1,2,0,1"><span data-path-to-node="95,3,0,2"><span data-path-to-node="27,0,1,0,0">**Note:** If you change a material after tapping `Confirm fabric`, the fabric status resets to unconfirmed—remember to tap `Confirm fabric` again before leaving</span><span data-path-to-node="27,0,1,0,1"><sup class="superscript"></sup></span><span data-path-to-node="27,0,1,0,2">.</span></span></span></span></p>

### Overriding a single wall or window

If an extension or specific wall is built differently from the rest of the property:

1. <span class="" data-path-to-node="98,0,0,0">Open the wall in the **Room Editor** (or during Step 1 of the room walk)</span><span class="" data-path-to-node="98,0,0,1"><sup class="superscript"></sup></span><span class="" data-path-to-node="98,0,0,2">.</span>
2. <span class="" data-path-to-node="98,1,0,0">Tap `Built Of` and select the new material</span><span class="" data-path-to-node="98,1,0,1"><sup class="superscript"></sup></span><span data-path-to-node="98,1,0,2">.</span>
3. <span data-path-to-node="98,1,0,2"><span data-path-to-node="98,2,0,0">When prompted, select `Just This Wall` (selecting `Change Every Outside Wall` updates the whole house)</span><span class="" data-path-to-node="98,2,0,1"><sup class="superscript"></sup></span><span data-path-to-node="98,2,0,2">.</span></span>

---

### <span class="corp-icon material-symbols-rounded icon-support mceNonEditable" style="user-select: none;">​</span>Still Need Help?

**Contact Support:** If you've got further questions, get in touch with our support team at **help@heatpunk.co.uk** (UK) or **help@heatpunk.ie** (IE). *If you are experiencing a bug, to help us look into your issue faster, please include the email address of your account, the name of the project and screenshots of any unexpected behaviour.*

# 9. Checking & sending your survey to Heatpunk

<span data-path-to-node="101,0">Once your rooms, floor plans, and survey questions are complete, run a final check before uploading the project to your Heatpunk account</span><span class="" data-path-to-node="101,1"><sup class="superscript"></sup></span><span data-path-to-node="101,2">.</span>

---

### 1. Review Before You Leave

1. <span data-path-to-node="103,0,0,0">Tap `More` &gt; `Finish Survey` after your last room, or tap `Send to Heatpunk` on the survey's page</span><span class="" data-path-to-node="103,0,0,1"><sup class="superscript"></sup></span><span data-path-to-node="103,0,0,2">.</span>
2. <span data-path-to-node="103,0,0,2"><span class="" data-path-to-node="103,1,0,0">Review the floor plan for each floor and tap `Next` at the top right to open **Before You Leave**</span><span class="" data-path-to-node="103,1,0,1"><sup class="superscript"></sup></span><span class="" data-path-to-node="103,1,0,2">.</span></span>
3. <span data-path-to-node="103,0,0,2"><span class="" data-path-to-node="103,1,0,2"><span data-path-to-node="103,2,0,0">Any missing items are grouped into three sections</span><span class="" data-path-to-node="103,2,0,1"><sup class="superscript"></sup></span><span data-path-to-node="103,2,0,2">:</span></span></span>
    - <span data-path-to-node="103,0,0,2"><span class="" data-path-to-node="103,1,0,2"><span data-path-to-node="103,2,0,2"><span data-path-to-node="103,2,1,0,0,0">**Needed to Send (Blocking):** Issues that must be resolved before uploading (e.g., unaligned floors, a room missing a Room Type, a radiator with no size, overlapping regions, or a dormer extending outside a sloped roof)</span><span class="" data-path-to-node="103,2,1,0,0,1"><sup class="superscript"></sup></span><span class="" data-path-to-node="103,2,1,0,0,2">. Tap any row or tap `Fix Now` to jump straight to the fix</span><span class="" data-path-to-node="103,2,1,0,0,3"><sup class="superscript"></sup></span></span></span></span>
    - <span data-path-to-node="103,0,0,2"><span class="" data-path-to-node="103,1,0,2"><span data-path-to-node="103,2,0,2"><span class="" data-path-to-node="103,2,1,0,0,3"><span class="" data-path-to-node="103,2,1,1,0,0">**Needed for an Accurate Heat Loss (Warning):** Non-blocking reminders (e.g., unconfirmed fabric materials, an unanswered fireplace flue, or a missing party wall)</span><span class="" data-path-to-node="103,2,1,1,0,1"><sup class="superscript"></sup></span> </span></span></span></span>
    - <span data-path-to-node="103,0,0,2"><span class="" data-path-to-node="103,1,0,2"><span data-path-to-node="103,2,0,2"><span class="" data-path-to-node="103,2,1,0,0,3"><span data-path-to-node="103,2,1,2,0,0">**Survey Answers and Photos (Warning):** Lists any unfinished survey sections</span><span class="" data-path-to-node="103,2,1,2,0,1"><sup class="superscript"></sup></span> </span></span></span></span>

<details id="bkmrk-common-%22needed-to-se"><summary>Common "Needed to Send" errors and how to fix them</summary>

- <span data-path-to-node="31,1,1,0,0,0">**"\[Room\] needs a type":** Open the room and assign a `Room Type`</span><span class="" data-path-to-node="31,1,1,0,0,1"><sup class="superscript"></sup></span>
- <span data-path-to-node="31,1,1,1,0,0">**"A radiator in \[Room\] has no size":** Type or camera-measure the radiator's dimensions</span><span class="" data-path-to-node="31,1,1,1,0,1"><sup class="superscript"></sup></span>
- <span data-path-to-node="31,1,1,2,0,0">**"The floors are not lined up":** Align your floors on the floor plan and tap `Aligned` at the top right</span><span class="" data-path-to-node="31,1,1,2,0,1"><sup class="superscript"></sup></span>
- <span data-path-to-node="31,1,1,3,0,0">**"Regions overlap by ... m²":** Move or reshape your floor or ceiling regions so they do not overlap</span><span class="" data-path-to-node="31,1,1,3,0,1"><sup class="superscript"></sup></span>
- <span data-path-to-node="31,1,1,4,0,0">**"This dormer is not fully contained in a sloped roof":** Move the dormer completely inside a sloped ceiling region</span><span class="" data-path-to-node="31,1,1,4,0,1"><sup class="superscript"></sup></span>
- <span data-path-to-node="31,1,1,5,0,0">**"The project details are missing":** Open `...` &gt; `Edit Details` and add the full postcode and house build era</span><span class="" data-path-to-node="31,1,1,5,0,1"><sup class="superscript"></sup></span>
- <span data-path-to-node="31,1,1,6,0,0">**"How sheltered the house is from the wind":** Select a wind shelter option on the `Ventilation` screen</span><span class="" data-path-to-node="31,1,1,6,0,1"><sup class="superscript"></sup></span>
- <span data-path-to-node="31,1,1,7,0,0">**"The measured air permeability":** Enter the air tightness test result on the `Ventilation` screen</span><span class="" data-path-to-node="31,1,1,7,0,1"><sup class="superscript"></sup></span>

</details>[![Screenshot_20261119_140350.png](https://help.heatpunk.co.uk/uploads/images/gallery/2026-11/scaled-1680-/7hZFHPcTcVmdihKD-screenshot-20261119-140350.png)](https://help.heatpunk.co.uk/uploads/images/gallery/2026-11/7hZFHPcTcVmdihKD-screenshot-20261119-140350.png)

### 2. Send the survey

1. <span data-path-to-node="105,0,0,0">Tap `Send to Heatpunk` (or `Send Anyway` if only non-blocking warnings remain)</span><span class="" data-path-to-node="105,0,0,1"><sup class="superscript"></sup></span><span data-path-to-node="105,0,0,2">.</span>
2. <span data-path-to-node="105,1,0,0">Keep the app open while your rooms and photos upload</span><span class="" data-path-to-node="105,1,0,1"><sup class="superscript"></sup></span><span data-path-to-node="105,1,0,2">.</span>
3. <span data-path-to-node="105,1,0,2"><span class="" data-path-to-node="105,2,0,0">When complete, the **Survey sent** receipt screen displays your unique **Reference** (e.g., `#HP-10482`) - quote this reference if you ever need Heatpunk Support to look up the upload</span><span class="" data-path-to-node="105,2,0,1"><sup class="superscript"></sup></span><span data-path-to-node="105,2,0,2">.</span></span>
4. <span data-path-to-node="105,1,0,2"><span data-path-to-node="105,2,0,2"><span data-path-to-node="105,3,0,0">Tap `Done`</span><span class="" data-path-to-node="105,3,0,1"><sup class="superscript"></sup></span><span data-path-to-node="105,3,0,2">. Your project is now ready in your Heatpunk web account</span><span class="" data-path-to-node="105,3,0,3"><sup class="superscript"></sup></span><span data-path-to-node="105,3,0,4">.</span> </span></span>

<span data-path-to-node="105,1,0,2"><span data-path-to-node="105,2,0,2"><span data-path-to-node="105,3,0,4">[![Screenshot_20261119_140407.png](https://help.heatpunk.co.uk/uploads/images/gallery/2026-11/scaled-1680-/xqNfIUqRr0bfk3dT-screenshot-20261119-140407.png)](https://help.heatpunk.co.uk/uploads/images/gallery/2026-11/xqNfIUqRr0bfk3dT-screenshot-20261119-140407.png)</span></span></span>

### <span data-path-to-node="105,1,0,2"><span data-path-to-node="105,2,0,2">3. Making changes after sending</span></span>

- <span data-path-to-node="105,1,0,2"><span data-path-to-node="105,2,0,2"><span data-path-to-node="107,0,0,0">**Updated survey answers or photos:** Open the survey's page and tap `Send Update` on the Survey Questions card to update the existing project in Heatpunk</span><span class="" data-path-to-node="107,0,0,1"><sup class="superscript"></sup></span> </span></span>
- <span data-path-to-node="105,1,0,2"><span data-path-to-node="105,2,0,2"><span class="" data-path-to-node="107,1,0,0">**Updated floor plan, rooms, or property details:** Tap `Send Again` on the survey's page</span><span class="" data-path-to-node="107,1,0,1"><sup class="superscript"></sup></span> </span></span>

<p class="callout info"><span data-path-to-node="105,1,0,2"><span data-path-to-node="105,2,0,2"><span class="" data-path-to-node="107,1,0,0"><span data-path-to-node="30,0,1,0,0">**Note:** Heatpunk never overwrites an existing floor plan once sent</span><span data-path-to-node="30,0,1,0,1"><sup class="superscript"></sup></span><span data-path-to-node="30,0,1,0,2">. Tapping `Send Again` creates a **second project** in your web account (defaulting to the name `Postcode (revised)`)</span><span data-path-to-node="30,0,1,0,3"><sup class="superscript"></sup></span><span data-path-to-node="30,0,1,0,4">.</span> </span></span></span></p>

---

### <span class="corp-icon material-symbols-rounded icon-support mceNonEditable" style="user-select: none;">​</span>Still Need Help?

**Contact Support:** If you've got further questions, get in touch with our support team at **help@heatpunk.co.uk** (UK) or **help@heatpunk.ie** (IE). *If you are experiencing a bug, to help us look into your issue faster, please include the email address of your account, the name of the project and screenshots of any unexpected behaviour.*

# 10. Managing surveys, troubleshooting & FAQs

### Managing surveys on your device

- **Find &amp; filter:** Open the `Surveys` tab to filter by status (`Not Scanned`, `Needs Attention`, `Ready to Send`, `Sent`), toggle between Gallery and List views, or use the `Search` tab to find a postcode or customer name
- **Edit details:** Open a survey, tap `...` &gt; `Edit Details`, make your changes, and tap the `blue tick`
- <span data-path-to-node="111,2,0,0">**Delete surveys:** Open a survey and tap `...` &gt; `Delete Survey` (or tap `...` &gt; `Select Surveys` on the Surveys tab to bulk delete)</span><span class="" data-path-to-node="111,2,0,1"><sup class="superscript"></sup></span><span data-path-to-node="111,2,0,2">. Surveys already marked `Sent` remain safely in your Heatpunk web account when deleted from your phone</span><span class="" data-path-to-node="111,2,0,3"><sup class="superscript"></sup></span>

<span data-path-to-node="111,2,0,2">[![Screenshot_20261119_140600.png](https://help.heatpunk.co.uk/uploads/images/gallery/2026-11/scaled-1680-/F1maxqPZa5sdFWci-screenshot-20261119-140600.png)](https://help.heatpunk.co.uk/uploads/images/gallery/2026-11/F1maxqPZa5sdFWci-screenshot-20261119-140600.png)[ ![Screenshot_20261119_140547.png](https://help.heatpunk.co.uk/uploads/images/gallery/2026-11/scaled-1680-/7bN4OajUwW6uveae-screenshot-20261119-140547.png)](https://help.heatpunk.co.uk/uploads/images/gallery/2026-11/7bN4OajUwW6uveae-screenshot-20261119-140547.png)</span>
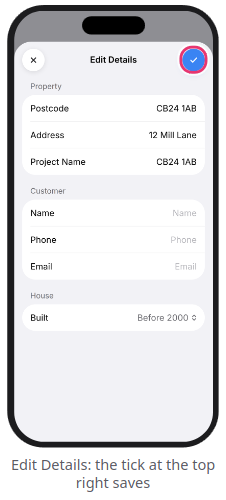
<p class="callout warning"><span data-path-to-node="111,2,0,2"><span data-path-to-node="33,0,1,0,0">**Warning:** Deleting a survey that has never been sent to Heatpunk permanently erases it—always upload your survey first</span><span data-path-to-node="33,0,1,0,1"><sup class="superscript"></sup></span><span data-path-to-node="33,0,1,0,2">.</span> </span></p>

---

### FAQs

<span class="" data-path-to-node="114,0">**<span class="corp-icon material-symbols-rounded icon-expand mceNonEditable" style="user-select: none;">​</span>*Expand the sections below for information on common scanning, sending, and account questions*</span><span class="" data-path-to-node="114,1"><sup class="superscript"></sup></span>

<details id="bkmrk-%E2%9D%93-%C2%A0"><summary>❓Two rooms merged into one during a LiDAR scan</summary>

<span data-path-to-node="35,1,0,0">Wide openings between spaces or very cluttered floors can cause two rooms to read as one</span><span class="" data-path-to-node="35,1,0,1"><sup class="superscript"></sup></span><span data-path-to-node="35,1,0,2">. Fix this on the floor plan by resizing the room in the **Room Editor**, or close the door between the rooms and re-scan them separately</span><span class="" data-path-to-node="35,1,0,3"><sup class="superscript"></sup></span><span data-path-to-node="35,1,0,4">.</span>

</details><details id="bkmrk-%E2%9D%93-%C2%A0-1"><summary>❓The floor plan looks slightly skewed</summary>

<span data-path-to-node="37,1,0,0">Scans can occasionally drift by a degree or two, and the app automatically straightens slight offsets</span><span class="" data-path-to-node="37,1,0,1"><sup class="superscript"></sup></span><span data-path-to-node="37,1,0,2">. Deliberately angled walls (such as bay windows) are left angled on purpose</span><span class="" data-path-to-node="37,1,0,3"><sup class="superscript"></sup></span><span data-path-to-node="37,1,0,4">. If a room is still slightly off-square, select it on the floor plan and tap `Square Up` on the room card</span><span class="" data-path-to-node="37,1,0,5"><sup class="superscript"></sup></span><span data-path-to-node="37,1,0,6">.</span>

</details><details id="bkmrk-%E2%9D%93-%C2%A0-2"><summary>❓Inner walls are missing when I open the project on the Heatpunk website</summary>

<span data-path-to-node="39,1,0,0">Your rooms uploaded properly—the web floor plan simply calculates internal partition walls after a room is adjusted</span><span class="" data-path-to-node="39,1,0,1"><sup class="superscript"></sup></span><span data-path-to-node="39,1,0,2">. On the Heatpunk website's floor plan, drag any room slightly and drop it back into place; all internal walls will appear</span><span class="" data-path-to-node="39,1,0,3"><sup class="superscript"></sup></span><span data-path-to-node="39,1,0,4">.</span>

</details><details id="bkmrk-%E2%9D%93the-stop-button-sta"><summary>❓The stop button stays grey during a LiDAR scan</summary>

<span data-path-to-node="41,1,0,0">The scan requires at least **3 walls** to be detected before the stop button activates</span><span class="" data-path-to-node="41,1,0,1"><sup class="superscript"></sup></span><span data-path-to-node="41,1,0,2">. Keep sweeping the camera slowly around the room until 3 walls have been captured</span><span class="" data-path-to-node="41,1,0,3"><sup class="superscript"></sup></span><span data-path-to-node="41,1,0,4">.</span>

</details><details id="bkmrk-%E2%9D%93the-app-says-%22key-n"><summary>❓The app says "Key not accepted" or asks me to "Reconnect"</summary>

<span data-path-to-node="43,1,0,0">Your device key was removed on the website or your **Pro** subscription ended</span><span class="" data-path-to-node="43,1,0,1"><sup class="superscript"></sup></span><span data-path-to-node="43,1,0,2">. Generate a new QR code under `My Account` &gt; `Preferences` &gt; `Heatpunk App` on a computer, then open `Settings` in the app and tap `Reconnect`</span><span class="" data-path-to-node="43,1,0,3"><sup class="superscript"></sup></span><span data-path-to-node="43,1,0,4">. Your existing surveys remain safely on your phone</span><span class="" data-path-to-node="43,1,0,5"><sup class="superscript"></sup></span><span data-path-to-node="43,1,0,6">.</span>

</details><details id="bkmrk-%E2%9D%93i-got-a-new-phone-f"><summary>❓I got a new phone</summary>

<span data-path-to-node="45,1,0,0">First, send any unsent surveys from your old phone—they are stored locally on that device and are not in Heatpunk yet</span><span class="" data-path-to-node="45,1,0,1"><sup class="superscript"></sup></span><span data-path-to-node="45,1,0,2">. Then log in to the Heatpunk website, click `Remove` next to your old phone under **Your devices**, and generate a new QR code to connect your new phone</span><span class="" data-path-to-node="45,1,0,3"><sup class="superscript"></sup></span><span data-path-to-node="45,1,0,4">.</span>

</details>---

### Reporting issues &amp; contacting support

- **In-app tips:** Go to `Settings` &gt; `Help & Support` &gt; `Getting a Clean Scan` &gt; `Show Me` for a quick 6-step refresher
- <span class="" data-path-to-node="117,1,0,0">**Send Feedback / Report a Bad Scan:** In `Settings` &gt; `Help & Support`, tap `Send Feedback` (to attach diagnostic logs) or `Report a Bad Scan` (to attach the raw scan `.zip` file)</span><span class="" data-path-to-node="117,1,0,1"><sup class="superscript"></sup></span><span data-path-to-node="117,1,0,2">. Neither report includes customer personal details</span><span class="" data-path-to-node="117,1,0,3"><sup class="superscript"></sup></span>
- <span class="" data-path-to-node="117,1,0,3"><span class="" data-path-to-node="117,2,0,0">**Email Support:** Contact <help@heatpunk.co.uk> with your account email, survey **Reference** (`#HP-...`), device model, and the app **Version** (found in `Settings`)</span><span class="" data-path-to-node="117,2,0,1"><sup class="superscript"></sup></span> </span>

<span class="" data-path-to-node="117,1,0,3"><span class="" data-path-to-node="117,2,0,0">[![Gemini_Generated_Image_oyzjyroyzjyroyzj.jpeg](https://help.heatpunk.co.uk/uploads/images/gallery/2026-11/scaled-1680-/Is9A1SwQbqx9l6Zg-gemini-generated-image-oyzjyroyzjyroyzj.jpeg)](https://help.heatpunk.co.uk/uploads/images/gallery/2026-11/Is9A1SwQbqx9l6Zg-gemini-generated-image-oyzjyroyzjyroyzj.jpeg)</span></span>

---

### <span class="corp-icon material-symbols-rounded icon-support mceNonEditable" style="user-select: none;">​</span>Still Need Help?

**Contact Support:** If you've got further questions, get in touch with our support team at **help@heatpunk.co.uk** (UK) or **help@heatpunk.ie** (IE). *If you are experiencing a bug, to help us look into your issue faster, please include the email address of your account, the name of the project and screenshots of any unexpected behaviour.*