# 5. Editing the floor plan & aligning floors

<span data-path-to-node="57,0">You can view and refine your floor plan at any time by tapping the `Plan` (map) icon during a room walk, or tapping `Open` next to Floor Plan on the survey's page</span><span class="" data-path-to-node="57,1"><sup class="superscript"></sup></span><span data-path-to-node="57,2">.</span>

---

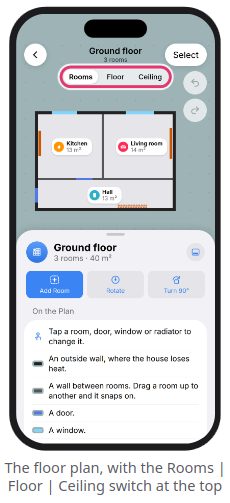
### Understanding floor plan colours

- **Thick black wall:** External wall (heat loss boundary)
- <span data-path-to-node="59,1,0,0">**Thin grey wall:** Internal partition wall between two scanned rooms</span><span class="" data-path-to-node="59,1,0,1"><sup class="superscript"></sup></span>
- **Dark blue line:** Door
- **Light blue line:** Window
- **Orange edge:** Room still needing a Room Type
- <span data-path-to-node="59,5,0,0">**Orange bar:** Radiator (solid once sized; pale and dashed if unmeasured)</span><span class="" data-path-to-node="59,5,0,1"><sup class="superscript"></sup></span>

<span data-path-to-node="59,5,0,0">[![Screenshot_20261119_134351.png](https://help.heatpunk.co.uk/uploads/images/gallery/2026-11/scaled-1680-/M3qR5WmldUmkUWmR-screenshot-20261119-134351.png)](https://help.heatpunk.co.uk/uploads/images/gallery/2026-11/M3qR5WmldUmkUWmR-screenshot-20261119-134351.png)</span>

### Moving, rotating &amp; squaring up rooms

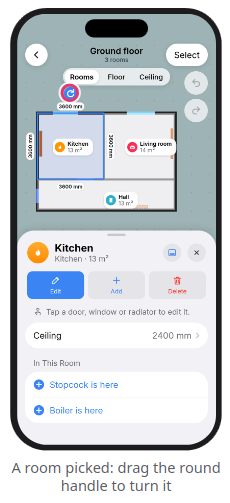
- **Move a room:** Tap a room to select it, then drag inside it—it will snap automatically to neighbouring rooms
- **Rotate a room:** Drag the round blue handle above a selected room, or tap `Square Up` on the room card to straighten walls that are slightly off-square
- **Move multiple rooms:** Tap `Select` at the top right, tap each room you want to group, and drag or rotate them together
- **Rotate the whole floor:** With no room selected, use `Rotate` or `Turn 90°` on the bottom card

[![Screenshot_20261119_134409.png](https://help.heatpunk.co.uk/uploads/images/gallery/2026-11/scaled-1680-/r7hDx33CK3kwhtly-screenshot-20261119-134409.png)](https://help.heatpunk.co.uk/uploads/images/gallery/2026-11/r7hDx33CK3kwhtly-screenshot-20261119-134409.png)
### Editing a room's shape &amp; wall boundaries

1. <span class="" data-path-to-node="63,0,0,0">Select a room and tap `Edit` to open the **Room Editor**</span><span class="" data-path-to-node="63,0,0,1"><sup class="superscript"></sup></span><span data-path-to-node="63,0,0,2">.</span>
2. <span data-path-to-node="63,0,0,2"><span data-path-to-node="63,1,0,0">**Reshape walls:** Drag pink corner squares (fixed angle), pink circles (free angle), or pink wall bars</span><span class="" data-path-to-node="63,1,0,1"><sup class="superscript"></sup></span><span data-path-to-node="63,1,0,2">. Drag a small teal dot to add a new corner, or tap any wall length to type an exact measurement in **mm**</span><span class="" data-path-to-node="63,1,0,3"><sup class="superscript"></sup></span><span data-path-to-node="63,1,0,4">.</span></span>
3. <span data-path-to-node="63,0,0,2"><span data-path-to-node="63,1,0,4"><span data-path-to-node="63,2,0,0">**Set What's Behind each wall:** Tap a wall (or open `Walls` in the card list) and set `What's Behind` to `Outside`, `Heated`, `Unheated` (e.g., an attached garage), `Ground`, or `Neighbour's Home` (essential for semi-detached and terraced party walls)</span><span class="" data-path-to-node="63,2,0,1"><sup class="superscript"></sup></span><span data-path-to-node="63,2,0,2">.</span> </span></span>
4. <span data-path-to-node="63,0,0,2"><span data-path-to-node="63,1,0,4"><span data-path-to-node="63,3,0,0">Tap the `blue tick` at the top right to save</span><span class="" data-path-to-node="63,3,0,1"><sup class="superscript"></sup></span><span data-path-to-node="63,3,0,2">.</span></span></span>

<details id="bkmrk-what-do-the-differen"><summary>What do the different "What's Behind" wall options mean?</summary>

- <span data-path-to-node="23,1,1,0,0,0">**`Outside`:** The wall is an external wall (this is the default for unshared walls)</span><span class="" data-path-to-node="23,1,1,0,0,1"><sup class="superscript"></sup></span>
- **`Heated`:** Another heated space is on the other side
- <span data-path-to-node="23,1,1,2,0,0">**`Unheated`:** An unheated space is on the other side, such as an attached garage</span><span class="" data-path-to-node="23,1,1,2,0,1"><sup class="superscript"></sup></span>
- <span data-path-to-node="23,1,1,3,0,0">**`Ground`:** Earth is on the other side, such as a basement retaining wall</span><span class="" data-path-to-node="23,1,1,3,0,1"><sup class="superscript"></sup></span>
- <span data-path-to-node="23,1,1,3,0,0"><span data-path-to-node="23,1,1,4,0,0">**`Neighbour's Home`:** The wall is a party wall shared with an adjoining property—be sure to set this on semi-detached or terraced houses so Heatpunk does not treat it as an external heat-loss wall</span><span class="" data-path-to-node="23,1,1,4,0,1"><sup class="superscript"></sup></span></span>

</details>![Screenshot_20261119_134429.png](https://help.heatpunk.co.uk/uploads/images/gallery/2026-11/scaled-1680-/KWUsN4sIdtpKeJCY-screenshot-20261119-134429.png) <span data-path-to-node="59,5,0,0">![download.gif](https://help.heatpunk.co.uk/uploads/images/gallery/2026-11/Nod6NuUEYBlxiC3g-download.gif)</span>

### Adding or editing doors, windows &amp; radiators

- <span data-path-to-node="65,0,0,0">**Add:** Select a room, tap `+ Add`, and choose `Door`, `Window`, or `Radiator`</span><span class="" data-path-to-node="65,0,0,1"><sup class="superscript"></sup></span><span data-path-to-node="65,0,0,2">. Enter the dimensions and wall, then drag it into position</span><span class="" data-path-to-node="65,0,0,3"><sup class="superscript"></sup></span>
- <span class="" data-path-to-node="65,0,0,3"><span data-path-to-node="65,1,0,0">**Edit:** Select a room, tap the door, window, or radiator on the plan, and use the card to adjust dimensions, toggle `Plug socket nearby` (for radiators), or nudge its position in **10 mm** increments</span><span class="" data-path-to-node="65,1,0,1"><sup class="superscript"></sup></span></span>
- <span class="" data-path-to-node="65,0,0,3"><span class="" data-path-to-node="65,1,0,1"><span data-path-to-node="65,2,0,0">**Add a missed room:** With no room selected, tap `Add Room`, choose the room type, and select `Scan It` (LiDAR), `Measure with Taps` (AR), or `Enter Size` (manual rectangle)</span><span class="" data-path-to-node="65,2,0,1"><sup class="superscript"></sup></span> </span></span>

<span class="" data-path-to-node="65,0,0,3"><span class="" data-path-to-node="65,1,0,1"><span data-path-to-node="65,2,0,0">[![Screenshot_20261119_134503.png](https://help.heatpunk.co.uk/uploads/images/gallery/2026-11/scaled-1680-/vLj1H4U41QOs98WQ-screenshot-20261119-134503.png)](https://help.heatpunk.co.uk/uploads/images/gallery/2026-11/vLj1H4U41QOs98WQ-screenshot-20261119-134503.png)</span></span></span>

### Lining up multiple floors

<span data-path-to-node="68,0">If the property has two or more floors, you **must** align them before sending the survey</span><span class="" data-path-to-node="68,1"><sup class="superscript"></sup></span><span data-path-to-node="68,2">.</span>

1. <span data-path-to-node="69,0,0,0">Open the floor plan with no room selected and tap `Line Up` (or select `...` &gt; `Line Floors Up` on the survey page)</span><span class="" data-path-to-node="69,0,0,1"><sup class="superscript"></sup></span><span data-path-to-node="69,0,0,2">.</span>
2. <span data-path-to-node="69,0,0,2"><span data-path-to-node="69,1,0,0">Tap `Auto Align` to snap the upper floor over the floor below (shown in blue)</span><span class="" data-path-to-node="69,1,0,1"><sup class="superscript"></sup></span><span data-path-to-node="69,1,0,2">.</span> </span>
3. <span data-path-to-node="69,0,0,2"><span data-path-to-node="69,2,0,0">Fine-tune using drag, `Nudge 50 mm`, or `Rotate` if needed</span><span class="" data-path-to-node="69,2,0,1"><sup class="superscript"></sup></span><span data-path-to-node="69,2,0,2">.</span></span>
4. <span data-path-to-node="69,0,0,2"><span data-path-to-node="69,2,0,2"><span data-path-to-node="69,3,0,0">Tap `Aligned` at the top right</span><span class="" data-path-to-node="69,3,0,1"><sup class="superscript"></sup></span><span data-path-to-node="69,3,0,2">.</span></span></span>

<p class="callout warning"><span data-path-to-node="69,0,0,2"><span data-path-to-node="69,2,0,2"><span data-path-to-node="69,3,0,2"><span data-path-to-node="18,0,1,0,0">**Warning:** Always tap `Aligned` rather than `Back` when you finish aligning floors—tapping `Back` keeps your position changes but will not mark the floors as aligned for upload</span><span data-path-to-node="18,0,1,0,1"><sup class="superscript"></sup></span><span data-path-to-node="18,0,1,0,2">.</span></span></span></span></p>

---

### <span class="corp-icon material-symbols-rounded icon-support mceNonEditable" style="user-select: none;">​</span>Still Need Help?

**Contact Support:** If you've got further questions, get in touch with our support team at **help@heatpunk.co.uk** (UK) or **help@heatpunk.ie** (IE). *If you are experiencing a bug, to help us look into your issue faster, please include the email address of your account, the name of the project and screenshots of any unexpected behaviour.*