# 6. Drawing floor & ceiling regions, rooflights & dormers

<span data-path-to-node="72,0">By default, Heatpunk assumes the lowest floor sits on the ground and the highest ceiling is a standard flat roof</span><span class="" data-path-to-node="72,1"><sup class="superscript"></sup></span><span data-path-to-node="72,2">. You only need to use the **Floor** and **Ceiling** layers when part of a property differs—such as a room over an unheated garage, a suspended timber floor, a flat roof extension, or a room in the roof</span><span class="" data-path-to-node="72,3"><sup class="superscript"></sup></span><span class="" data-path-to-node="72,4">. For more background on how regions work on the web, see the [Floor and ceiling regions](https://help.heatpunk.co.uk/books/plans-task/page/floor-and-ceiling-regions) guide in the **Plans task**</span><span class="" data-path-to-node="72,5"><sup class="superscript"></sup></span><span data-path-to-node="72,6">.</span>

---

<p class="callout warning"><span data-path-to-node="21,0,1,0,0">**Warning:** Regions on the same layer must not overlap by more than 0.5 m², or you will not be able to send the survey</span><span data-path-to-node="21,0,1,0,1"><sup class="superscript"></sup></span><span data-path-to-node="21,0,1,0,2">.</span> </p>

### Adding a floor or ceiling region

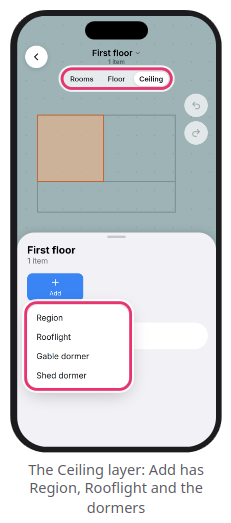
1. <span data-path-to-node="74,0,0,0">Open the floor plan, select the relevant floor at the top, and toggle the top switch from `Rooms` to `Floor` (between this floor and the floor below) or `Ceiling` (between this floor and the floor above)</span><span class="" data-path-to-node="74,0,0,1"><sup class="superscript"></sup></span><span data-path-to-node="74,0,0,2">.</span>
2. <span data-path-to-node="74,0,0,2"><span class="" data-path-to-node="74,1,0,0">Tap `+ Add` &gt; `Region`</span><span class="" data-path-to-node="74,1,0,1"><sup class="superscript"></sup></span><span class="" data-path-to-node="74,1,0,2">.</span></span>
3. <span data-path-to-node="74,0,0,2"><span class="" data-path-to-node="74,1,0,2"><span data-path-to-node="74,2,0,0">Drag the region and use its corner and edge handles to snap it over the relevant area</span><span class="" data-path-to-node="74,2,0,1"><sup class="superscript"></sup></span><span data-path-to-node="74,2,0,2">.</span></span></span>
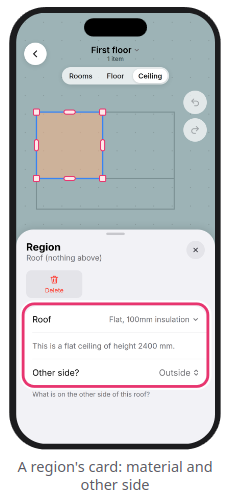
4. <span data-path-to-node="74,0,0,2"><span class="" data-path-to-node="74,1,0,2"><span data-path-to-node="74,2,0,2"><span data-path-to-node="74,3,0,0">On the region card, select the **Material** build-up and set `Other side?` (`Ground`, `Outside`, `Unheated Space`, or `Heated Space`)</span><span class="" data-path-to-node="74,3,0,1"><sup class="superscript"></sup></span><span data-path-to-node="74,3,0,2">.</span></span></span></span>

[![Screenshot_20261119_135342.png](https://help.heatpunk.co.uk/uploads/images/gallery/2026-11/scaled-1680-/KvAPAV9eAljW0Qaq-screenshot-20261119-135342.png)](https://help.heatpunk.co.uk/uploads/images/gallery/2026-11/KvAPAV9eAljW0Qaq-screenshot-20261119-135342.png)

### Drawing a sloped ceiling (room in the roof)

1. <span class="" data-path-to-node="76,0,0,0">On the `Ceiling` layer, draw a `Region` covering the sloped portion of the ceiling</span><span class="" data-path-to-node="76,0,0,1"><sup class="superscript"></sup></span><span class="" data-path-to-node="76,0,0,2">.</span>
2. <span data-path-to-node="76,1,0,0">Select the region, tap a **corner dot**, and enter the ceiling height at that corner in **mm**</span><span class="" data-path-to-node="76,1,0,1"><sup class="superscript"></sup></span><span data-path-to-node="76,1,0,2">. Tap the `tick` to confirm</span><span class="" data-path-to-node="76,1,0,3"><sup class="superscript"></sup></span><span data-path-to-node="76,1,0,4">.</span>
3. <span data-path-to-node="76,1,0,4"><span class="" data-path-to-node="76,2,0,0">Repeat for the remaining corners—a red arrow will appear on the plan pointing down the slope</span><span class="" data-path-to-node="76,2,0,1"><sup class="superscript"></sup></span><span data-path-to-node="76,2,0,2">. (All corner heights must form a single flat plane</span><span class="" data-path-to-node="76,2,0,3"><sup class="superscript"></sup></span><span data-path-to-node="76,2,0,4">.)</span></span>

### Adding rooflights and dormers

- <span data-path-to-node="78,0,0,0">**Rooflight:** On the top floor's `Ceiling` layer, tap `+ Add` &gt; `Rooflight`, drag it onto the roof region, and set its glazing material, `Aspect` (`Plan` or `Roof`), and dimensions in **mm**</span><span class="" data-path-to-node="78,0,0,1"><sup class="superscript"></sup></span>
- <span class="" data-path-to-node="78,0,0,1"><span data-path-to-node="78,1,0,0">**Dormer:** First draw the sloped ceiling region, then tap `+ Add` &gt; `Gable dormer` or `Shed dormer`</span><span class="" data-path-to-node="78,1,0,1"><sup class="superscript"></sup></span><span class="" data-path-to-node="78,1,0,2">. Drag it **wholly inside** the sloped ceiling region, enter the roof and wall materials, gutter height (`A`), and ridge height (`B`), then tap the dormer window strip to set the window size</span><span class="" data-path-to-node="78,1,0,3"><sup class="superscript"></sup></span></span>

<span class="" data-path-to-node="78,0,0,1"><span class="" data-path-to-node="78,1,0,2">[![Screenshot_20261119_135307.png](https://help.heatpunk.co.uk/uploads/images/gallery/2026-11/scaled-1680-/KLDkOSpF1QtC7ZgI-screenshot-20261119-135307.png)](https://help.heatpunk.co.uk/uploads/images/gallery/2026-11/KLDkOSpF1QtC7ZgI-screenshot-20261119-135307.png)</span></span>

### Adding a material not in your palette

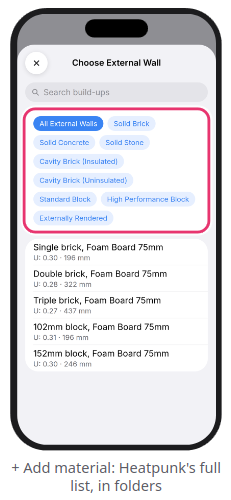
<span data-path-to-node="80,0">If a wall, floor, roof, or window build-up is missing from your dropdown list, scroll to the bottom and tap `+ Add material` to search Heatpunk's full material library and add it to the current survey</span><span class="" data-path-to-node="80,1"><sup class="superscript"></sup></span><span data-path-to-node="80,2">.  
</span>

<span data-path-to-node="80,2">[![Screenshot_20261119_135359.png](https://help.heatpunk.co.uk/uploads/images/gallery/2026-11/scaled-1680-/L9tpeZbcWslX6iJJ-screenshot-20261119-135359.png)](https://help.heatpunk.co.uk/uploads/images/gallery/2026-11/L9tpeZbcWslX6iJJ-screenshot-20261119-135359.png)</span>

<p class="callout info"><span data-path-to-node="80,2"><span data-path-to-node="21,1,1,0,0">**Note:** Adding a material via `+ Add material` adds it only to the current survey—it does not change your saved palettes on the Heatpunk website</span><span data-path-to-node="21,1,1,0,1"><sup class="superscript"></sup></span><span data-path-to-node="21,1,1,0,2">.</span></span></p>

---

### <span class="corp-icon material-symbols-rounded icon-support mceNonEditable" style="user-select: none;">​</span>Still Need Help?

**Contact Support:** If you've got further questions, get in touch with our support team at **help@heatpunk.co.uk** (UK) or **help@heatpunk.ie** (IE). *If you are experiencing a bug, to help us look into your issue faster, please include the email address of your account, the name of the project and screenshots of any unexpected behaviour.*