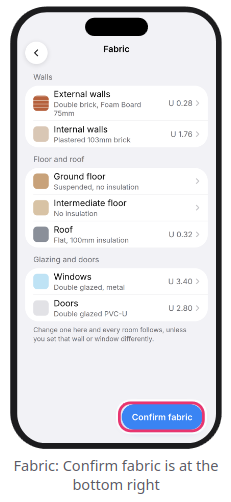
# 8. Confirming house materials (Fabric)

<span data-path-to-node="93,0">Before leaving the property, review and confirm the default construction materials for the whole house</span><span class="" data-path-to-node="93,1"><sup class="superscript"></sup></span><span class="" data-path-to-node="93,2">. To manage your saved palettes on the web, see the [Material library and palettes](https://help.heatpunk.co.uk/books/plans-task/chapter/material-library-and-palettes) guide in the **Plans task**</span><span class="" data-path-to-node="93,3"><sup class="superscript"></sup></span><span data-path-to-node="93,4">.</span>

---

### Confirming whole-house materials

1. <span data-path-to-node="95,0,0,0">On the survey's page, scroll down to **House** and tap `Walls, Floors & Windows` (marked *Not Confirmed* in orange)</span><span class="" data-path-to-node="95,0,0,1"><sup class="superscript"></sup></span><span data-path-to-node="95,0,0,2">.</span>
2. Review each category and its U-value:
    
    
    - <span data-path-to-node="95,1,1,0,0,0">**Walls:** `External walls`, `Internal walls`</span><span class="" data-path-to-node="95,1,1,0,0,1"><sup class="superscript"></sup></span>
    - <span class="" data-path-to-node="95,1,1,0,0,1"><span data-path-to-node="95,1,1,1,0,0">**Floor and roof:** `Ground floor`, `Intermediate floor`, `Roof`</span><span class="" data-path-to-node="95,1,1,1,0,1"><sup class="superscript"></sup></span> </span>
    - <span class="" data-path-to-node="95,1,1,0,0,1"><span data-path-to-node="95,1,1,2,0,0">**Glazing and doors:** `Windows`, `Doors`</span><span class="" data-path-to-node="95,1,1,2,0,1"><sup class="superscript"></sup></span></span>
3. <span class="" data-path-to-node="95,1,1,0,0,1"><span class="" data-path-to-node="95,1,1,2,0,1"><span class="" data-path-to-node="95,2,0,0">Tap any row to change its build-up—changing a material here updates every room in the survey unless you have overridden a specific wall or window individually</span><span class="" data-path-to-node="95,2,0,1"><sup class="superscript"></sup></span><span data-path-to-node="95,2,0,2">.</span> </span></span>
4. <span class="" data-path-to-node="95,1,1,0,0,1"><span class="" data-path-to-node="95,1,1,2,0,1"><span data-path-to-node="95,3,0,0">Tap `Confirm fabric` at the bottom right</span><span class="" data-path-to-node="95,3,0,1"><sup class="superscript"></sup></span><span data-path-to-node="95,3,0,2">.</span></span></span>

<span class="" data-path-to-node="95,1,1,0,0,1"><span class="" data-path-to-node="95,1,1,2,0,1"><span data-path-to-node="95,3,0,2">[![Screenshot_20261119_140257.png](https://help.heatpunk.co.uk/uploads/images/gallery/2026-11/scaled-1680-/8BsyJdV5Yt87ut8s-screenshot-20261119-140257.png)](https://help.heatpunk.co.uk/uploads/images/gallery/2026-11/8BsyJdV5Yt87ut8s-screenshot-20261119-140257.png)</span></span></span>

<p class="callout info"><span class="" data-path-to-node="95,1,1,0,0,1"><span class="" data-path-to-node="95,1,1,2,0,1"><span data-path-to-node="95,3,0,2"><span data-path-to-node="27,0,1,0,0">**Note:** If you change a material after tapping `Confirm fabric`, the fabric status resets to unconfirmed—remember to tap `Confirm fabric` again before leaving</span><span data-path-to-node="27,0,1,0,1"><sup class="superscript"></sup></span><span data-path-to-node="27,0,1,0,2">.</span></span></span></span></p>

### Overriding a single wall or window

If an extension or specific wall is built differently from the rest of the property:

1. <span class="" data-path-to-node="98,0,0,0">Open the wall in the **Room Editor** (or during Step 1 of the room walk)</span><span class="" data-path-to-node="98,0,0,1"><sup class="superscript"></sup></span><span class="" data-path-to-node="98,0,0,2">.</span>
2. <span class="" data-path-to-node="98,1,0,0">Tap `Built Of` and select the new material</span><span class="" data-path-to-node="98,1,0,1"><sup class="superscript"></sup></span><span data-path-to-node="98,1,0,2">.</span>
3. <span data-path-to-node="98,1,0,2"><span data-path-to-node="98,2,0,0">When prompted, select `Just This Wall` (selecting `Change Every Outside Wall` updates the whole house)</span><span class="" data-path-to-node="98,2,0,1"><sup class="superscript"></sup></span><span data-path-to-node="98,2,0,2">.</span></span>

---

### <span class="corp-icon material-symbols-rounded icon-support mceNonEditable" style="user-select: none;">​</span>Still Need Help?

**Contact Support:** If you've got further questions, get in touch with our support team at **help@heatpunk.co.uk** (UK) or **help@heatpunk.ie** (IE). *If you are experiencing a bug, to help us look into your issue faster, please include the email address of your account, the name of the project and screenshots of any unexpected behaviour.*