Pro account settings
Pro Team Management
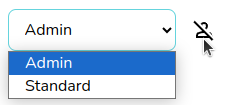
Team management allows you to have control over who is on your Heatpunk Team and the role type they have. The team Owner and any users with the Admin role type can add and remove users as well as change their role type.

Add and remove users
To add users, you’ll need the individual’s name and email address. You can choose a user’s role from the Role Type drop-down menu. The Admin role includes the ability to manage team settings.
To remove a user, click on the icon beside the user. This will disable their account and remove them from the subscription. The owner account cannot be removed so ensure it is under a company email address.
Company details
You can set default information that will be used across all your team’s user accounts. This includes company name, accreditation, logo, address, phone number, and email address. The details you set here will be used where relevant throughout Heatpunk tasks, forms, and reports.
Billing information
Here you enter the details we should use for billing your subscription. If you have a separate accounts department, you may wish to use their email address here. We send out invoices by email every month after your subscription payment has been taken.
Cancel your subscription
To cancel your subscription, scroll to the bottom of the screen while in Pro Account Settings. Then click Cancel Subscription. This will cancel your subscription and your team’s accounts will switch back to standard access.
Automatic pricing
With Heatpunk Pro you can either set pricing based on:
- The cost of materials plus a markup
- Involves cost of material plus a set percentage
- Is best for when you use a variety of components
- Custom lookup tables
- Involves using specified prices for each heat pump and hot water storage
- Is best for when you always use the same components
On top of the cost of materials, you can set up additional charges for delivery of goods, plumbing and electrical labour and travel to the site.
Pricing settings can be accessed via ‘Pro Account settings’ > ‘Automatic pricing’
Configuring pricing for your projects
Choose if you are using markup or lookup tables.

Option 1: Cost of materials plus a markup
When using markup, you enter the percentage markup for goods prices.
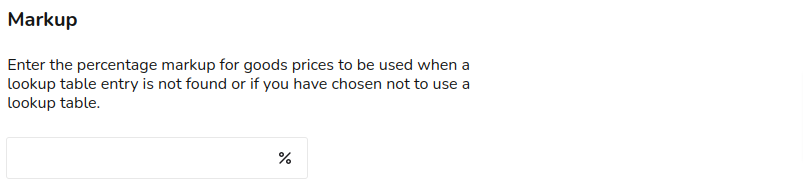
This will apply the specified markup to your Midsummer wholesale price. Ensure your wholesale account is connected, otherwise retail wholesale prices will be applied. See our guide on Connecting to Midsummer for more information on this.
Option 2: Lookup tables
When you have chosen lookup tables, you can first choose to use a markup-based pricing for any designs that don’t match one of the lookup tables you have entered. In this case the marked-up Midsummer wholesale price will be used as a fallback.
You can then create your lookup tables for heat pumps and hot water storage by selecting from the options in the drop down menu and adding the respective prices to goods and services.
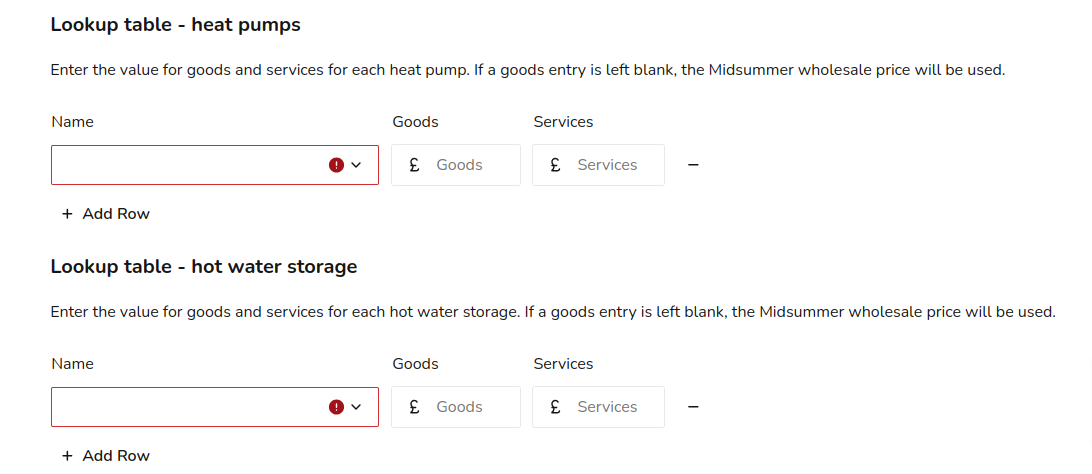
Lookup tables are most useful if you install just a few different system combinations. If you use a wide range of kit, it’s probably more efficient to use the ‘markup’ method. Lookup tables also require additional maintenance as the component prices will not change automatically with costs.
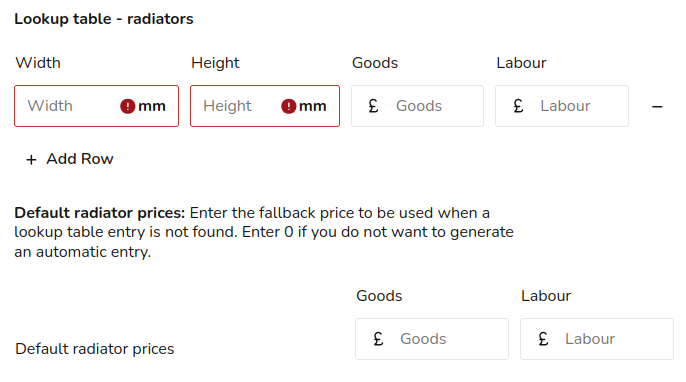
Additional Radiators
Each radiator added via the Heat Pump task will automatically generate an entry in the Financial task. Currently, we do not support varying prices for different radiator types. However, here you can enter the cost of goods and labour for different sized radiators.
You can also set a default radiator price for cases where the radiators used do not match any of your lookup table entries.
Other items
With both options above, after setting up your pricing, you can add prices additional items.
Default items
These items will be added to every project by default. Examples include delivery of goods, plumbing labour and electrical labour.
Optional items
These items will be prompted for addition at the start of the Financial task. Examples include an extended warranty or replacement of microbore pipework.
In each case, you add the description as you want it to appear on the financial task and then a cost of the goods and labour.
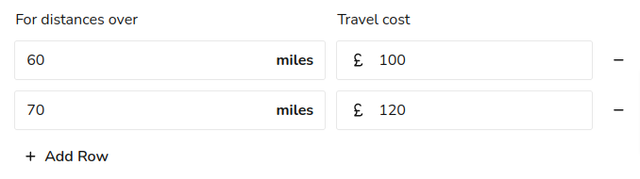
Travel
To set up your office location, navigate to 'My Account' > 'Preferences' > 'General' > 'Company Details' and drag the location pin on the map. The travel distance will be automatically calculated as the driving distance from the office to the project address.
You can then add any additional costs for travel over a certain distance.