Videos and guides
Explore videos and guides for all of the Heatpunk tasks.
- Overview
- Getting started
- Plans
- Choosing a Palette
- PRO: Importing floor plans
- Creating Rooms
- Editting Room Properties
- Walls, Windows, Doors and Radiators
- Floors and Ceilings
- Vaulted Ceilings and Dormers
- Heat pump
- Performance Estimate - a guide
Overview
Brought to you by the Midsummer development team, Heatpunk represents our vision of accessible heat loss calculations for all. As a standalone web-based tool, Heatpunk offers a complete design package for both commercial and personal use. Offering industry-leading value, installers rely on Heatpunk to support their front-line sales teams with a feature rich all-in-one solution. If you're looking for help with designs, quotations, purchasing and the certification process, we've got you sorted.
Heatpunk is suitable for everyone! Heatpunk has been designed with simplicity in mind. Simply let Heatpunk guide you through the design process step by step.
First time using Heatpunk? This video will walk you through many of the key features available, such as: choosing materials, creating a floor plan, choosing a heat pump, doing a performance estimate, viewing the report and filling out forms.
Heatpunk Pro
Considering using Heatpunk Pro? Below is a feature comparison showing all the different options you get when you upgrade.
| Standard | Pro | |
|
Floor plan designer |
✔ | ✔ |
| Room by room heat loss calculations | ✔ | ✔ |
| Heat pump sizing and flow temp design | ✔ | ✔ |
| Radiator Sizing | ✔ | ✔ |
|
DHW calculations |
✔ | ✔ |
| MCS Performance Estimate | ✔ | ✔ |
| Sound Assessment | ✔ | ✔ |
| Heat pump design report | ✔ | ✔ |
| DNO forms | ✔ | ✔ |
| Free Training | ✔ | ✔ |
| Access to Shrunk Punk | ✗ | ✔ |
| Upload floor plans | ✗ | ✔ |
| Project sharing & team management | ✗ | ✔ |
| Custom components | ✗ | ✔ |
| Share custom components and material folders | ✗ | ✔ |
| Project file management | ✗ | ✔ |
| Email templates & sending | ✗ | ✔ |
| Project status | ✗ | ✔ |
| Pre-installation survey | ✗ | ✔ |
| Customisation of proposal documents | ✗ | ✔ |
| E-signing | ✗ | ✔ |
| Additional forms and reports | ✗ | ✔ |
Sign up here for training on either Heatpunk or Heatpunk Pro to see all of these features in action!
Getting started
Connecting to Midsummer
Connecting your Heatpunk account to your Midsummer Wholesale account will allow Heatpunk to set its prices to your wholesale price level. This means you do not have to make changes to your goods prices in the financial task except for custom components.
To connect your wholesale account:
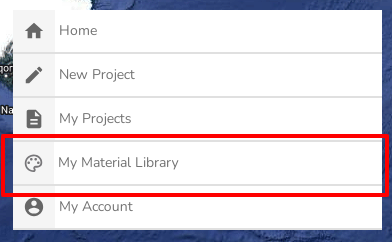
Managing Your Material Library
Materials are used in all your Heatpunk projects. They define the properties of walls, windows, door, floors, ceilings and radiators. You can access your Material Library from the Heatpunk home page.
Palettes
Materials in Heatpunk are stored in palettes. At the start of each project you will select a palette which contains the materials available to you in that project. Heatpunk includes a palette with a range of standard materials for you to use or you can create your own.
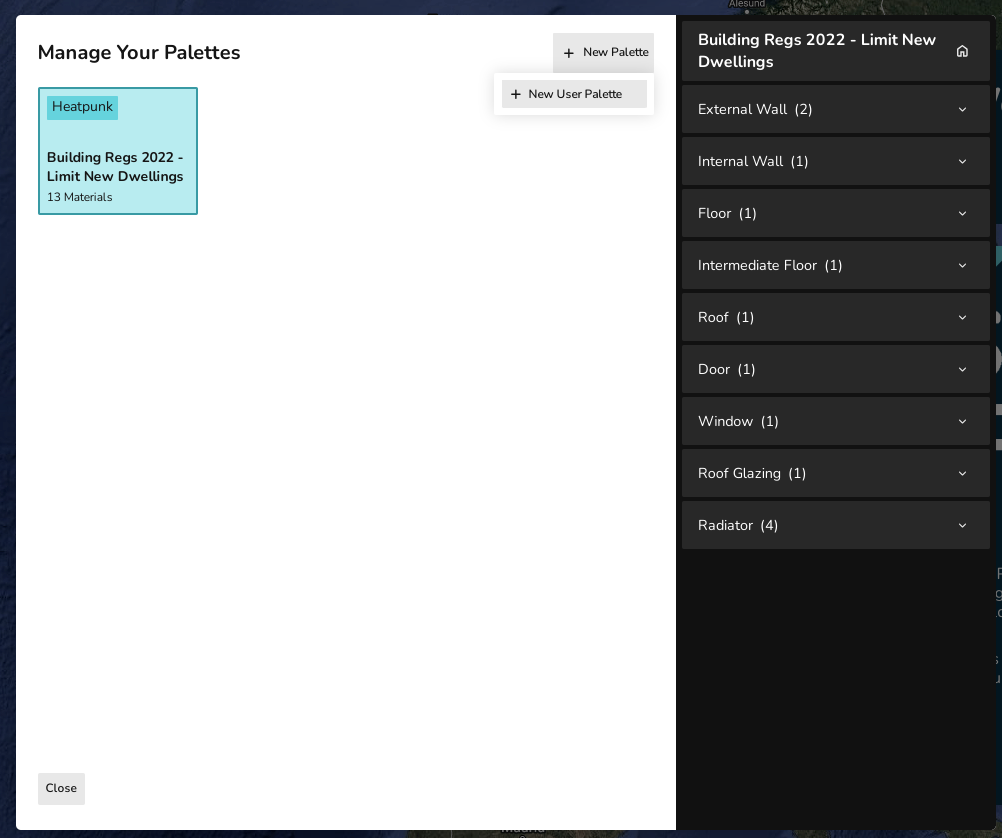
In each category you can star a material to make it that palette's default for that catergory. When adding to your floor plan, the default, starred material will automatically be used. This can be editted as necessary within a project.
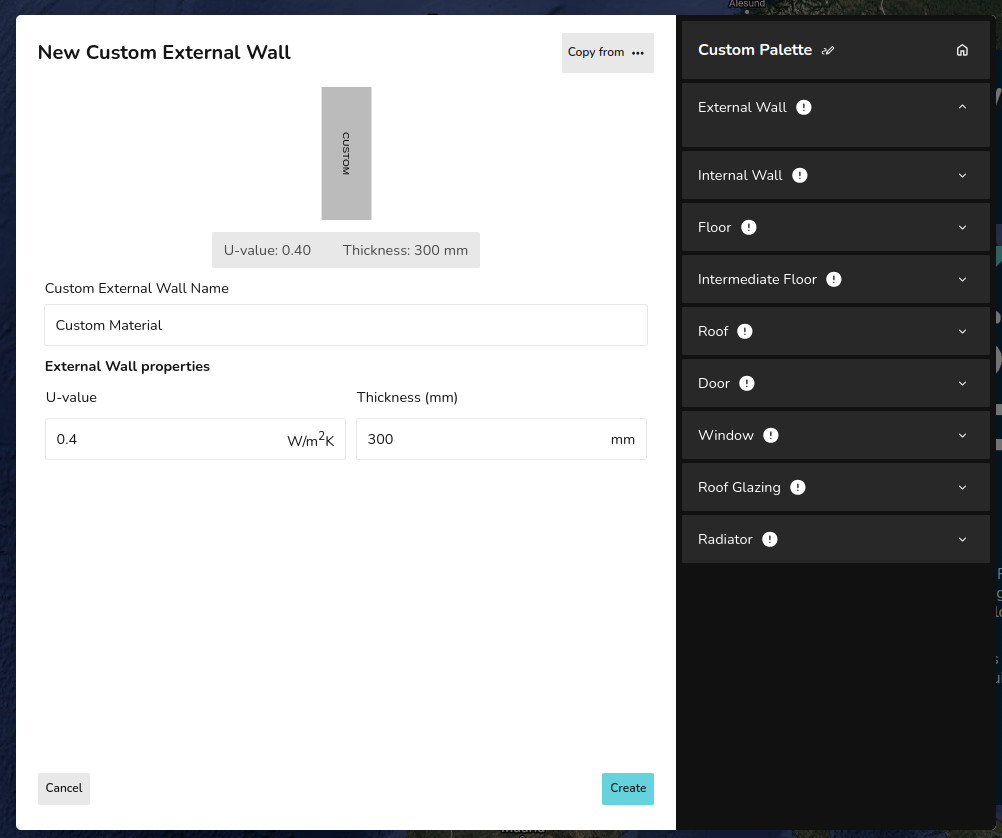
Adding Materials
Once you have created a palette you need to add materials. You can either add existing materials or create your own. Their are two options when creating your own material:
- Build layers - adding materials by layers.
- Enter U value - adding materials with U-value
Windows, doors and roof glazing can only be added with U-value. Adding radiators differs from other materials as described below.
Each method for adding materials is described below and demonstrated in the following video.
NOTE: You must have at least one material selected in each category (external walls, internal walls, floor, etc). An exclamation mark will show next to categories that do not have a material selected. You do not have to use all the materials in your palette within the project.
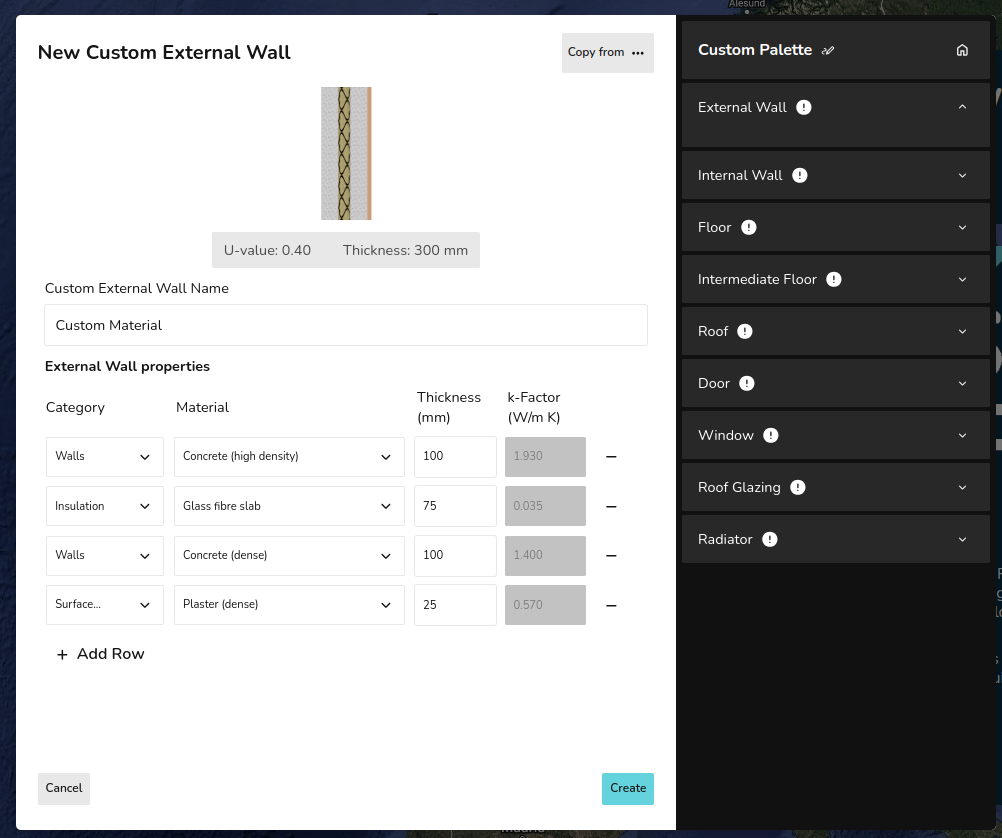
Adding materials by layers
When adding a material by layers, you need to define the Category, Material and Thickness of each layer. This will then generate a k-Factor for each layer as well as a U-value and total thickness for the wall. Adding rows will add layers. Layers can be removed using the - on the right.
Adding materials with U-value
When adding a material with the U-value you simply need to input the U-value and thickness.
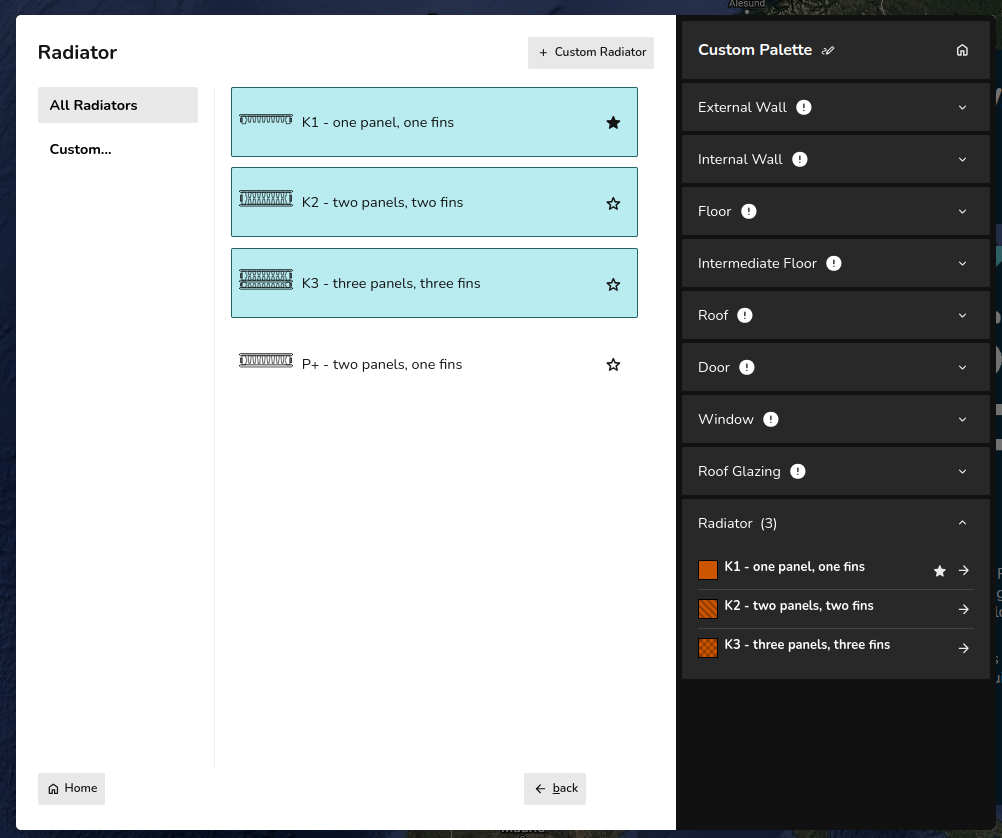
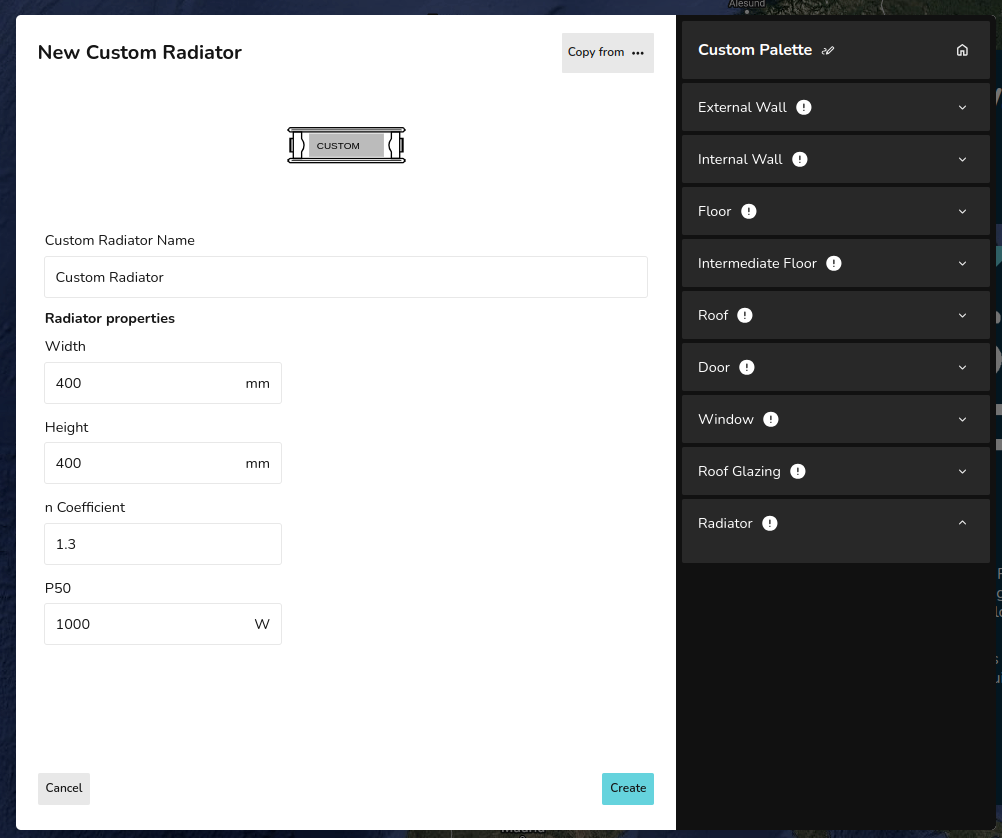
Adding radiators
When adding a radiator you need to define the default width and height, as well as the n coefficient, and P50 of the radiator. You can edit the width and height as necessary within your project.
Plans
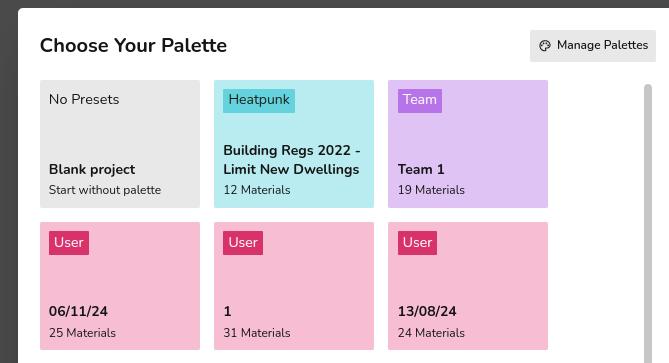
Choosing a Palette
On creating a Heatpunk project you will be asked to choose a palette. This will contain all the materials you will use in your project. You can always add materials later. We recommend choosing a palette rather than starting with a blank project.
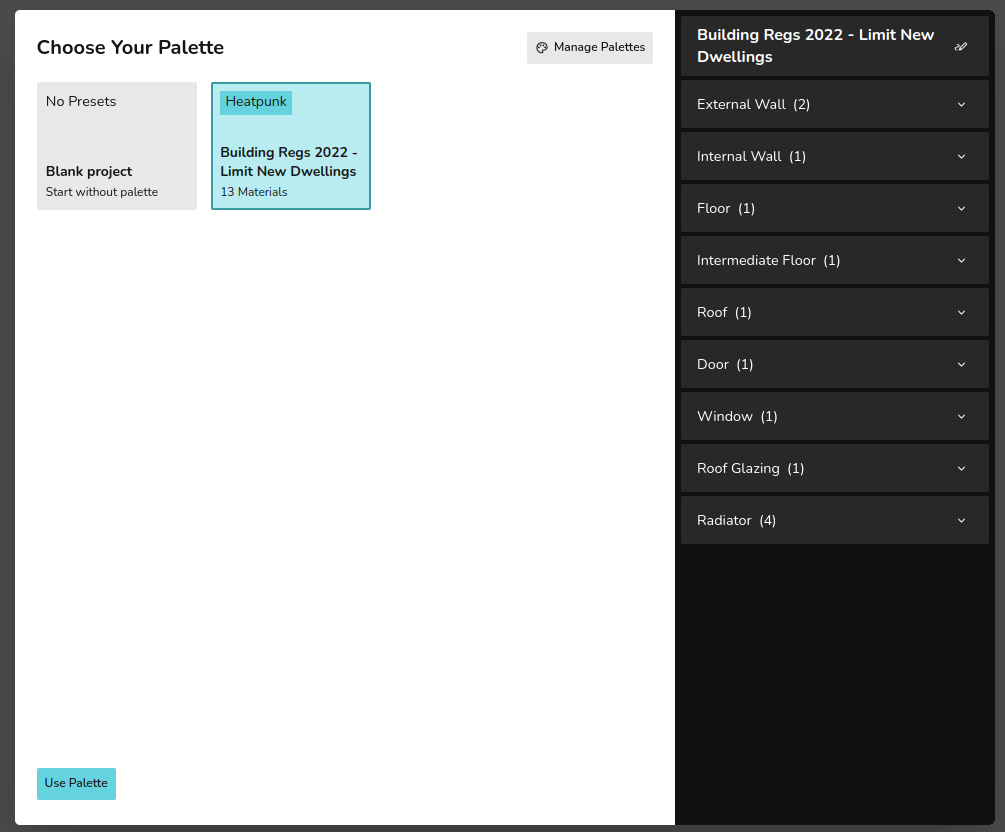
Please see the guide on Managing Your Material Library for details on creating and editting your palettes.
PRO: Importing floor plans
A step by step guide to the importing plans feature in Heatpunk.
This feature is only accessible with a Heatpunk Pro subscription.
- Click 'New Project' to launch a project as standard, setting the customer details, build date (affects ventilation rates used) address for the property.

- Choose your material palette: select from your own user or team palettes, Heatpunk defaults or start from fresh with the blank project palette to set the construction type (u-values) for all the building elements.

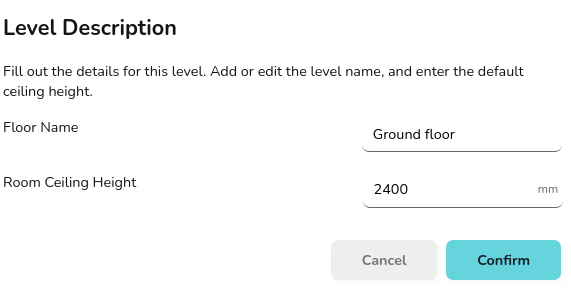
- Set default ceiling height and the floor name

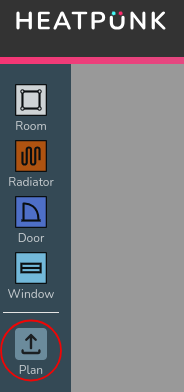
- Once at the start, on the building stage in the plans task, click on the 'Plan' Icon on the left hand side of the page:

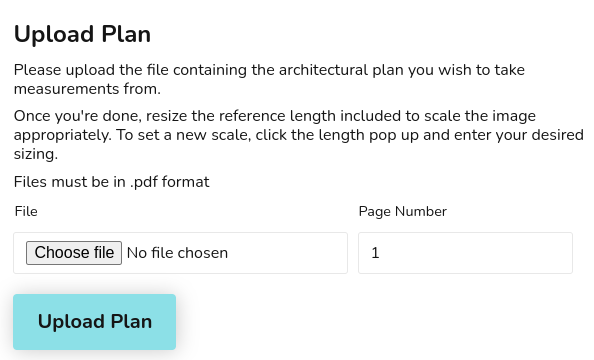
- Choose a PDF file to upload:

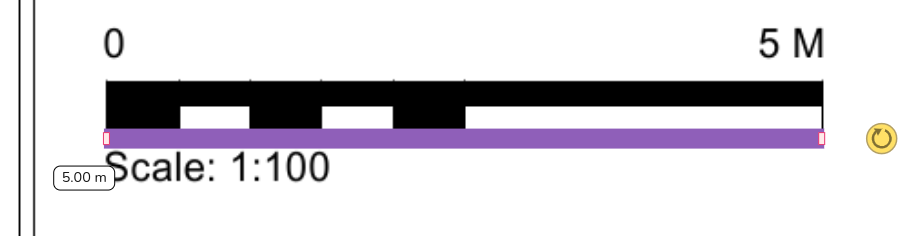
- Use the purple reference length bar to set the scale: drag the reference length bar over to the plans scale or an object of known length. Set the size to match and then click on the dimension to enter the relevant value. Ex: below the scale represents 5m, I've set the purple ref length bar against it and set it's dimensions to 5m.

- Start adding in the rooms: you can drag on your rooms as you normally would in Heatpunk, but now you can overlay them onto the background plans. Once you've aligned the walls will automatically scale to be the correct size.

- Continue adding rooms to build up your floor plans. Clicking to the side of rooms, or on walls will turn off the transparency and allow you to see the rooms as normal to select wall type, room type, etc. Clicking a holding for 2 sec on the room will turn it back to the transparent mode so you can see the plans behind again.

- Once you've done your ground level, you can add in a level above. When you add a new level, click the 'Plan' button to import the relevant PDF.
- Once your plan is uploaded you will need to align this with the rooms below. To do this, double click on the plans to select them, once selected you can move them. As you move the plans they will become transparent allowing you to see the outline of the rooms below. This should allow you to line up the plans correctly.
- Then it is just a case of checking your scale is still correct (if the two PDF's have the same scale it should already be correct), and then continuing to create your plans.
- Once you've finished, you can set wall types, room types, add windows, doors and existing rads before proceeding to the heat pump task.
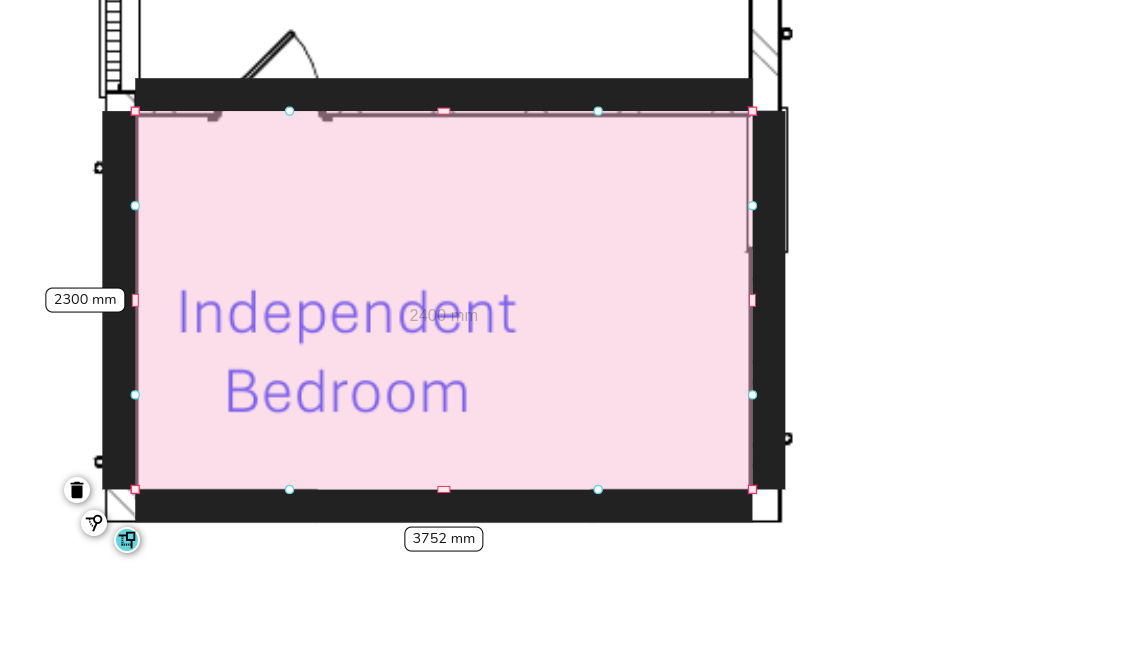
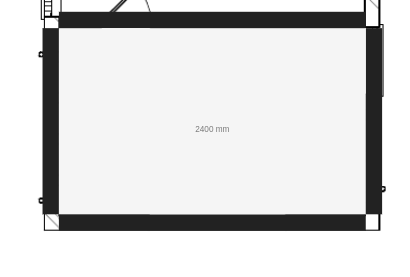
Creating Rooms
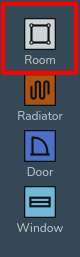
Rooms can be dragged and dropped in from the menu of the left.
When editting a room you can:
- Click the square corner handles to show dimensions of the associated walls. You can then click on the values to manually change these.
- Click on the pink corner handles to toggle between a square and circle handle:
- Use the square corner handles to resize the room whilst keeping the adjacent walls at the same angle.
- Use the circle corner handles to move that point independently of the other points to create angled walls.
- Click and drag the blue circle handles to allow you to split a wall and create irregular shapes.
- Click on the pink rectangular handles to toggle between a square and curved cornered handles:
- Use the square cornered handle to extend a wall out.
- Use the curved cornered handle to extend the adjoining wall independently of the others.
These tools are demonstrated in the video below.
Editting Room Properties
Once you have created a floor plan you can change the properties of each room by clicking on it.
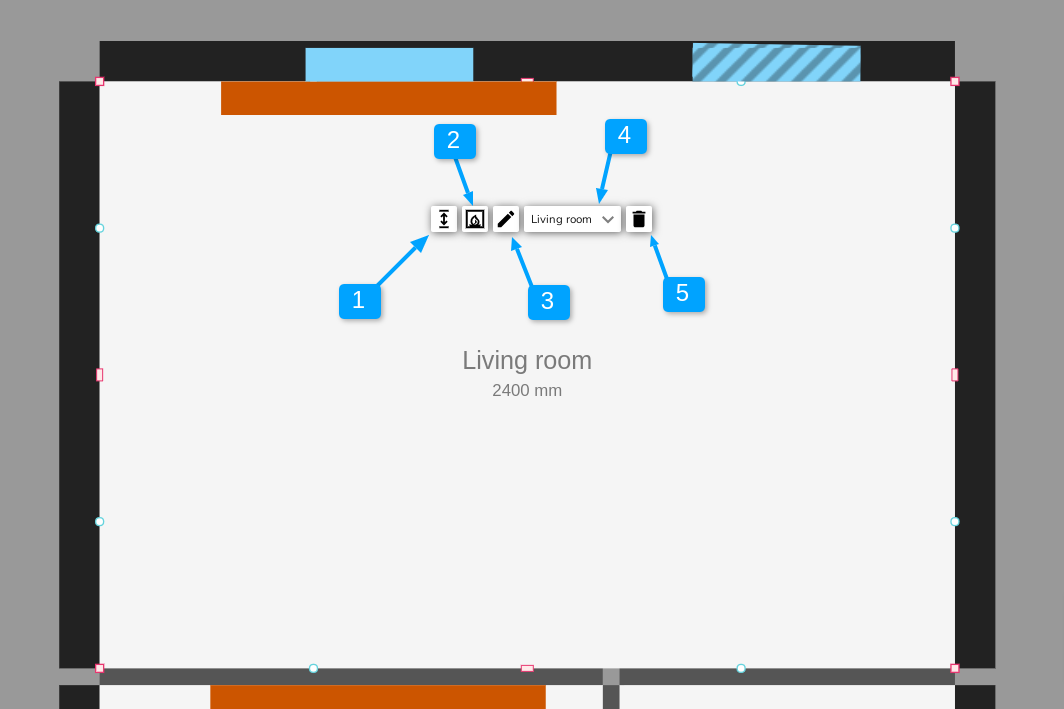
- Use this tool to change the height of the ceiling. Note, this is for the selected room only. See our guide on Floors and Ceilings for how to edit the ceiling height for the whole floor.
- Use this tool to toggle whether there is a flue or not in this room.
- Use this tool to change the name of the room.
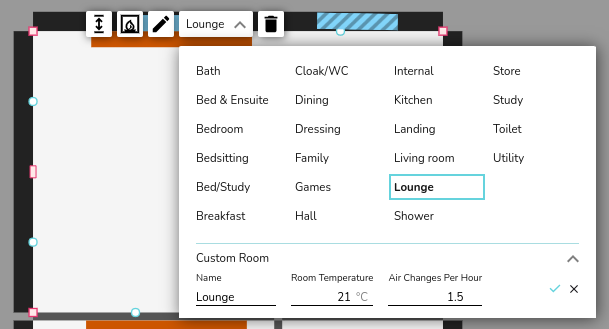
- Use this menu to change the room type. This will also change the air changes and design temperature for the room in line with the room type chosen. See below for custom room types.
- Use this button to delete the room.
Custom room types
If you need custom air changes and design temperatures for a room you can do this by using a custom room type. When choosing the room type from the drop down menu, select Custom Room and edit the Name, Room Temperature and Air Changes Per Hour as necessary.
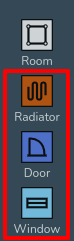
Walls, Windows, Doors and Radiators
To add windows, doors and radiators, drag and drop the relevant icon from the left hand menu.
Click on walls, windows, doors and radiators to change their material. The materials shown will be those chosen in your palette. The default defined in your palette will be used initially. If the material you need is not in your chosen palette, you can add a custom material at this stage. Please see the guide on Managing Your Material Library for more details on this topic.
To change the width on windows, doors and radiators you can click and drag the pink handles at each end. Alternatively, you can also click on windows, doors, and radiators, then select the dimensions icon to change their dimensions, including height.

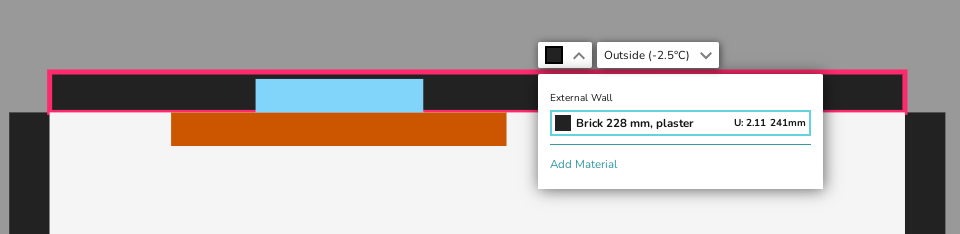
External Walls
You will need to define what is on the other side of your external walls. Heatpunk will automatically set this as Outside. To change this, click on walls and use the drop down menu to define what is on the otherside. This is particualrly important for parting walls.

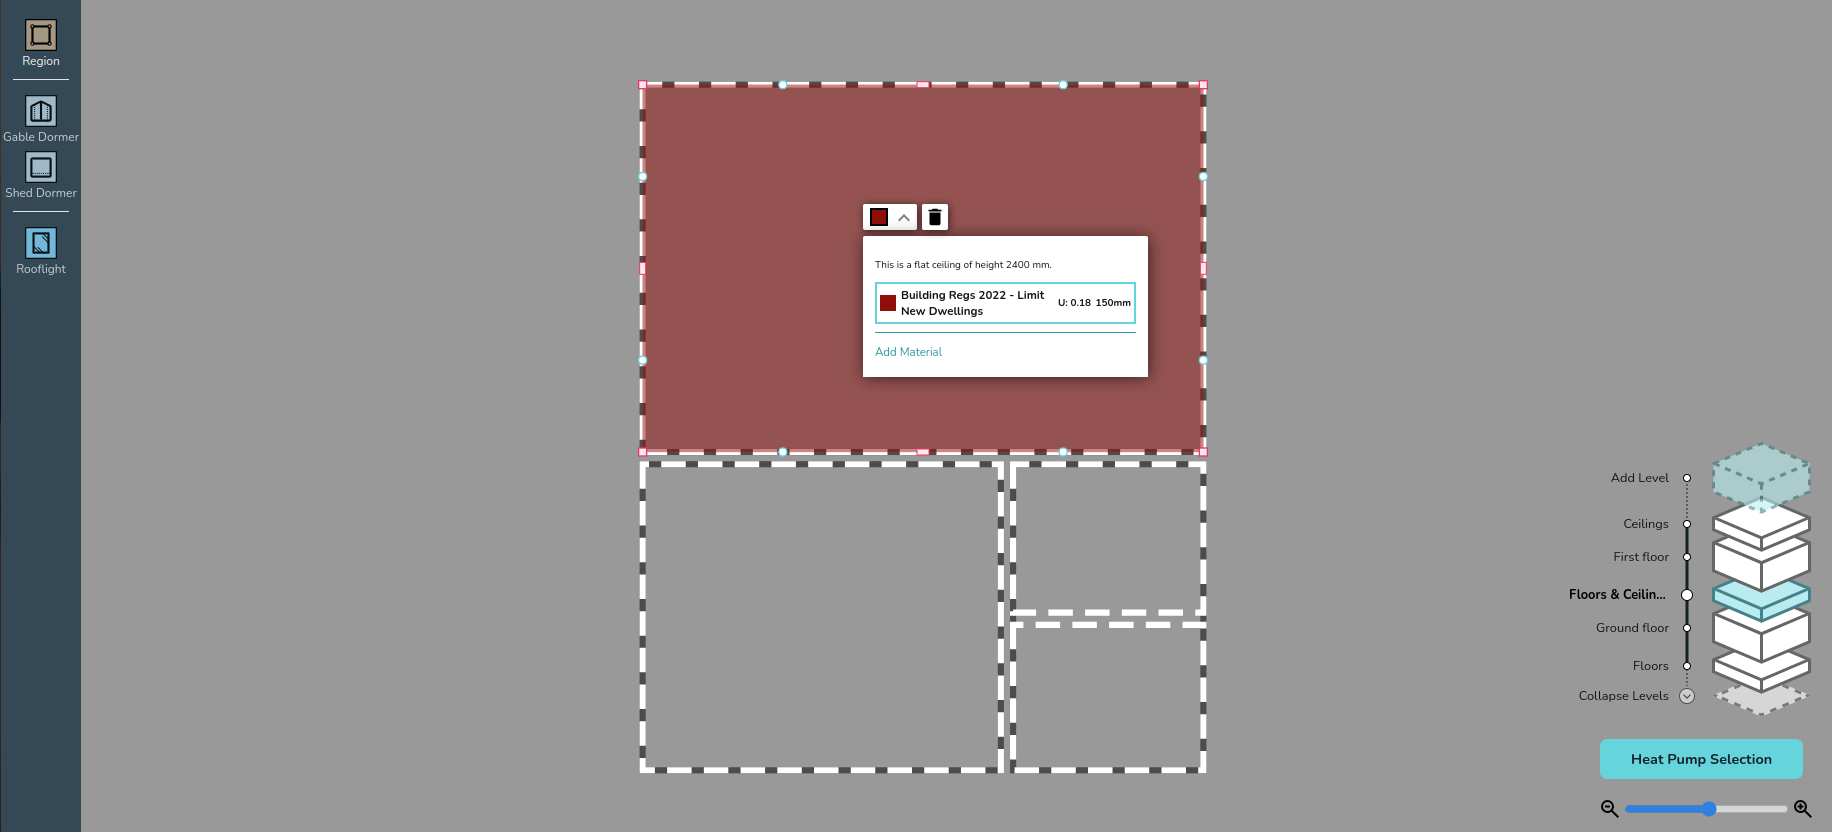
Floors and Ceilings
You can add different floors and move between them using the exploded view in the bottom right.
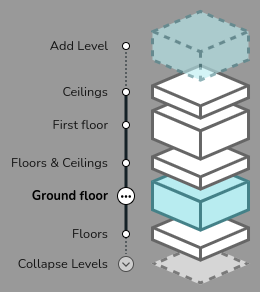
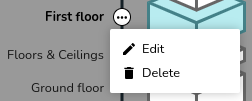
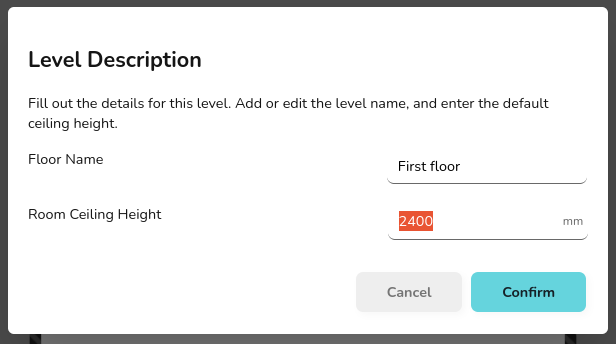
You can change the ceiling height on the whole floor by clicking on the three dots to the right of the relevant floor, and selecting edit. You can also change the name of the floor here. To delete an entire floor, select delete.
Editting the Properties of Floor and Ceilings
Heatpunk will automatically set the material of floors and ceilings to those defaults defined in your palette (see Managing Your Material Library for more information).
To change this, you will need to add a region. First navigate to the relvant floor/ceiling using the exploded view, then drag and drop a region in from the menu on the left. Regions can be set to cover the entirity of the floor/ceiling, or only certain areas. You can use as many regions as necessary to correctly define each area of the floor/ceiling. The shape of regions can be editted using the same handkles as for rooms (see Creating Rooms).

Once you have added a region, simply select the relevant region and use the drop down menu to change the material as required. If editting the ground floor floor or the ceiling in the top floor, you should also define what is on the otherside of the floor/ceiling. For intermediate floors, Heatpunk will do this for you.
Vaulted Ceilings and Dormers
Please see the video below to learn how to add vaulted ceilings and dormers.
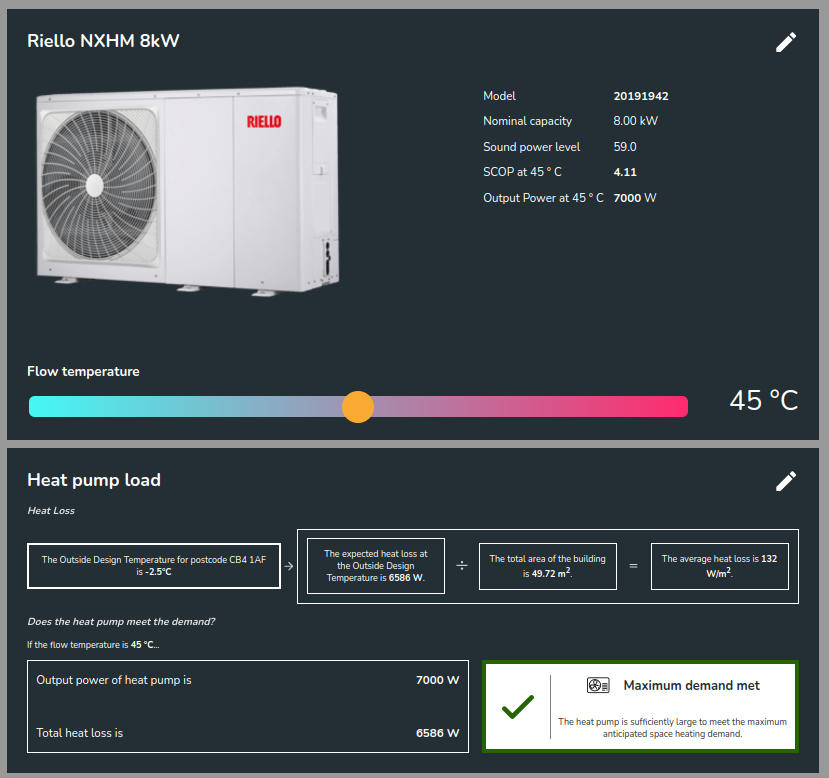
Heat pump
Heat Pump Load
In the Heat Pump task you can see the results of the heat loss calculation as well as information on the heat pump you have chosen. You can alter the flow temperature and see the impact of this on SCOP and output power. This is also given for each heat emitter as shown in the example below.
For more information on Heat Emitters see our guide on the topic.
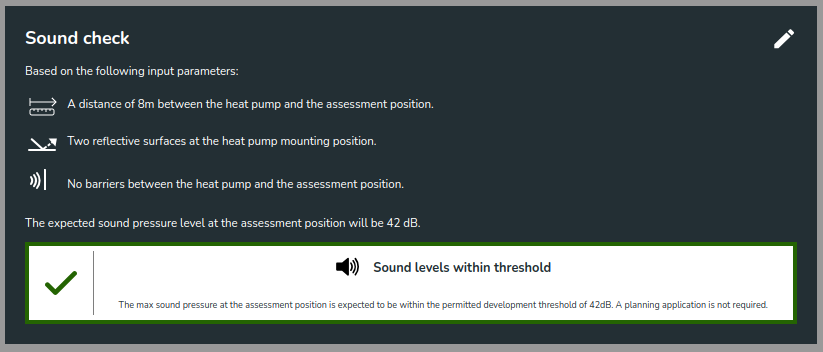
Sound Check
You can review the results of your sound check. If you need to edit the inputs, click on pen in the top right.
Design Options
You can add multiple design options to your project allowing you to review a range of solutions. Use the drop down in the top right to choose which option you wish to produce a report for. With this tool you can easily produce several proposals for your customer to review before choosing their preferred option.

Performance Estimate - a guide
The Performance Task in Heatpunk was updated on 17 March 2025 to be compliant with the new version MCS calculation methods outlined in the updated MCS 031: Heat Pump Pre-sale information and performance calculation standards.
Full details of the MCS standard can be found here: mcscertified.com/an-update-to-mcs-031-the-heat-pump-pre-sale-information-and-performance-calculation.
Compliance with this update is mandatory from 18 March 2025.
How this update affects existing projects
Any existing Heatpunk projects with completed MCS performance estimates prior to this date will remain unchanged within Heatpunk, with the option to switch to the new version: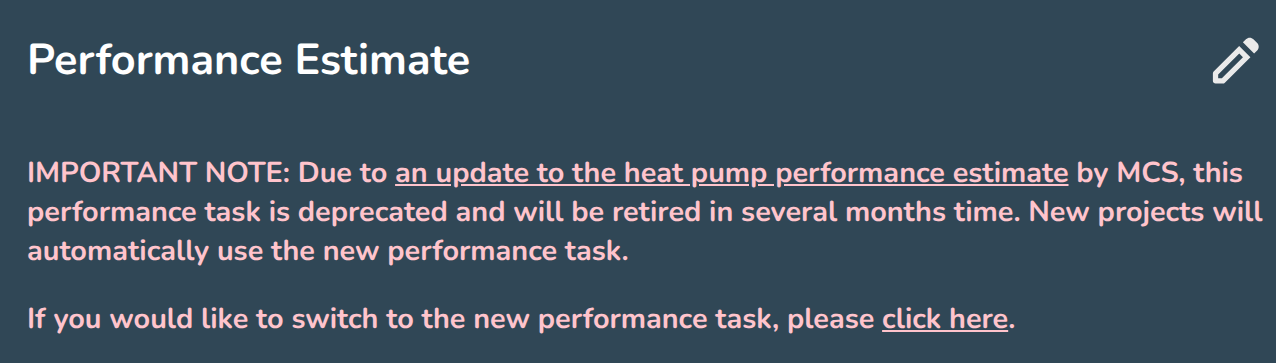
It's recommended that completed project reports are downloaded as PDFs and copies are kept for your records.
How the new task works:
Enter the performance task in your project:
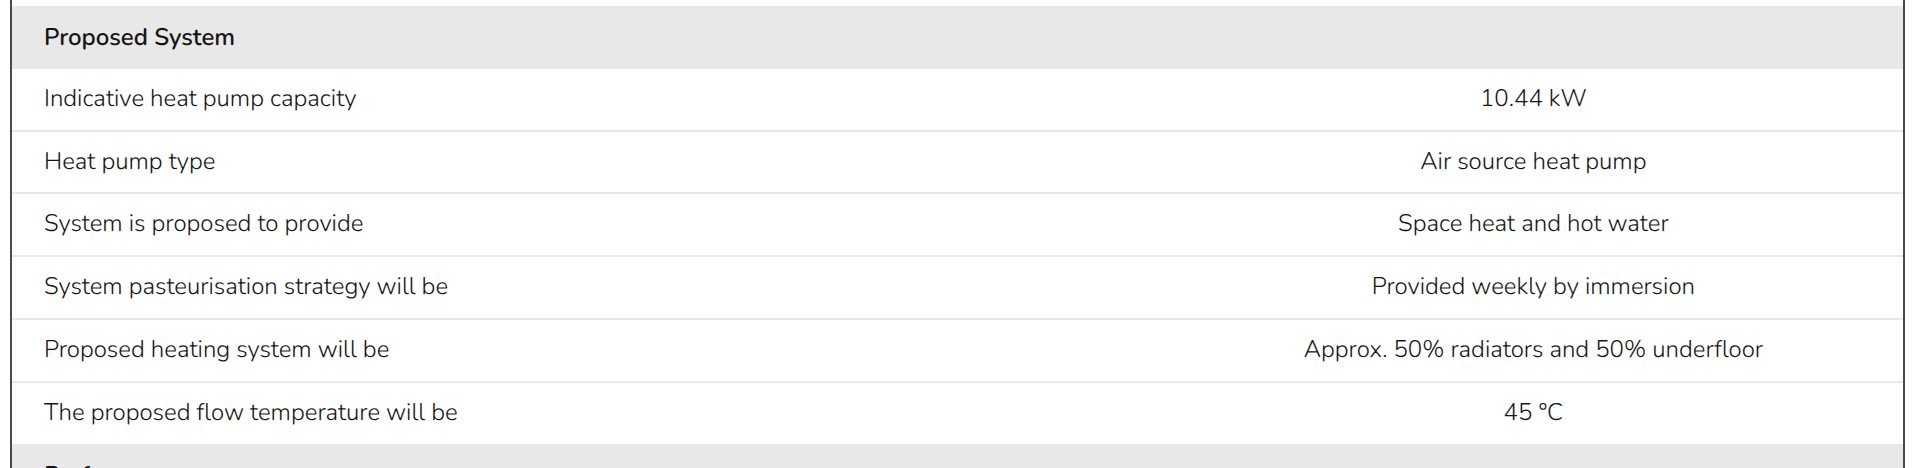
Step 1 - Proposed system:
- Set the purpose of the system: Heatpunk will set the default based on your project settings. If you have added a DHW cylinder then it will assume "space heating and hot water" but this can be overridden if the estimate is being performed prior to the full design being completed.
- Set the Emitter type(s): Again Heatpunk will default based on the emitters added to your design but if you are completing the performance calculation prior to the full design you can adjust this as needed:

- If UFH is selected you will then need to select a type:

Step 2 - Property Details:
For MCS compliance this step needs to be completed using EPC data
Fill out the energy demand for space heating, hot water and total property floor-space from a valid EPC:
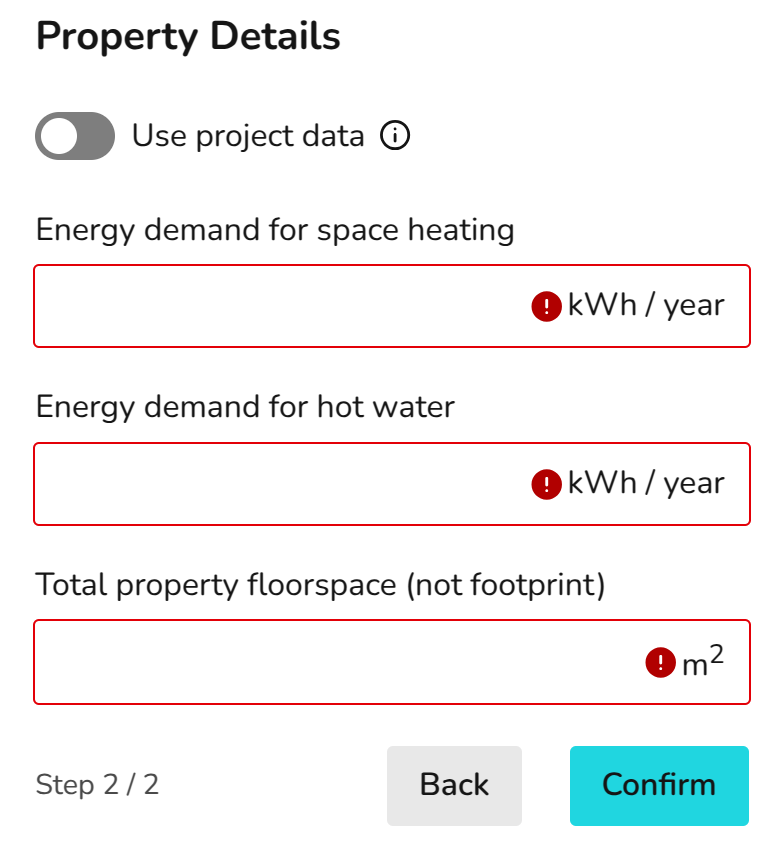
You may choose to switch to project data, doing this will populate the fields from Heatpunk, with a degree day calculation used to give the kWh "energy demand for space heating" figure, and the "energy demand for hot water" coming from the DHW storage selection. To comply with MCS, users must use EPC data to complete the performance calculation. You may then provide a subsequent performance estimate using project data, but you must explain the difference between the two estimates to the customer.
Step 3 - MCS Performance Results:
Heatpunk will do the rest! 
The MCS performance estimate uses 'Outdoor Low Temperature' from the CIBSE guide A 99.6th percentile. This may vary from the project ODT if it has been left on the default 99th percentile temperature. The average watts per square metre is calculated based on the kWh data provided (as per MCS 031) and so when using EPC data this will likely vary from the "project data" values calculated by Heatpunk.
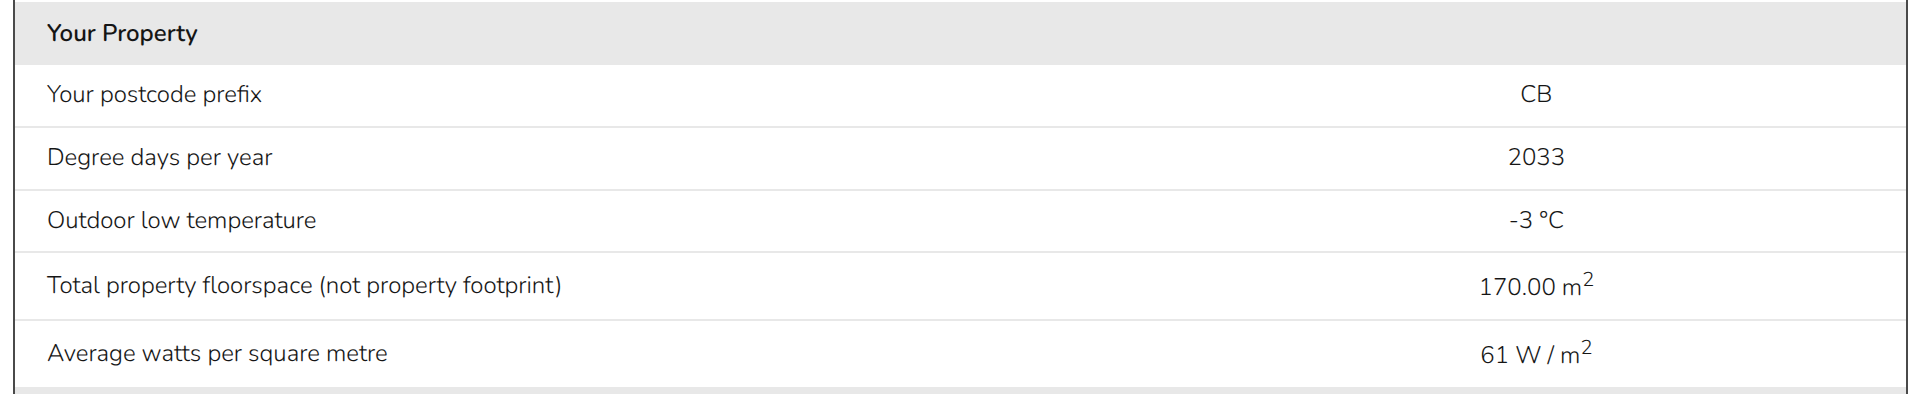
The calculated watts per square metre is then used to give an indicative heat pump capacity, which again may be different than the from your Heatpunk project when using EPC data. If the full heat loss calcs have been done with Heatpunk and the project data has been used to give the estimate, then this value should be closer to the output power of the heat pump being used.
"System pasteurisation strategy" is pulled directly from the DHW storage settings in the heat pump task, and so can be adjust there. This also applies to the proposed flow temperature, with it being pulled from the flow temp slider in the same task.
Rather than using SCOPs as per the previous MCS performance calculation, the new version uses SPF (seasonal performance factor) which is pulled from Table 2: Heat emitter guide of MCS 031 depending on the property specific heat loss (W/m2) and the flow temperature.
This SPF will then be used give an estimate of electricity consumption for space heating. A set performance factor of 1.7 is used for water heating, and the method for system pasteurisation is detailed in MCS 031. The combined estimate of electricity consumption is then converted into a high and low estimate of +/- 10%.
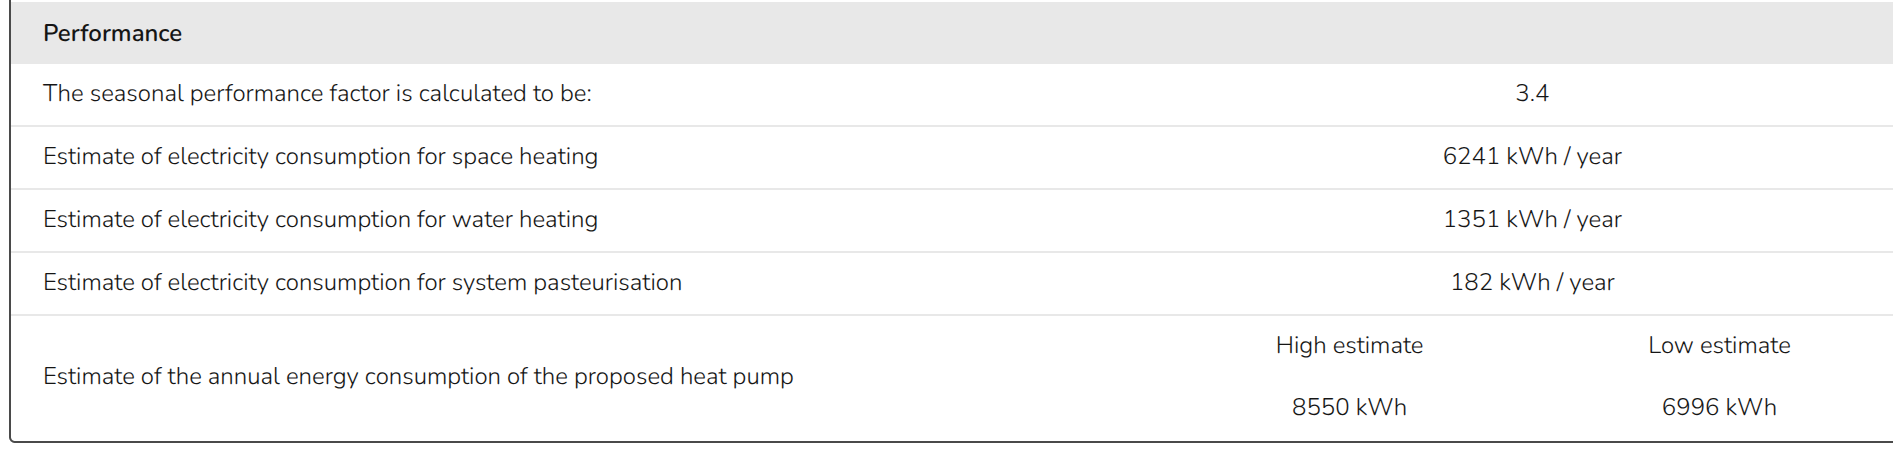
The results of this calculation will be given in the "MCS 031 Performance Calculation" report when using EPC data, as well as the technical report and customer proposal. If the task has been completed using project data, it will not generate the separate MCS 031 report but it will give a performance estimate in the technical report and customer proposal.
Notes
The full table (Table 2: heat emitter guide) is given on page 16 of MCS 031 standard (https://mcscertified.com/wp-content/uploads/2025/01/MCS-031-Heat-Pump-Pre-Sale-Information-and-Calculations-Issue-4.0.pdf).
On the right hand side of the performance task we will display any relevant notes about the system:
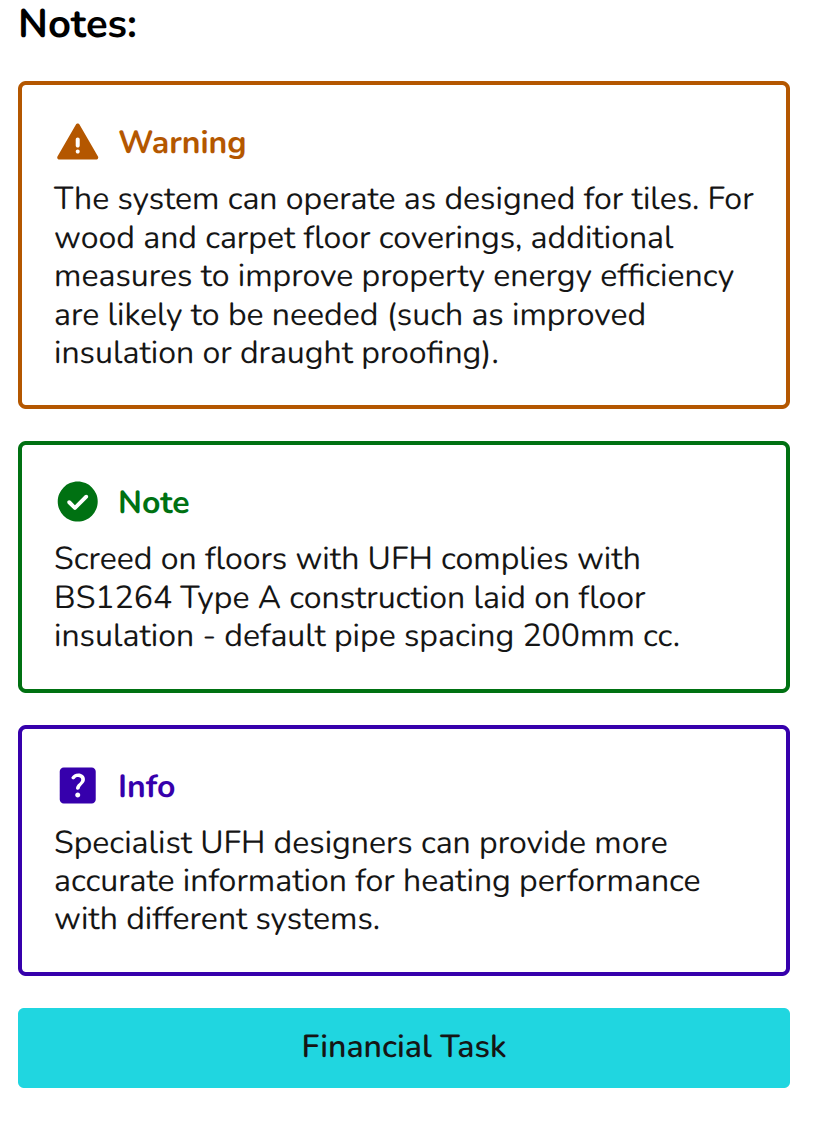
You may need to adjust the proposed flow temp, heat emitters used, or the lower the watts per square metre heat loss (improve building fabric) in order to generate a viable proposal.