FAQs
This page brings together answers to the questions we’re asked most often – from getting started to handling more advanced workflows. If you’re looking for quick guidance, troubleshooting tips, or a refresher on how something works, you’re in the right place.
- General
- Is there training available?
- Can I pay Heatpunk to design a project for me?
- Are Midsummer trade discounts reflected within Heatpunk?
- How can I share projects with others?
- I have an idea for a future update
- How do I do a hard refresh of my browser?
- How do I change my email address?
- Pro and Enterprise
- Can I upgrade to Pro? How much is the upgraded version?
- Are there different versions of Heatpunk?
- I need specific features tailored to the needs of my business
- What are some example Enterprise features?
- How much is an Enterprise license?
- What happens to all my cloud stored documents if I cancel my Pro Subscription?
- Is there an app for the surveys task?
- My bank is not showing up when trying to upgrade to Pro, what should I do?
- Can I get a free trial of Pro?
- How do I cancel my Pro subscription?
- My material library
- I can't find the material I need, what can I do?
- The project has no roof glazing but I can't skip that material selection
- Plan task: creating a surveyed floor plan
- How can I create L-shaped rooms easily?
- How do I change the ceiling height of a room?
- Can I change ventilation rates for rooms?
- Can I model vaulted ceilings?
- How do I add dormers?
- How do I specify a party wall?
- What do I do if only a section of the wall is a party wall?
- Do I need to model unheated spaces?
- How do I model a space that goes from the ground floor to the ceiling of the next level?
- How do I model rooms with open doorways?
- Do I need to add stairs?
- How do I model void space above a room-in-roof/ loft?
- Plan task: system designs
- Why does my total heat loss not equal the sum total of the room heat loss?
- How are radiator outputs calculated?
- How do you select underfloor heating?
- Can I add in different brands of heat pump?
- How is the Outdoor Design Temperature (ODT) set?
- How do I change the Outdoor Design Temperature (ODT) for my project?
- Why is the Outdoor Low Temperature (ODL) not changing after I've amended it?
- How do I factor in intermittent heating?
- Performance and Consumption Task
General
A quick-access hub for common questions covering the basics of using Heatpunk.
Is there training available?
Absolutely! We run free, online training sessions weekly, covering Heatpunk, Heatpunk Pro, Shrunk Punk and Lead Generation. You can book onto our training sessions here.
If you have any questions, you can also contact us at help@heatpunk.co.uk.
Can I pay Heatpunk to design a project for me?
No, this is not a service we offer at Heatpunk, but if you’re struggling to use the software, you can always come to one or more of our free training sessions or email us at help@heatpunk.co.uk!
Are Midsummer trade discounts reflected within Heatpunk?
Heatpunk and Midsummer accounts can be linked for accurate pricing.
Unless a trade link is established, Heatpunk displays retail pricing as standard. See our guide on Connecting to Midsummer to link your two accounts.
How can I share projects with others?
Sharing projects is available with a Heatpunk Pro license. To share a project, go to the project and select the share icon.

See this guide for detailed instructions: Share projects and components
I have an idea for a future update
Great! We're always keen to hear from our users. Heatpunk has been developed by heat experts for heat pump installers. Updates go live on a regular basis, so get in touch via help@heatpunk.co.uk and share your feature requests.
How do I do a hard refresh of my browser?
Sometimes your browser may store old versions of the Heatpunk code and this can cause issues. A hard refresh clears your browser cache for a specific page, which forces it to load the most recent version of that page. This could include new scripts, styles or features. Here's how you can clear your cache through a hard refresh on any browser:
Google Chrome
- Load any page on the Heatpunk site and make sure you are logged in
- Windows users: hold down Ctrl and then press F5 on your keyboard (alternatively hold down Ctrl + Shift and press R on your keyboard)
- Mac users: hold down Cmd and Shift and then press R on your keyboard
Firefox
- Load any page on the Heatpunk site and make sure you are logged in
- For Windows users: hold down Ctrl and then press F5 on your keyboard
- Mac users: hold down ? Cmd and ? Shift and then press R on your keyboard
Safari (Mac)
- Load any page on the Heatpunk site and make sure you are logged in
- Go to Safari > Empty Cache, or hit Opt + Cmd + E
- To refresh, click the refresh button on the address bar or press Cmd + R
Microsoft Edge/Internet Explorer (Windows)
- Load any page on the Heatpunk site and make sure you are logged in
- Hold down Ctrl and then press F5 on your keyboard (alternatively hold down Ctrl + Shift and press R on your keyboard)
Important: Clicking the "Refresh" icon on your browser address bar is not a hard refresh.
How do I change my email address?
Note: the link will expire after 15 minutes. If you do not click in within that time you will need to generate another verification link.
Pro and Enterprise
Key information about Heatpunk’s Pro and Enterprise subscription options.
Can I upgrade to Pro? How much is the upgraded version?
Heatpunk Pro is available at £35/month/user and you can upgrade or cancel at any time. For more information on the features of Pro see Are there different versions of Heatpunk?.
An enterprise license is available, as a bespoke purpose built software solution, pricing differs depending on the complexity of the development work required. Following a one-to-one consultation, the team will supply a detailed quotation outlining project scope, development cost, license fee and completion time frame. For more information on Enterprise see What are some example Enterprise features?.
We always aim to be as transparent and fair with our pricing structure. The development cost will be agreed upon before work commences and can be paid upfront or with regular instalments. The ongoing license fee covers corporate multi-user access with company wide training and support. Plus ongoing maintenance to ensure an up to date, safe and secure user experience.
Are there different versions of Heatpunk?
Yes there are a few options with Heatpunk. These are Standard, Pro and Enterprise.
Standard - Free to use
- Generates heat load calculations, compliant with MCS heat pump design standards (MIS 3005-D)
- Room by room heat loss
- Sizing of heat pump and DHW storage (cylinder)
- Sizing of radiators at different flow temps
- MCS sound & performance assessments built in
- Generate quotes and reports
- Only has Midsummer products (heat pumps and DHW storage)
Heatpunk Pro - £35/month/user
- Pre-install Survey (can upload site photos)
- Can add in components (only Pro users can add in non-Midsummer heat pumps and hot water storage)
- Customisation and branding project reports
- Automated DNO applications
- Access to Shrunk Punk
- Team collaboration: sharing of projects, custom components and material sets
- Automatic pricing for financial task (save your pricing logic)
- E-signing
- Import floor plans
Enterprise
- Fully bespoke stand alone site
- Has it's own URL and your branding
- Control over users
- Populate your own documentation with the data produced
- Additional forms and projects sharing
- Control over components
- CRM and API integrations
I need specific features tailored to the needs of my business
Following a consultation process, our Enterprise solution allows custom versions of Heatpunk to be developed. Unique features, widgets and tweaks tailored to your exact requirements. Peace of mind guaranteed.
For more information on this topic, see What are some example Enterprise features? or get in touch (help@heatpunk.co.uk).
What are some example Enterprise features?
- White-labelled software with custom branding
- Bespoke handover reports
- Customer-focused design tool for your own website
- Streamlined customer-facing retail design mode
- CRM and QMS support
- Custom automated forms and PDFs
- Digital customer confirmation with e-signature support
- Unique features designed to your exact specification
- API integration with existing company systems
How much is an Enterprise license?
As a bespoke purpose-built software solution, pricing differs depending on the complexity of the development work required. Following a one-to-one consultation, the team will supply a detailed quotation outlining project scope, development cost, license fee and completion time frame.
We always aim to be transparent and fair with our pricing structure. The development cost will be agreed upon before work commences and can be paid upfront or with regular instalments. The ongoing license fee covers corporate multi-user access with company-wide training and support. Plus ongoing maintenance to ensure an up-to-date, safe and secure user experience.
What happens to all my cloud stored documents if I cancel my Pro Subscription?
As per data retention regulations, we will hold your documents according to our data retention policy but they will become unavailable to you. If you wish to keep a record of any documents please do download them and store them as they are generated.
Is there an app for the surveys task?
The survey task can be completed from any device with a mobile connection, including mobile phones and tablets. Unfortunately, there is no app available for this at the moment.
My bank is not showing up when trying to upgrade to Pro, what should I do?
If you can't find your bank when you enter it's name, try just typing a few letters of the bank name and wait a moment to see what results come up. Sometimes the name of the bank will be slightly different to what you expect it to be. If you still can't find your bank please get into contact with us at help@heatpunk.co.uk and we’ll get this sorted for you.
To see a list of all the banks that GoCardless (our payment partner) supports click here.
Can I get a free trial of Pro?
If you are interested in a free trial please get in touch at help@heatpunk.co.uk. Please do also book one of our demo webinars to see what Pro can do for you!
How do I cancel my Pro subscription?
You can cancel your subscription at any point by logging into Heatpunk and navigating to Pro Account Settings > General then scrolling to the bottom of the page to view your subscription settings. Only owners and admins of the Pro team can manage the subscription.
If you cancel your subscription it will will remain active until the end of your current subscription period. Please note, we do not offer refunds on Pro subscriptions.
My material library
Quick answers to help you find, select, and manage the right materials for your Heatpunk projects
I can't find the material I need, what can I do?
There are two options here:
-
If you know the building fabric composition but not the U-value, you can click on the [+] Custom material button and select Build Layers. You can then add each layer of building material from the drop down menu and its associated thickness (mm). The software is then able to calculate the corresponding U-value of the building fabric.
- If you already know the thickness of the material and its associated U-value then you can input this directly by clicking on [+] Custom material in the material selection section and clicking Enter U Value. This will allow you to type in a custom name, U-value (W/m2) and thickness (mm) for the entire building fabric.
For more information on this topic, see our guide on Managing Your Material Library.
The project has no roof glazing but I can't skip that material selection
Heat Punk requires you to select a type of roof glazing (even if you do not require it in the design process). Only materials that you use in the design will be displayed in the design report so this won’t be displayed unless you use it.
Plan task: creating a surveyed floor plan
Read how to handle some of the common challenges users encounter when creating an as-surveyed floor plan.
How can I create L-shaped rooms easily?
Moving the blue dots located on each wall will create new vertices. By dragging one of the blue dots along the boundary you can effectively split that wall in two segments while keeping it straight.
Select the segment you need to extend outwards and click on the rectangular handle. A pop-up will appear allowing you to change to an oval-shaped handle. This enables you to pull out that portion of the wall to create an L-shaped room.
Below is a step by step guide of the above outlined steps:
- Drag over your room and size one side of the L
- Drag the nearest blue dot to the point you want the L to 'turn'
- Select the rectangle handle in the middle of that new section of wall and select the option that isn't currently selected - this option allows you to extend out just that section between the pink dots, rather than the whole wall
- Drag the pink handle to make your L!
For more help on this topic, see our guide on Creating Rooms.
How do I change the ceiling height of a room?
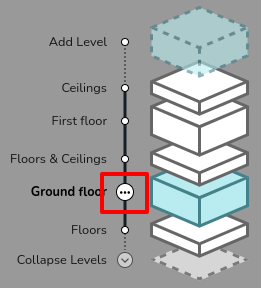
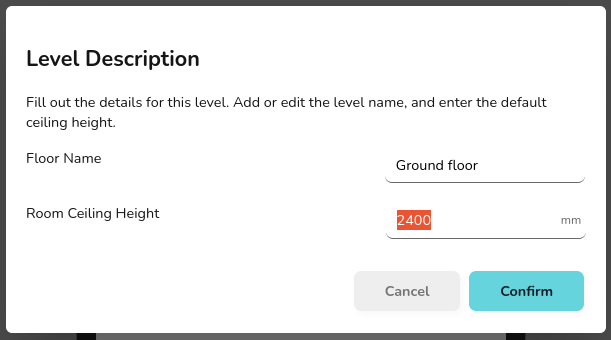
To change the ceiling height across the whole floor, click the three dots next to the relevant floor in the exploded view, bottom right. Select edit and change the value of the ceiling height as necessary.
To adjust the height of just one room, select the relevant room, and click the two sided arrow icon. Then enter the value needed for ceiling height. Ensure you click the tick after editting the value to save your changes.

For more help on this topic, see our guide on Floors and Ceilings.
Can I change ventilation rates for rooms?
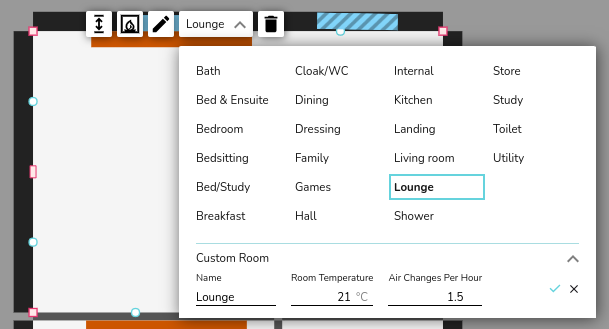
Yes, this is done by clicking on the room and changing the Room Type to a Custom Room. You can then edit the Air Changes Per Hour to suit your needs.
For more information on this topic see our guide on creating a floor plan.
Can I model vaulted ceilings?
Vaulted ceilings can be added by segmenting the roof into as many different slopes as are required.
This is done by dragging multiple ceiling regions onto the design and fitting them accordingly. You can then set the associated height at the corners of each segment by clicking on them, selecting the up/down arrow and inputting the appropriate values (you must click the tick beside the text box to confirm). An arrow should then be displayed, this indicates the downwards slope direction of the ceiling.
For more help on this topic watch the video below or read more in our guide on Vaulted Ceilings and Dormers.
How do I add dormers?
Dormers can be added to any vaulted ceilings. For more information on this topic, see our guide on Vaulted Ceilings and Dormers.
To add a dormer simply drag and drop the Gable Dormer or Shed Dormer function onto where it is required. The dormer will automatically orientate itself with the slope of the roof. The specific dimensions can then be set, as well as the roof, wall, and window materials.
How do I specify a party wall?
Click on the wall you want to specify and use the drop down menu to select whether the other side of this wall is a heated or unheated space. By default the drop down will be set to Outside.
For more information on this topic see our guide on creating floor plans.
What do I do if only a section of the wall is a party wall?
If only a section of the wall is a party wall, for instance, if there is a garage behind half the wall but not the other half, you can split the wall using the blue handles.
Simply drag and drop the blue handle to the point where the wall needs to be split.
You can then select whether the other side of this wall is a heated or unheated space. In the example, you would select one half of the wall as unheated space and the other as outside.
Do I need to model unheated spaces?
In general, you do not need to model unheated spaces. All rooms included will be added to the total heat loss calculation and therefore the heat pump will be sized against this. Therefore, including unheated spaces could lead to oversizing the heat pump.
It's therefore, better to exclude unheated spaces in most cases, for example garages and conservatories. Instead, you should specify the parting wall between the heated and unheated space.
However, some unheated spaces should be included for practicality, for example internal store rooms. Rather than leaving a gap in the floor plan, rooms like this should be included. In line with MCS, Heatpunk includes a room type for this scenario (Store).
How do I model a space that goes from the ground floor to the ceiling of the next level?
To model a tall room which goes from the floor on the ground level to the ceiling of the level above, you can simply model this as two rooms on top of each other.
Even if in reality there is no floor separating them, as long as both rooms are set to the same type, there will be no heat loss between them, so it will act as one room.
Heatpunk doesn't currently account for increased heat loss in rooms with high ceilings. Refer to CIBSE Domestic Heating Guide for information on what high ceiling factor to use.
How do I model rooms with open doorways?
For open plan spaces where rooms do not have doors separating them, you will need to model it all as one large room. Make sure that you set the room type to the one that has the highest air changes per hour (ACH).
If you need to use the wall between the rooms to place a radiator, then you can model these as separate rooms but make sure the room temperatures and the air changes are the same, again using the highest ACH. This will mean there will be no heat loss across that wall so the calculations are unaffected by modelling the wall.
Do I need to add stairs?
The nature of the calculations carried out by Heatpunk mean that you do not need to account for stairs. The landing and hallway can be considered separately and therefore should be added as separate rooms on separate floors. If the room temperatures are the same there will be no heat loss between them.
How do I model void space above a room-in-roof/ loft?
The U-value of the roof materials are usually calculated for the entire roof construction (outer waterproof surface, loft void, insulation, timber, internal ceilings, etc.)
You do not need to model the void space. Simply set the ceiling material to that of the roof and ensure that you've set 'Outside' for what's on the other side of this roof.
Plan task: system designs
Common questions about how to design a heat pump heating system.
Why does my total heat loss not equal the sum total of the room heat loss?
If you are using one of the BS EN 12831-1:2017 methods, the ventilation losses for a building are not a simple sum of the ventilation losses for each room. Instead ventilation losses are calculated both at a room level and then separately on a building (or zone) level.
On the building level, there's an additional factor (fi-z), typically assumed to be 0.5, which makes the building ventilation losses smaller. This is to account for the fact that rooms facing the wind may have cold outside air pushed into them, but then the warm air from those rooms will flow into other internal rooms. This ensures your radiators are large enough for worst-case conditions, while preventing your heat pump from being oversized, which would limit its efficiency.
Read more about this here.
How are radiator outputs calculated?
Heatpunk calculates actual radiator outputs with the below formula. This allows us to easily consider differences in flow, return and room temperatures.
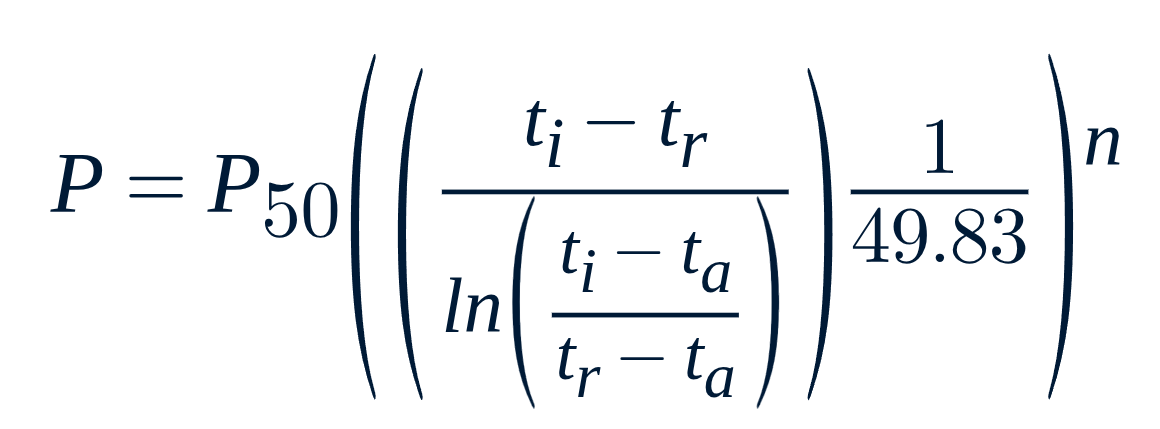
where
P = heat emission from radiator (W, J/s)
P50 = heat emission from radiator with temperature difference 50 oC between the radiator and room(W)
ti = water temperature inlet (oC)
tr = water temperature outlet (oC)
ta = surrounding air temperature (oC)
n = n coefficient
The other way you can calculate radiator outputs is by calculating the correction factor based on temperature differences and the specific radiator being used. This can then be multiplied by the power output given on the datasheet to give the radiator output. To calculate the correction factor you should use the below formula.

where
n = n-coefficient (from radiator datasheet)
trad = mean radiator temperature
troom = room temperature
dT = delta temperature used on the datasheet for the relevant radiator (this is usually 50oC)
In the room breakdown of Heatpunk it should give you the total heat loss of the room and then radiator outputs will be calculated based on the flow temp you have used.
The radiators built into Heatpunk are Stelrad Classic Compacts with Bottom Opposite End connection. If you are using radiators where the outputs differ significantly, you should add them in as a custom radiator. If you are using other varieties of connections for pipework, you must also account for this to ensure the outputs are calculated correctly.
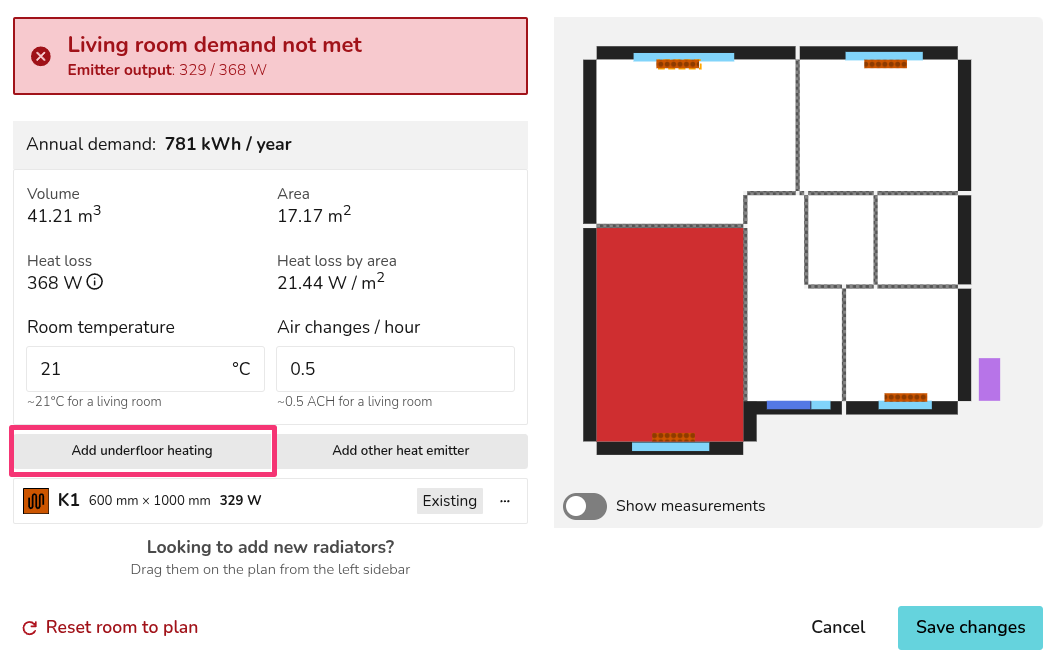
How do you select underfloor heating?
While on the plan task, from the Emitters sidebar, click the 🡥 icon and then select Add Underfloor Heating which will prompt you to input the floor area covered by the underfloor heating elements and their outputs in W/m2.
Can I add in different brands of heat pump?
You can add in different heat pumps if you have a Heatpunk Pro license. For information on how to do this, see our guide on how to Create and manage your own components.
How is the Outdoor Design Temperature (ODT) set?
The Outdoor Design Temperature (ODT) for your project will be automatically set using the 99th percentile temperature for the relevant project location from CIBSE guide A.
Using the 99th percentile temperature means the temperature will only fall below the ODT for 1% of the year. You may choose to use the 99.6th percentile in which case no additional uplift is needed for intermittent heating or exposed locations (see MIS 3005-d for details).
Using the project's location, Heatpunk will also automatically subtract 0.3°C from the ODT for every 50 m above sea level.
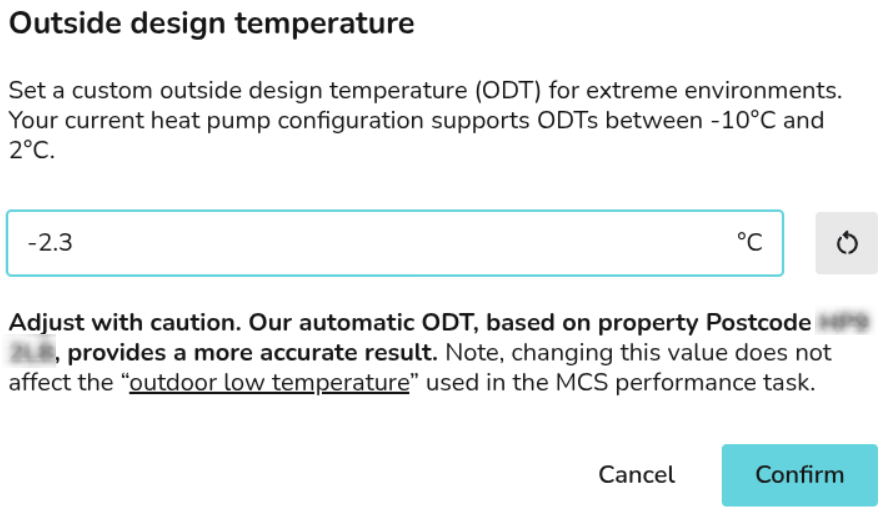
How do I change the Outdoor Design Temperature (ODT) for my project?
To change the ODT, follow these steps:
Note this will not affect the Outdoor Low Temperature (ODL) used in the performance task. Read here for more information.
- Navigate to the Plan task and the Sources tab
- Below the sound heat pump load and sound check, click Outside design temperature
- Set the temperature you want to use

An additional 0.3°C will need to be removed for every 50 m above sea level, with altitude given in the input section of the technical report & customer proposal.
Why is the Outdoor Low Temperature (ODL) not changing after I've amended it?
Changing the Outdoor Design Temperature (ODT) does not affect the Outdoor Low Temperature (ODL) used in the performance task. This task is based on MCS 031, which states the the ODL from Appendix A must be used. MCS 031 Appendix A is equivalent to the 99.6th percentile from MIS 3005 D.
The ODL is not the same as the ODT used for the design, which you may adjust within MCS rules stated in MIS 3005 D. Read here for info on how Heatpunk sets the ODT.
How do I factor in intermittent heating?
Heatpunk assumes continuous heating when determining the ODT and sizing the heat pump.
If the property will be heated intermittently, you can change the ODT (in line with MIS 3005-d) to the 99.6th percentile and no uplift factor will be required. Read here to see what the 99.6th percentile is for your area, note that you will also need to subtract 0.3 degrees for each 50m above sea level.
Performance and Consumption Task
Common questions about the Heatpunk performance and consumption tasks.
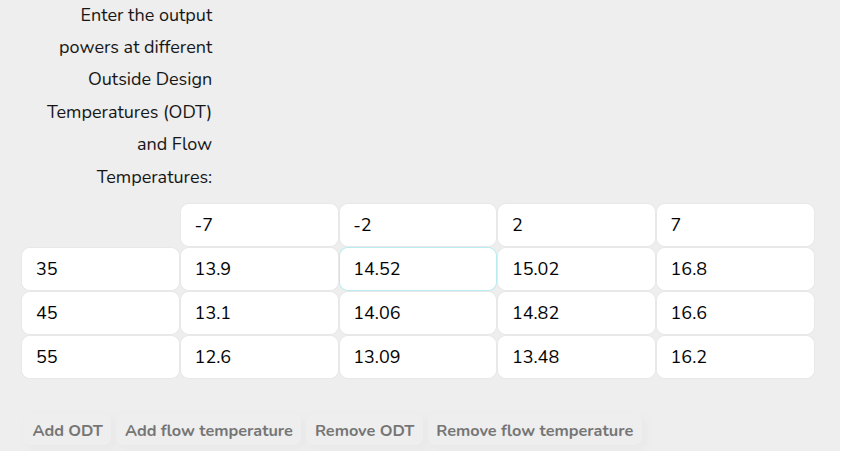
Error: Couldn't get heat pump capacity: ODT out of range
This error will usually occur when you have set up a custom heat pump with some missing values.
The performance task uses an ODL (outdoor low temp) which is lower than the standard project ODT in Heatpunk. This can mean it works fine in the previous task but then there is an issue in Performance.

To solve this, go to the heat pump in My Components. You will need to ensure that the table goes down to -7 degrees to make sure it works in every location. You should be able to find the values you need in the datasheet.
Where can I find the solar and battery details in Easy PV?
If you're modelling solar and batteries in the Consumption task and also modelling the project in Easy PV, you can find all the required information in your Easy PV project:
Solar
Navigate to the Performance task > Performance results:

Then for each roof or input:
- Pitch
- Orientation
- Array size
- Shading: subtract this value from 1 and multiply by 10, then select closest value

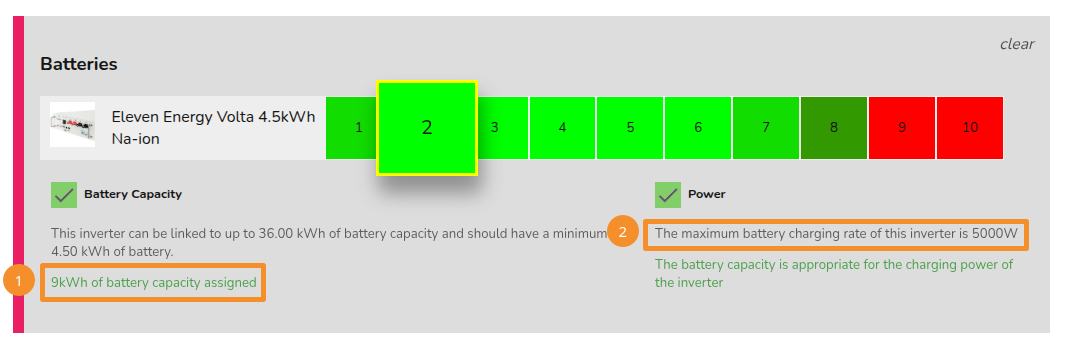
Battery
- Capacity
- Max charge rate