
2. Starting a new survey
Before scanning rooms, set up the property details, measurement method, and ventilation settings.
1. Create the survey
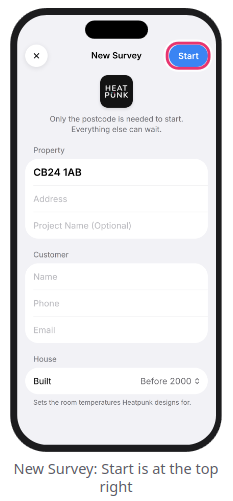
- From the Home screen, tap
+(or+ New Survey). - Enter the full UK postcode (e.g.,
CB24 1AB). This is the only mandatory field to begin. - Optionally enter the Address, Project Name (defaults to the postcode if left blank), Customer contact details, and the House Built era (
Before 2000,2000-2006, orAfter 2006). - Tap
Startat the top right.
2. Choose your measurement method
You choose one measurement method for the entire survey, then tap the blue arrow at the bottom right to continue.
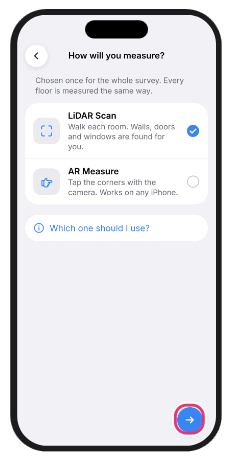
Expand the sections below for information on which measurement mode to choose
LiDAR Scan (iPhone Pro & iPad Pro)
- Compatible devices: iPhone 12 Pro or later Pro models, and iPad Pro
- How it works: Walk slowly around each room (~1 minute per room); walls, doors, windows, and a 3D model are detected automatically
- Best for: Most rooms that are quick, furnished, and have ordinary shapes
- Watch out for: Mirrors, large expanses of glass, and very dark rooms
AR Measure (Any compatible iPhone)
- Compatible devices: Any compatible iPhone
- How it works: Aim the screen ring at and tap each floor corner, ceiling height, door, window, and radiator (2–3 minutes per room)
- Best for: Lofts, awkward shapes, rooms a LiDAR scan gets wrong, and phones without LiDAR
- Watch out for: Plain shiny floors and dim lighting
3. Pick your starting floor
- Select the floor you want to survey first (
Ground flooris selected by default, though you can scan floors in any order). - Skip
Atticunless it is a converted habitable space, and only selectBasementif it is heated. - Once the green Sensor ready (or Camera ready) indicator appears, tap
Start.
4. Complete Before You Start
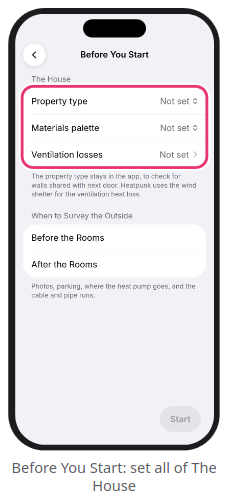
Configure these four settings before the camera opens:
- Property type: Tap
Property typeand pickDetached,Semi-detached,End of terrace,Mid-terrace, orFlat(used locally to prompt you for shared party walls). - Materials palette: Tap
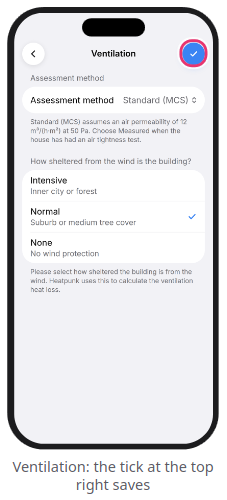
Materials paletteand select one of your Heatpunk account palettes orBlank palette (standard materials). - Ventilation losses: Tap
Ventilation losses, chooseStandard (MCS)(12 m³/(h·m²) at 50 Pa) orMeasured Air Permeability(if an air tightness test was performed), select the wind shelter (Intensive,Normal, orNone), and tap theblue tick. - When to Survey the Outside: Choose
Before the Roomsto answer external survey questions first (Property Details, Access, Heat Pump Location, Wiring, and Pipe runs), orAfter the Roomsto jump straight into scanning. - Tap
Start(orStart Scanningif you completed outside questions first) to begin.
Warning: If the app warns that your phone has less than 1 GB of free space, clear some storage before scanning or you risk losing what you record.
Still Need Help?
Contact Support: If you've got further questions, get in touch with our support team at help@heatpunk.co.uk (UK) or help@heatpunk.ie (IE). If you are experiencing a bug, to help us look into your issue faster, please include the email address of your account, the name of the project and screenshots of any unexpected behaviour.