
Plan Task Overview
Overview
[video/gif like 3D overview video and design modes video. Overview of sections (side bars, design area), sped up design. Wait til it's on staging. Purpose of this video is to show the flow of the task]
In the plan task, you model your surveyed plan and create design options based on the surveyed plan. In the design options you can then:
- Complete sound assessment (UK only)
- Complete ventilation calculations
- Place where new radiators, the heat pump and cylinder will go on the plan and specify any relevant accessories
- Specify emitters, view room details and input any heat loss overrides.
Changes made to the room temperature, ACH and emitters are specific to each design option. Changes will not apply across plans. Adjust the Plan if you would like changes to apply to each option. Read more about how design options work.
Creating your surveyed plan
PRO: Speed up creating your floor plan by uploading architectural plans to design atop of and take measurements from.
When creating a floor plan, the first step is to select or create your material palette. You will then be prompted to input the default ceiling height and can then complete the surveyed plan.
When completing the plan, elements can be dragged and dropped from the left-hand sidebar. On the Emitters tab, you can also access key details about the plan:
- Click ⋯ three dots > 🡥 See room details to:
- View the annual demand, volume, area and heat loss for that room
- View the measurements for that floor
- Edit room temperature and ACH
- Add underfloor heating or other heat emitters
- Reset the room to the surveyed plan
- Hover over the 🛈 info icon next to emitters to view:
- Total expected heat loss
- Total building floor area
- Total heat loss per floor area
- Total emitter output
- Total annual demand
All emitters added to this the Plan will be listed as Existing in the Emitters tab. To specify new emitter, add these to a design option.
Read more about creating a floor plan and using design options.
Once you have completed your initial plan, click Finish Plan at the top. This will then take you to a plan called Option 1 where you can complete necessary calculations, model emitter changes, heat pump and hot water placement and any accessories.
Sound check and ventilation calculations
When you finish your plan, you will be prompted to complete the ventilation calculation and then, for UK users, the sound check.
Ventilation calculations
For Heatpunk UK/IE, choose from:
- Legacy MCS method / S.R.50-2021
- Standard method / BS EN 12831-1:2017 using assumed air permeability
- BS EN 12831-1:2017 using measured air permeability
Once completed, to edit ventilation calculations, in the top right corner click ⋯ three dots > Ventilation details.
Ventilation settings are consistent across plans, but the calculation is done per plan or option based on ACH and room temperature. To create an option with proposed MVHR, duplicate the project and input the air permeability.
Sound check (UK)
[this cannot be written yet because it's not been moved]
Sound check calculation details need to be specific to the plan because there may be different numbers of heat pumps on the plans
Completing design options
Once the sound check and ventilation calculations are completed, you can start speccing the heat pump, cylinders and any emitter upgrades. You can also specify the location of the new emitters, the heat pump, and the cylinder on the plan.
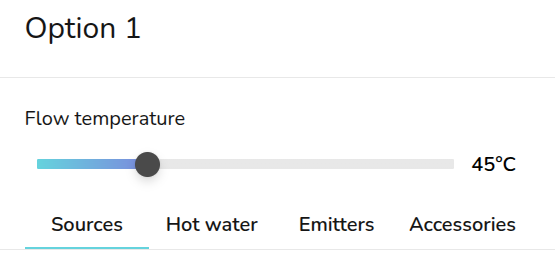
On the right hand sidebar, you can adjust the flow temperature using the slider. From the Sources and Emitters tab, you can view how this affects the heat pump and emitter outputs.
Heat sources
[gif showing dragging and selecting heat pump - only when on staging because dev site has no component images]
To add a heat pump, drag and drop a Pump from the left-hand sidebar. Once you have placed these on the floor plan, a menu will pop up to specify the model.
On the right-hand sidebar, from the Sources tab you can:
 |
Edit outside design temperature Set a custom outside design temperature (ODT). Note, changing this value does not affect the “outdoor low temperature” used in the MCS performance task. |
 |
Edit heat pump Re-open the heat pump selector menu to change the heat pump. |
 |
More options Click See more details to display the nominal capacity and ENA registration number. Click the bin icon to remove the heat pump from the design option. |
Read more about selecting a heat pump.
Hot water
[gif showing dragging and selecting hot water - only when on staging because dev site has no component images]
Similarly, to add a hot water storage, drag and drop from Hot water on the left-hand sidebar. A menu will then appear to specify the model. On the right-hand sidebar you can do the following:
|
Edit hot water preferences |
|
Edit hot water Re-open the hot water storage selector menu to change the cylinder. |
|
More options Click See more details to display the DHW energy demand, legionella purge demand, weight, standing heat loss, coil size, immersion heater size. Click the bin icon to remove the hot water storage from the design option. |
Read more about specifying hot water storage, including information on domestic hot water calculations.
Emitters
[gif showing removing existing, adding new and emitters tab]
Plan guide focus is on adding initial emitters - focus here is on summarising new/existing emitters functionality
Accessories
Once you have added a heat pump and hot water storage, you can add accessories to the project. When you click + Add Accessories from the accessories tab, compatible components will automatically be selected.