Creating a Floor Plan
This section covers the tools needed to create a floor plan - focusing on the surveyed plan.
Go back to material library and palettes or to the rest of the plans task guides.
Creating a Floor Plan
This guide covers an update coming to Heatpunk UK April 27th 2026. Read more about it here. View the old guide here.
The first step in a project is to create a floor plan. The floor plan you build in Heatpunk is used to model the existing state of the property for heat loss calculations, model any emitter upgrades, and specify the location of the heat pump and hot water storage on the plan.
This guide focuses on creating the initial plan, called the surveyed plan. Emitter upgrades, heat pumps and hot water storage also use the floor plan but are modelled in design options, rather than the surveyed plan.
Starting a floor plan
When you create a project, you will be prompted to select a material palette. This determines the materials you can choose from when modelling the property but can be amended at any stage.
You are then prompted to enter the default height for the rooms in the property.
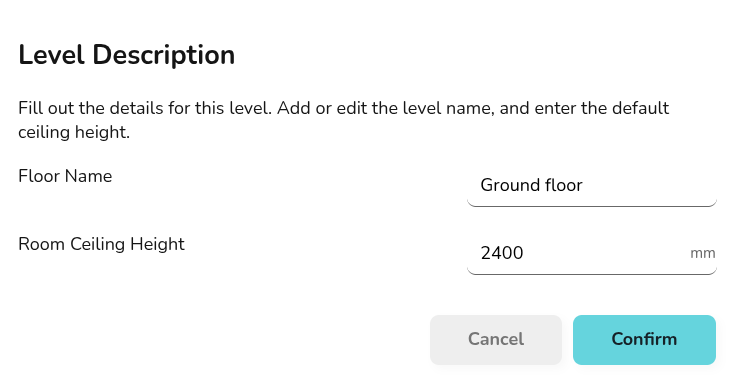
All of these details can be adjusted as you construct your floor plan.
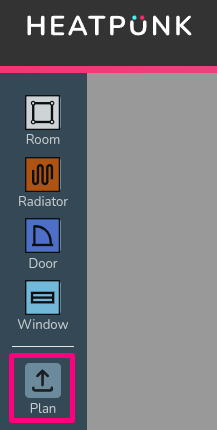
Heatpunk Pro: Speed up creating your floor plan by uploading architectural plans to take measurements from.
Examples
Join our weekly training session for a live example.
Creating rooms
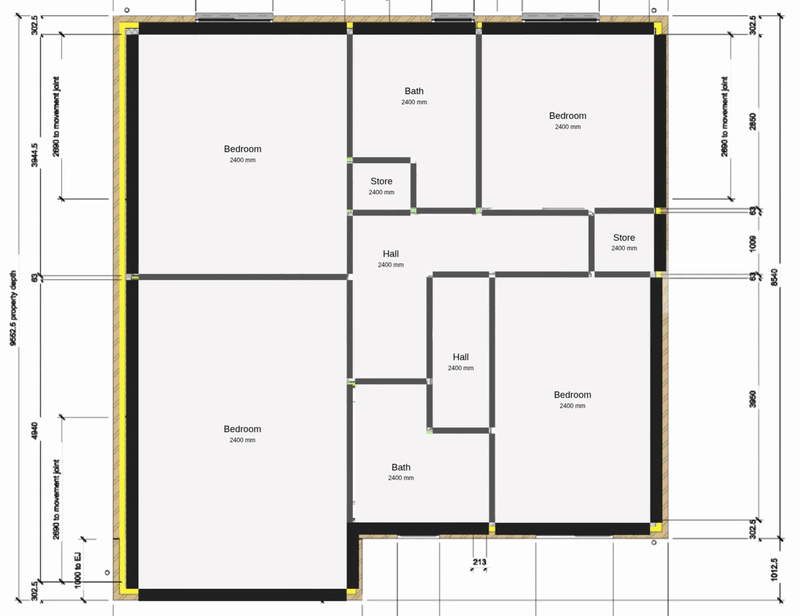
Drag and drop a room from the left-hand menu into position and size to the correct shape. If not using an uploaded floor plan, click the corners of the room to view the dimensions. If using an uploaded floor plan, you can rely on aligning the rooms with the plan below.
Editing room details
Click each room to view the following options:
 |
Change height Adjust the height of the room. Input the height and click the tick to save or the cross to cancel. |
 |
Flue Select whether there is a flue. Choose from: no flue, throat restrictor fitted to flue, no throat restrictor fitted to flue. |
 |
Edit name Change the name of the room. |
 |
Room notes Enter any additional notes about this room, such as customer preferences, pipe routes, etc. These notes will be displayed in the technical report.
|
 |
Select room type Each room needs a type as this determines the ACH, temperature and default name for the room. Select from pre-set options or create a custom room. |
 |
Delete Remove the room from the floor plan |
Note if ceiling regions are added later, they will override height for the room.
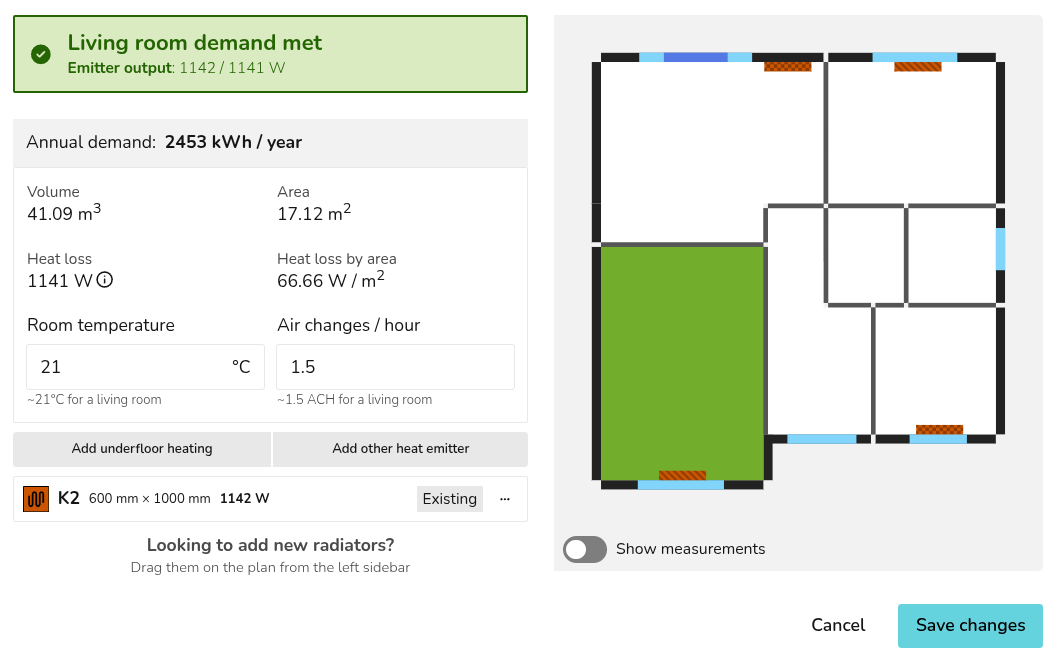
On the right-hand side bar, under emitters you can also see each room listed. Click 🡥 See room details. Here you can view the emitter, annual demand, volume, area, heat loss and element heat loss for the room. You can also adjust the room temperature and ACH, as well as add underfloor heating or other emitters.
Adjusting wall properties
Click the walls to view the following options:
 |
Change material Click to view and select from the material options for this palette. Click Add Materials to adjust the palette. |
 |
External temperature Set the temperature of the region on the other side of this wall. This will default to the ODT and can be adjusted for walls adjoining unheated spaces or neighbouring properties. |
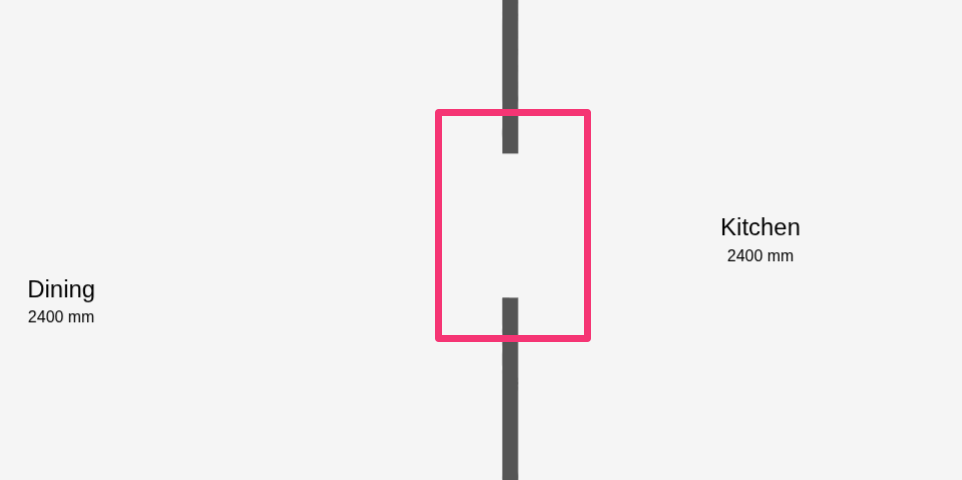
External and internal walls
Each wall is either an external or internal wall. This is detected automatically based on whether there is an adjoining room.
As you drag rooms into your plan, it's important that they lock together with existing walls correctly so external/internal walls are correctly identified. Only external walls will have the external temperature setting, external walls are also a darker grey colour.
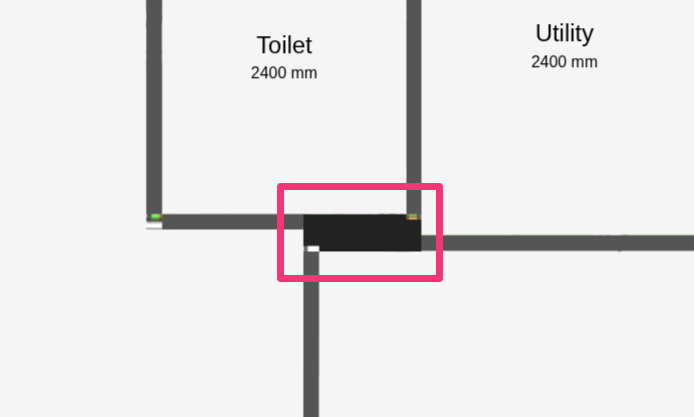
Walls should not overlap and there typically should not be external walls within the interior of a property. Below are some common errors that will lead to errors in the heat loss calculation.
|
Don't overlap walls |
 |
|
Don't leave large gaps between internal walls |
 |
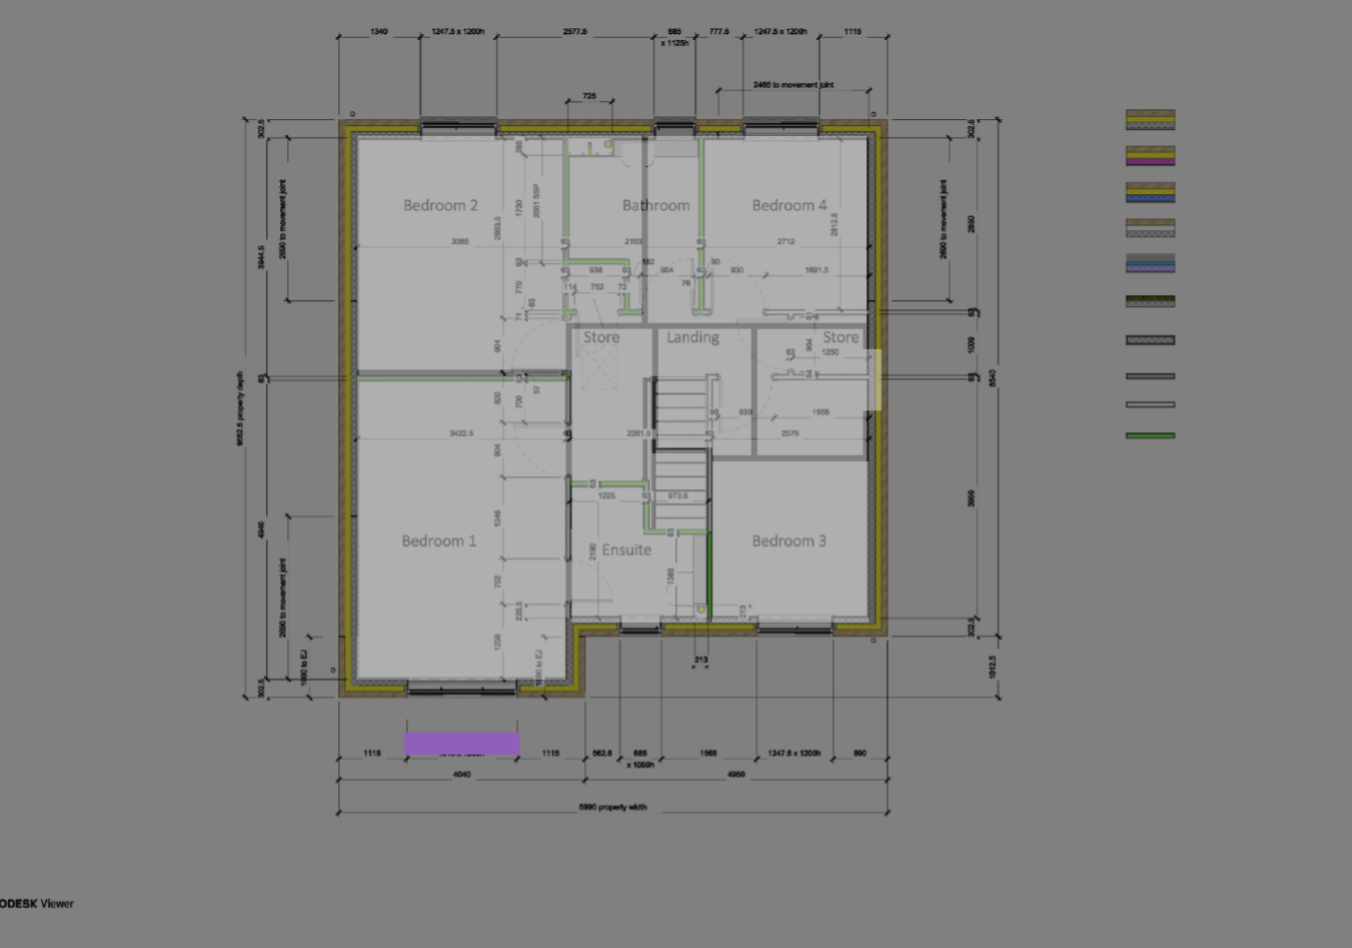
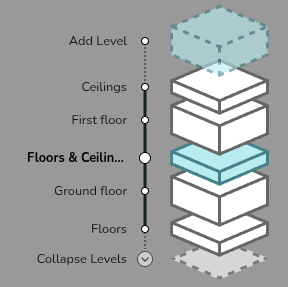
Adding floors
You can add different floors by clicking the transparent box next to Add Level. Move between floors using the expanded view in the bottom-right.
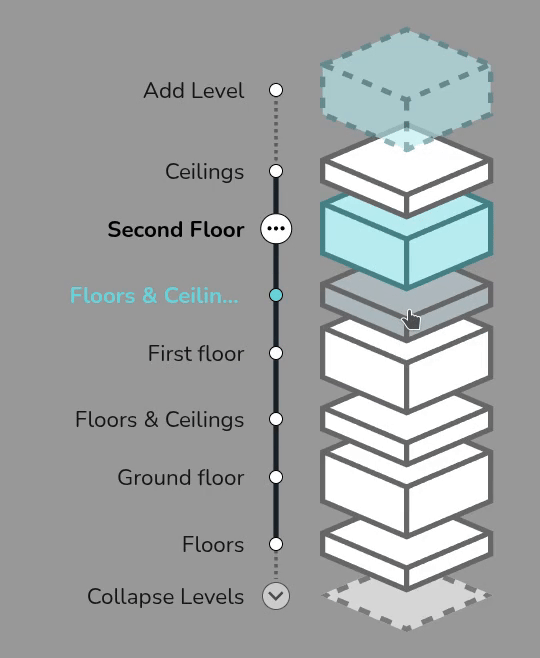
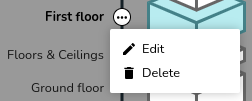
You can change the ceiling height on the whole floor by clicking on the three dots to the right of the relevant floor and selecting Edit. You can also change the name of the floor here. To delete an entire floor, select Delete.
Where the floor and ceiling materials are the default on the selected palette, there is no need to add a region. If the floor and ceiling region has a different material or height to the rest of the space, you can use regions to model this.

Read more on configuring floor and ceiling regions, including adding vaulted ceilings and dormers.
A light grey footprint of the floor below will be displayed, ensure the above rooms are correctly aligned with the floor below. Misalignment will lead to errors in the heat loss.
Adding room components

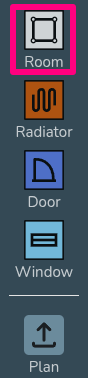
On the left-hand sidebar you will have the above options. Drag and drop an icon to place the component on your floor plan.
Adding emitters, doors and windows
Drag and drop a radiator, door or window from the left-hand menu into the room and snap it into position on a wall. Click the component to view and adjust the following options:
|
Change material or type Click to view and select from the material options for the selected palette. Click Add Materials to edit the palette. |
|
 |
Adjust dimensions Input the width and height, then tick to save or cross to cancel. This option will not be available for custom radiators which require a different P50 for each radiator size. |
|
Delete Remove the component from the floor plan |
Internal doors do not need to be included in the floor plan. Rooms with open doorways should typically be modelled as one room.
To add other emitters or underfloor heating, on the room where you want underfloor heating click 🡥 See room details. Then click Add underfloor heating and specify the output per m². You can also see further details on the heat loss calculations in that menu.
For information on emitter upgrades, see Emitters.
Adding heat pump and hot water
Heat pumps and hot water storage cannot be added to the surveyed plan. Create a design option to add these to the plan.
Drag and drop a heat pump or hot water storage option onto the plan. Once you place the heat pump or hot water storage, a menu will appear to select a specific model.
Read more about this in Heat Sources and Hot Water Storage.
If you have further questions, please get in touch at help@heatpunk.co.uk or help@heatpunk.ie.
Pro: Importing Floor Plans
This feature is only available to users with a Heatpunk Pro subscription.

Importing floor plan PDF
Open an existing project or create a new project and navigate to the floor level you want to upload the plan to. Click on the plan button on the left hand side of the page to upload a plan.
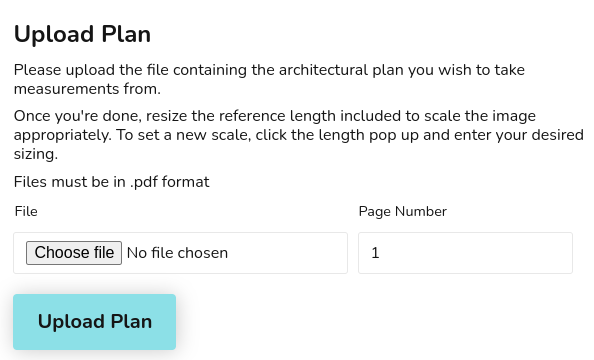
Step 1: Upload the floor plan PDF
Click Choose file to browse the files on your computer. If your file has multiple pages, set the specific page that contains the floor plan you want to use. Click Upload Plan to continue.
For additional levels it's important to align the floor plan with the floor below so heat loss between levels is calculated correctly. See Step 4 for how to do this.
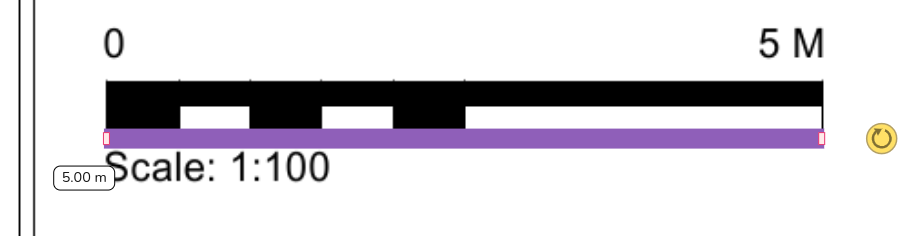
Step 2: Set the scale
Use the purple reference length bar to set the scale.
- Drag the reference length bar over to the plans scale or an object of known length.
- Set the size to match and then click on the dimension to enter the relevant value.

Step 3: Add rooms to floor plan
Drag and drop rooms to build up the floor plan as normal, using the PDF plan as a guide. Read more about creating rooms and floor plans to help with this step.
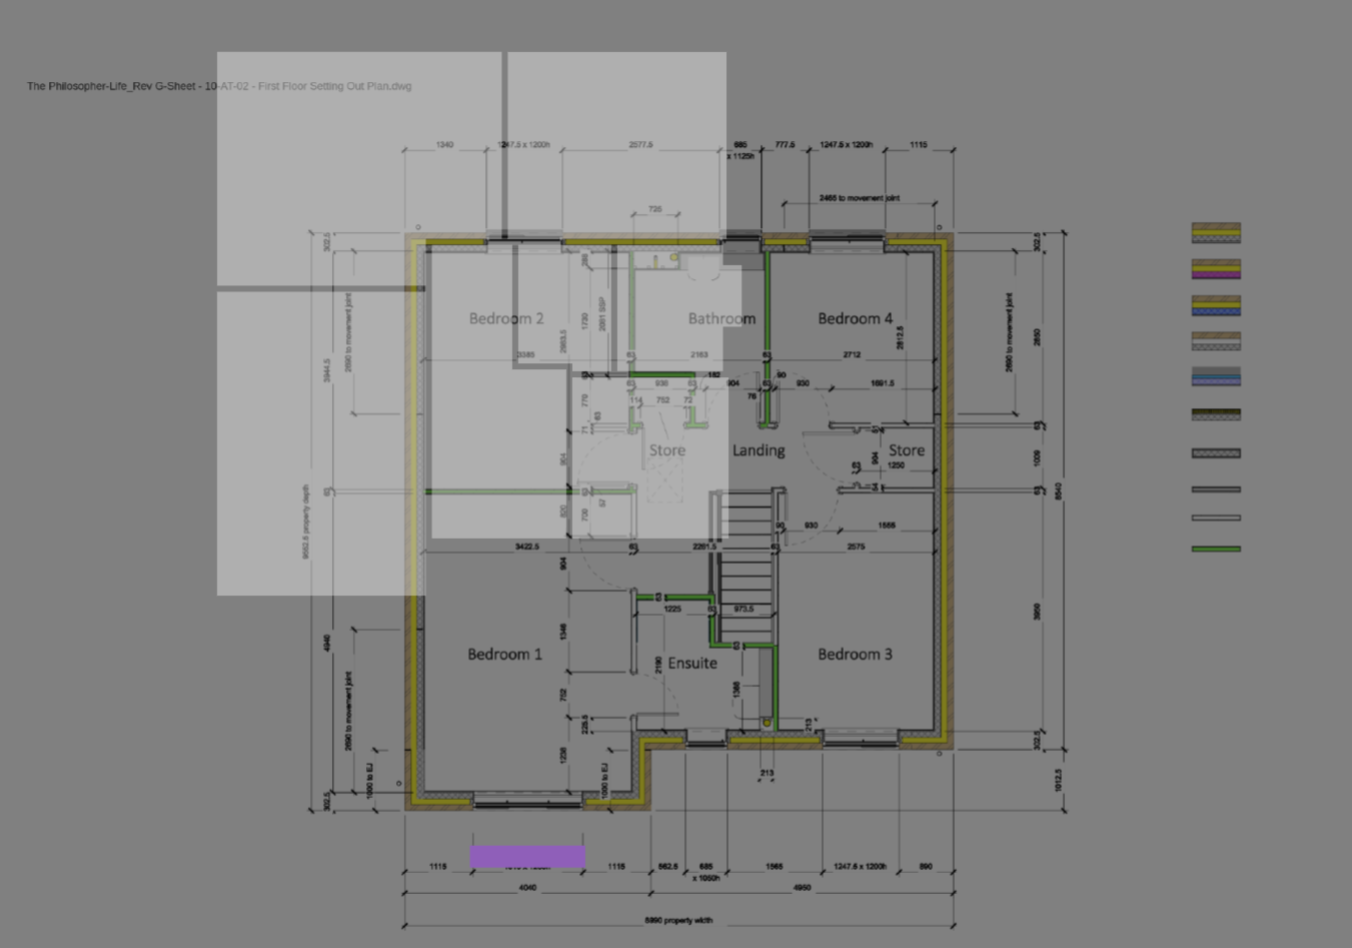
- Click and hold the middle of a room to make the rooms transparent and show the floor plan upload below.
- Click on the walls of a room to turn the transparency off and view the wall and room properties.
Step 4: Repeat for additional levels and align plans
Add level and repeat step 1-3.
After uploading plans for additional floors, ensure the floor plan is correctly aligned with the floor below. Double click and drag to make the plan transparent and display the floor below. You can then align the floors correctly.
|
|
 |
Watch the feature in action
Importing floor plans can massively speed up design time. Watch Angus from our software team use the import feature to create a room-by-room heat loss calculation in under 10 minutes.
If you have further questions, please get in touch at help@heatpunk.co.uk or help@heatpunk.ie.
Creating Rooms
This guide covers how to size a room to the correct shape. For information on adjusting the properties of a room, see Creating a Floor Plan.
Rooms can be dragged and dropped onto your floor plan from the left-hand sidebar
Adjusting shape of room
When creating a room in the plans task, there are a variety of different handles you can use to accurately adjust the shape of a room:
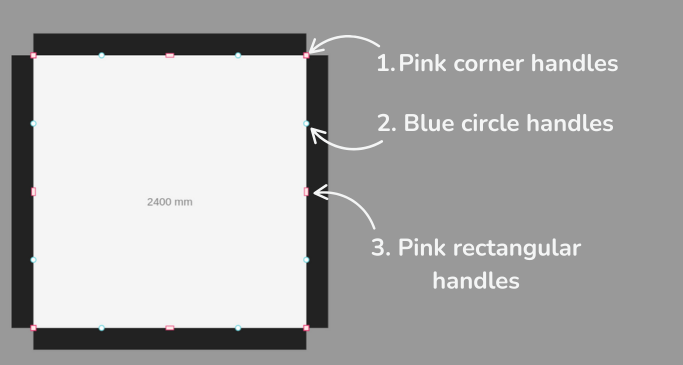
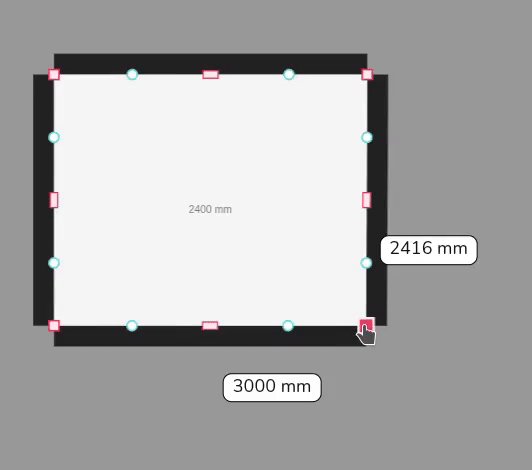
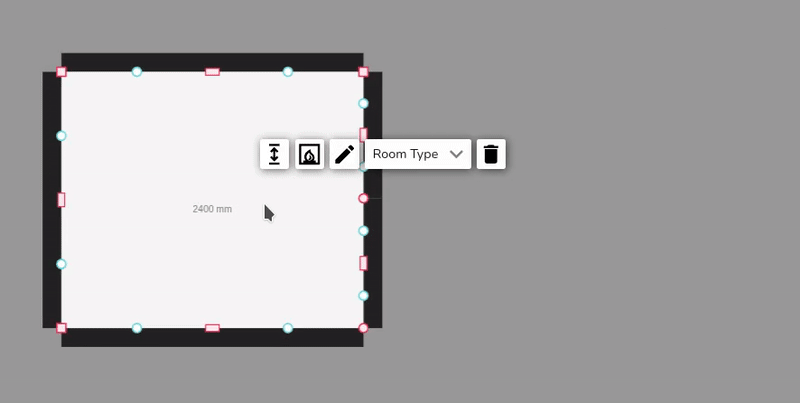
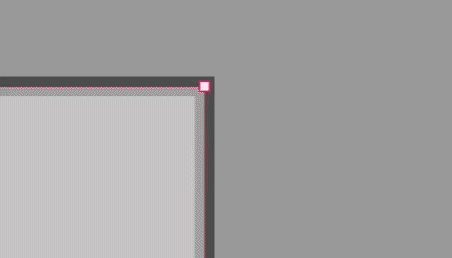
1. Pink corner handles
Click the pink corner handles to show dimensions of the associated walls. You can then click on the values to manually change these.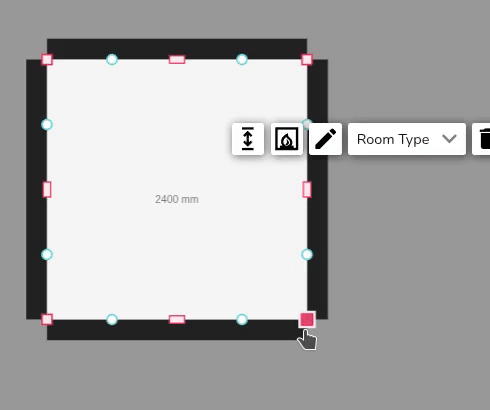
Click on the pink corner handles to switch between a square and circle handle:
- Use the square corner handles to resize the room whilst keeping the adjacent walls at the same angle.
- Use the circle corner handles to move that point independently of the other points to create angled walls.
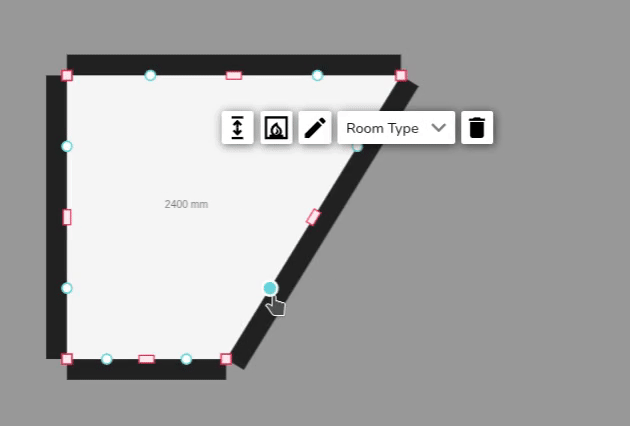
2. Blue circle handles
Click and drag the blue circle handles to allow you to split a wall and create irregular shapes. These will then convert to pink handles which you can delete if needed.
3. Pink rectangular handles
Use the rectangular handle to resize the room. Click on the pink rectangular handles to toggle between a square and curved cornered handles:
- Use the square cornered handle to extend a wall out.
- Use the curved cornered handle to extend the adjoining wall independently of the others.
Video demonstration
These tools are demonstrated in the video below.
If you have further questions, please get in touch at help@heatpunk.co.uk or help@heatpunk.ie.
Floor and Ceiling Regions
Heatpunk automatically uses the default material of floors and ceilings defined in your material palette.
Regions are used if the height of a room or material of a ceiling or floor is different from the default. If the height and material are the same across the floor and match the default selected in the palette, you do not need to create a region.
For more information on how this fits into the rest of your floor plan, see Creating a Floor Plan.
Adding a region to change default material
When adding regions, make sure you only have one region covering any given area on your floor plan or this will lead to errors in your heat loss calculations.
Step 1: Navigate to the relevant floor
Step 2: Add the region
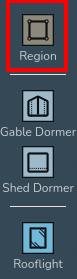
Drag and drop a region in from the left-hand menu. The shape of regions can be edited using the same handles as for rooms (see Creating Rooms).
Create as many regions as are necessary to correctly define each area of the floor/ceiling, as long as they do not overlap regions can be set to cover the entirety of the floor/ceiling or only certain areas. For areas where a region isn't defined, the default material and room height will be used.
Step 3: Set the material of the region
Once you have added a region, click anywhere on it and use the drop down menu to change the material as required.
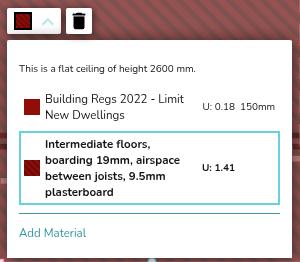
Step 4: Set the external temperature
For the ground floor or top floor ceiling, you should also set the temperature by defining what is on the other side (heated, unheated, ground) of the floor/ceiling. For intermediate floors, Heatpunk will do this for you.
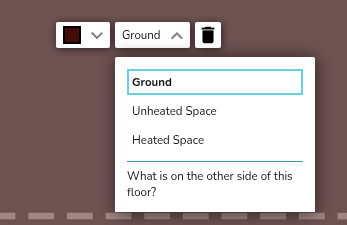
Unheated and heated spaces are taken to be 10°C and 18°C respectively. The ground temperature is based on your postcode.
Adding a region to change default height – vaulted ceilings and dormers
Setting the corner heights of a region overrides the height of the room below. Use this to model a room-in-roof with vaulted ceilings or dormers.
See the video below to learn how to add vaulted ceilings and dormers.
If you have further questions, please get in touch at help@heatpunk.co.uk or help@heatpunk.ie.